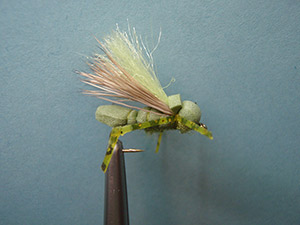
JR X HOPPER (OLIVE)

fotm-0ctober-2013

SCOTT SANCHEZ


Trout anglers love hopper season. The fishing can be really good, and seeing trout crush big surface patterns is a genuine thrill. Big hoppers, however, are not always the best option. In reality, not all natural grasshoppers are big, and circumstances often prohibit the bigger varieties from reaching maximum size. Further, pressured fish that see a lot of large hopper flies seem to respond better to the abbreviated patterns. Sizes range from minute quarter-inch specimens to enormous three-inchers, and their sizes are the result of multiple factors. Foremost their sizes depend on their species. The length of the growing season is the most important secondary influence. The longer they have to grow, the bigger they become. But adverse spring latitude can contribute to short growing seasons and a preponderance of diminutive hoppers. It pays to keep small hoppers in your fly box, especially in areas of short growing seasons. The JR X HOPPER’s material list is short and readily available, and the technique simple. The pattern floats well and is easy to track.


PATTERN
HOOK – Dai-Riki 320. Standard dry fly, sizes # 10 - # 16.
THREAD – Light olive, 8/0 (or 70 Denier).
UNDER BODY – Light olive antron dubbing.
BODY AND HEAD – Olive 2-millimeter foam.
WING- Dark elk hair.
OVER WING- Chartreuse polypropylene
LEGS – medium black- barred chartreuse rubber legs on sizes # 10 and #12, small on sizes # 14 and # 16. Glue a joint for the hind leg.


NOTE – This hopper can be tied in many colors. Tan, Cream, Brown, Chartreuse, and Rust are all good options as well as a black cricket. To further simplify leave out the rear leg joint.


HOW TO TIE

  1. Debarb hook – Mount the hook in the vise - start the thread a couple of eyelets from the eye. Then coat the hook with some ZAP-A-GAP or super glue and make a thread base all the way back to just before the bend of the hook. (This helps the foam from twisting). Make a dubbing loop with the thread, and secure it at the rear of the hook shank. Place the loop to the rear of the hook in a material clip and we will use this later on.
  2. Put some Antron Dubbing onto your thread then wrap forward and tie it  off where you started your thread , then spiral wrap your thread back to the rear of the hook shank.
  3. Round the back of a gap-wide strip of foam, and secure it to the hook shank just above the barb of the hook. The foam butt should extend past the bend of the hook just a little.   
  4. Put some more dubbing onto the thread then pull the foam back and dub in front of the foam strip up to two eyelets from the eye (don’t crowd the head). Pull the foam strip forward and secure it to the front quarter of the hook shank, this will be your thorax. Leave the front end of the foam for the head.                                                                                                                                      
  5. Use the dubbing loop from step 1 to rib over the foam body and dubbing underbody, but not too tight, just a little tension will do. This will take only two or three wraps on small flies. Secure the rib with the thread and clip the tag end off.
  6. Clean and stack a bundle of dark elk hair and tie it in on top of the foam to make the wing. The tips should extend about a hook gap length past the round foam end and not hang over the sides of the foam. Clip off butt ends.
  7. Tie in a bundle of polypropylene fibers over the elk, the tips should be even with the elk hair. Clip the tag ends off. If you need to you can fluff the poly fiber with your hair comb.
  8. Bring your thread forward to two eyelets from the eye then lightly dub over the butts of the wing with a slight taper toward the eye. Now with your thread at just in front of the tie in point of the wing, pull the foam back to make a bullet head and secure with just a couple wraps. Clip off any excess foam (Straight cut).
  9. Tie in a rubber leg on both sides of the head (Where your thread is now) to make a set of X-shaped legs. Whip-finish, clip thread and cement.

*Glue a rear rubber leg joint to the rear legs. Cut two small pieces of rubber leg material and use some ZAP-A-GAP to glue it to each end of the rear legs at an angle (down and rearward) on the outer part of the leg. Trim the joint clean when dry.                                                                                              


   *** But remember to practice    C.P.R. (CATCH – PICTURE – RELEASE).  


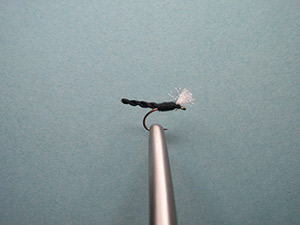
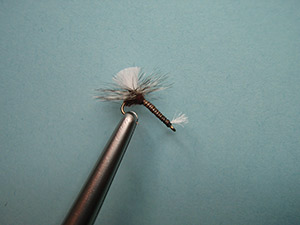
DRYEMERGER (BLACK)

fotm-september-2013
JAMES FERRIN


The dryemerger is a very unusual pattern. It’s similar to the parasol emerger. It’s a very effective pattern and a lot of people say they’re catching fish with it. The post is just white antron wrapped with thread and a hackle; that rests on the surface of the water. The pupa, which is pretty standard, hangs slightly underneath the surface.  The dryemerger is very interesting and shows what you can do with midge patterns.                                                   

PATTERN
HOOK – Mustad C49S – Tiemco 2457 – Daiichi 1120 sizes 22 to 16.
THREAD –   Black 6/0 (140 denier)
POST – White Antron
HACKLE – Black
BODY- Tying thread
RIB- Small copper Ultra wire
WING BUDS – White Antron yarn
THORAX – Peacock herl

HOW TO TIE

  1. Debarb hook – Mount the hook in the vise - start the thread about three eyelets from the eye then tie in your copper wire ribbing, keeping real close wraps (using the wire to keep it close) wrap back to just a little bit into the hooks bend. Bring your thread back to your starting point keeping close wraps again for a smooth body (no taper in this one). Then spiral wrap the wire forward and tie off at the starting point.    
  2. Take a large hunk of white Antron yarn about 2 to 3 inches’ long. Tie it in with about 3 eyelets (1/2 inch) hanging toward the bend of the hook for the wing bud (more is better cause you can trim later), where you ended your thread and wire abdomen.
  3. Using the thread, wrap forward toward the eye and stop about 2 eyelets from the eye. Then bring your thread back where you started tying in the yarn and tie in a couple strands of peacock herl. Then make a rope with the peacock by twisting it around the thread, and wrap it forward to cover the Antron yarn and stop where the yarn starts upward, tie off the herl then clip your tag end off. Now with the thread, start wrapping up the Antron yarn only while holding it with your other hand, keeping close tight wraps (like posting a wing) as you go up to form the post. (Post should be about 1 ¼ the hook length) Leave a small amount of Antron yarn for the top of the fly.  
  4. Chose a hackle about 1 ½ the size of the hook gap, tie it in toward the top of the post then wrap it upward (About 3 or 4 close wraps), hold back the hackle fiber and tie off the hackle and clip your tag end, whip finish, clip your thread, clip the Antron yarn post to size and trim the wing bud if needed.

NOTE: If you have trouble tying the post use a piece of 50lb to 80lb monofilament. Place it in the vice and tie the Antron onto the monofilament, making the black post by going from one side outward. Keep tight wraps. If you end up with a few white spots, a black sharpie pen will cover up that problem. Tie on and wrap your hackle. Clip tag end and whip finish. Now remove from vise and clip any extra pieces of monofilament that is not needed and tie in on the hook like in step #2.
 
Quite an unusual fly to tie, but fairly easy. Tie up a bunch for the closer next month
  

*** But remember to practice    C.P.R. (CATCH – PICTURE – RELEASE).
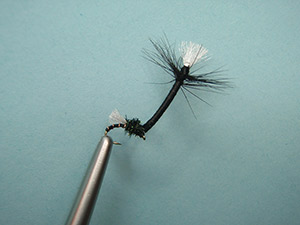


STRYMPH
Harry W. Murray

Here’s an equation every fly fisher should know:

STReamer + nYMPH = more fish. This fly can be fished both as a streamer and a nymph – hence the name STRYMPH. It will take trout and smallmouth almost anywhere you fish it. To match a broader variety of food forms tie the same pattern in olive or cream in addition to the original black.


FlyInsectBait
Black Strymph Hellgrammite Sculpin 
 - Dark Stonefly Mad tom
 - Dragon fly Tadpole
 -   leech
Olive Strymph Damselfly Sculpin 
 - Dragonfly Shiner
 - Caddis larva  
Cream Strymph Crane fly larva Chub
 - Mayfly nymph Silverside
 - Caddis larva Shad
 -   Shiner


For trout streams tie them in sizes 6 and 10 for smallmouths use sizes 4 through 10. I encourage you to experiment because STRYMPHs are exceptionally versatile. One of them often takes a good fish when other flies let you down.
                                           

PATTERN
HOOK - 3x-long nymph or streamer hook, sizes #2 through #10
THREAD -   3/0 prewaxed monocord, color to match body.
WEIGHT - Lead wire (The thickness of the hook shank) wrapped over three fourths of the hook shank.
TAILS - Ostrich herl, color to match body. On a larger Strymph, use up to 20 strands of herl: a smaller fly need fewer strands, select herl that has full, thick side filaments.
BODY - Black, cream, or olive rabbit fur.
COLLAR - Brown speckled Indian hen saddle.


HOW TO TIE

  1. Debarb hook – Mount the hook in the vise - start the thread about three eyelets from the eye and using the tag end of the thread lay a thread base all the way back to just before the hook bend then clip off your tag end. Now wrap your lead on three fourths of the hook shank then with your thread put a small dam of thread in front and behind the lead so you don’t have a step when wrapping your body later. Also a few spiral wraps of thread over the lead will help keep things together. Now coat the whole thing with head cement and let it dry (This keeps things from spinning on the hook shank).
  2. Tie in the tails(about a whole hooks length) by the butt ends of the herl and along the length of the hook shank (up and over the lead to just in front of the lead wire) clip off tag end of herl and work your thread back to the base of your tail.
  3. Make a dubbing loop at the rear of the hook with a dubbing twister of some sort inside the loop. (You can make one with a metal coat hanger or a paper clip).Advance the working thread not the loop part way up the shank.
  4. Clip a hunk or strip of rabbit fur and put it crosswise inside the loop. (Clip off the hide). Carefully spread out the material, keeping it centered within the loop. Remember to leave some bare thread below the fur
  5. Twist the loop to make a fur chenille, twist it a lot; you want to trap the fur securely.  
  6. Wrap the fur chenille up the hook, stroking the fibers rearward every half turn. (If you poke your finger on the hook point take a #2 pencil and remove the eraser and put it on the hook point). Tie down the bare thread at the end of the twisted loop to secure the fur chenille.      
  7. Make another dubbing loop, fill it with fur, and twist it. (A large hook might require the loops to fill the shank).
  8. Wrap the second fur chenille up the hook shank and tie it off. Be sure to leave enough room to attach and wind a hackle. Whip finish and clip the thread.
  9. With a small comb, brush the fur to remove any tangles and to make all the fibers stand up. Trim the body to shape (Cigar shape, thinner in the back fat in the front).
  10. Reattach the thread at the front of the hook. Prepare and tie in a speckled hen back feather.
  11. Make several wraps of hackle (on a larger fly, up to four) to form a wet fly collar, petting the hackle backward with each wrap.
  12. Tie off the hackle feather, form a tapered head, whip finish and apply at least one coat of head cement.

*** But remember to practice    C.P.R. (CATCH – PICTURE – RELEASE).
 

RAY CHARLES

fotm-february-2013

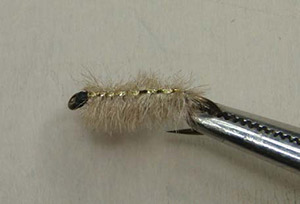
Aquatic sow bug – A crustacean, not an insect and trout nibble at sow bugs whenever they get a chance. Though they’re not often selective to them, they’re certainly aware of them, and almost always willing to take an imitation if even a few of the naturals are available. Since approxi- mately 130 species of aquatic sow bugs live in North America, trout get those chances almost everywhere that you might find them. Aquatic sow bugs feed primarily on decaying vegetation. Their numbers will be greatest in still or slow- flowing water with marl bottoms, in watercress beds, or in the thick sort of bottom vegetation that is often called moss. They will be absent or of little importance in freestone streams with brisk currents and clean bottom stones.

Sow bugs do not emerge and they have hard shells, usually grey, flattened and a bit wider at the butt than at the head. They have two pairs of antennae in front with a small “v” shape at the end of each, a pair of legs that extends off each of seven thoracic segments, and a pair of forked tail- like members. It should be rigged to get them on or near the bottom. Use an indicator about the depth of the water.

PATTERN

HOOK – Size # 14 - 20 2x long nymph or 2x heavy curved scud. Mustad #R72 or Tiemco # 5262. THREAD – Black 8/0
RIB – Fine silver wire SHELLBACK – Gold Mylar
BODY – Gray ostrich hurl (long ones if you can) SOFT HACKLE – (Optional) Light blue dun hen

HOW TO TIE

  1. Debarb- mount hook – start thread about halfway on the shank and go to just before the bend of the hook and tie in your wire. Then tie in your gold Mylar (If you have the kind with silver on one side and gold on the other tie it in with the silver side up and it will flip over to gold when bringing it forward).
  2. Tie in a couple of ostrich hurls (The longer the better) by the butt ends. Then bring your thread forward to just behind the eye of the hook.
  3. Wrap your hurl forward (Don’t make a rope with the thread – it lays the hurl down flat in spots) to just about an eyelets space behind the eye – if you come up on the hurl just tie in a couple more but remember you want a taper (fatter in the rear – thinner in the front) so tie in with the middle of the hurl instead of the butt end. Half hitch it to secure.
  4. Pet the top of the hurl down to the sides and bring your Mylar forward over the top and tie off in the front near the eyelet.
  5. Spiral wrap your wire forward. Just remember you need seven segments and the tie off, whip finish and you’re done.
  6. (Optional) Tie in a light blue dun hen feather and make a soft hackle collar by wrapping the feather two or three close wraps then tie off and using your thread do a few wraps over the front feather while petting the feather barbs backward which lays it backward. Whip finish and you’re done.

You can also tie this in brown-tan-black and even in pink. But the it would be more of an egg pattern than a sow bug.


FURLED MIDGE PUPA

fotm-july-2013


Furled bodies are excellent for extended bodies. Many materials that are thin or stranded can be shaped into extended bodies with this technique. Add strands of Krystal Flash or any other flashy or colored material to the yarn before it is furled for more variety.

PATTERN

HOOK – Scud, 2x wide, 2x short, 2x heavy, sizes 18 -22
THREAD – Black 8/0 or color to match natural.
ABDOMAN – Black or color to match natural Antron yarn. Furled.
GILLS – White Antron yarn
THORAX - Fine black dubbing or color to match abdomen.

HOW TO TIE

  1. Debarb hook – Mount the hook in the vise and start the thread behind the eyelet (one eyelet from the eye) and lay a thread base backward staying real close and stopping right above the hook point. This will help hold things down on the shank of the hook.
  2. Cut a 2-inch length of Antron yarn. Mount one end of the yarn to the top of the hook shank; and clip the tag end (the forward part) about 3 eyelets from the eye which leaves space for mounting the gills. Then cover the yarn butt ends and move the thread to the rear where you started tying in the abdomen (Antron yarn).
  3. Pinch the end of the yarn with your right thumb and fore finger and bring it downward toward you and below the hook point then twist the yarn clockwise into a tight cord but don’t let go or it will go weird on you. The tightness of twists will determine the tightness of the body.
  4. Use your left hand to place a dubbing needle at the position where you want the body extension to end (about the length of the hook shank), then fold the twisted yarn over the needle (with the yarn going from under the needle folding over the top) then bring the yarn on top of the hook shank and hold firmly then remove the needle and tie off where you ended the thread on the yarn. Secure with 3 or 4 wraps and clip off the tag end (part facing eyelet).
  5. Cut a 1-inch length of white Antron yarn and mount it on top of the hook shank (at the space we saved in step 2) wrap thread forward stopping just in front of the eyelet (about 1 eyelet). Then trim the yarn at the rear close to the thread wraps. Bring the thread back where you tied in the abdomen (above the hook point) while covering the butt ends of the gills (white antron yarn).
  6. Using a small amount of fine dubbing on the thread, dub the thorax with a taper (just a little) toward the front and ending at the gills (white antron yarn).
  7. Fold the white antron yarn (gills) back and put about 4-5 thread wraps in front of it to get it away from the eyelet. Tie off the thread and whip finish the head. Trim gills to desired length (about ¾ of the overall hook size is good; you can trim on the water if needed).


REVERSE MIDGE EMERGER 
JIM SCHOLLMEYER AND TED LEESON

fotm-may-2013


This reverse style can be used for a variety of emerger types. It presents a clear and uncluttered profile of the body and shuck of the insect by placing the hook bend and spear at the head of the fly. Leave your tippet ungreased so that the hook shank will sink.

PATTERN

HOOK – TMC101 – Mustad 3366 or other ring- eye, dry fly hook, #12 - #16
THREAD – Black 8/0
WING - White poly yarn
HACKLE – Grizzly
THORAX – Brown superfine dubbing
ABDOMEN – Stripped peacock quill (herl)
SHUCK - White antron

HOW TO TIE

  1. Debarb hook – Mount the hook in the vise with the eyelet pointing down a little bit so you can tie the wing on. Start your thread about three eyelets from the eye of the hook and lay a thread base all the way into the bend of the hook (about 1/3 of the way). Cut a 3 inch length of poly yarn, then pull the yarn in half to make two wings but you may need to adjust the thickness according to the size of the hook. Next tie in the poly yarn by folding it over the thread and moving it to the top of the bend of the hook (from the back side and moving it to the top) make two or three wraps to hold it down. Then post it by making some wraps real close to the base of the wing (poly yarn), keep real close wraps and go up the wing just enough to put your hackle in ( about 4 or 5 wraps of hackle) then back down to the base (not to tight going up the wing but tighter going down).
  2. Prepare a hackle feather that is about one and a half the size of the hook gap and mount it at an angle just in front of the base (butt side at base of wing) facing the rear of the hook tying it to the front side of the wing then wrapping the bare shank of the feather up the wing and ending where you stopped your posting (this stiffens the post a little more), then wrap downward keeping close wraps each way. You should have the feather standing up right next to the wing. Do not wrap the feather yet.
  3. Dub a thorax without wax (dry)( using the superfine dubbing) a little behind the wing (about one eyelet) and in front of the wing (about 2 to 3 eyelets).
  4. With your fingers or hackle pliers wrap the hackle around the wing base (posting) about 4 or 5 wraps downward will do, then tie of in front of your thorax and clip the tag off.
  5. Re-mount the hook to a normal position then bring your thread forward to about one and a half eyelets from the eye and mount a sparse length of antron yarn for the shuck. Don’t worry about the length we will trim it after we are done. Now use the antron yarn to help you lay down a thread base over the antron and end it just in front of your thorax (dubbing), clip off tag end of yarn.
  6. Now select a long peacock herl from a sword as they are a little easier to work with. Using a pencil eraser gently rub the herl stem to remove the fibers , go easy cause we need the stem in one piece. Tie in the herl by the butt end, right in front of the thorax and wrap your thread forward and stop just in front of the shuck (antron yarn), Now you can use your hackle pliers or your fingers to wrap the herl forward keeping close wraps and even slightly over lapping each turn and end the wraps just in front of the shuck, Tie off, clip tag end, make a small head in front of the shuck and whip finish.
  7. Use a dubbing needle to apply a drop of head cement to the body for durability. Clip the wing post and the shuck to ½ the hook gap in length.