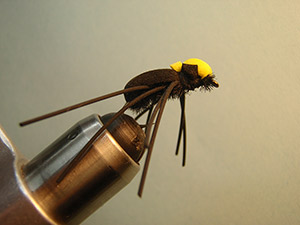
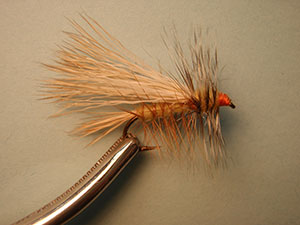
Yellow Stimulator

fotm-june-2014
RANDALL KAUFMANN  Translated by CARL WUEBBEN


The two largest stonefly species, the salmon fly and golden stone are the most important hatches in the order. Both are predominantly western. Many other groups, including little brown stones, yellow sallies, and olive sallies, are important in the east, the west, and everywhere in between. All stoneflies live only in moving water. It’s important to fish the correct imitation whenever a stonefly species is on the water in good numbers. Trout key in on them and refuse everything else. It’s also important to know that some stonefly dressings, such as Randal Kaufmann’s stimulator, when tied in smaller sizes will also take trout during caddis and grasshopper activity. They make excellent searching dressings.


PATTERN


HOOK – 3x or 4x long, sizes 4-6-8-10-12.
THREAD – 6/0 hot orange.
TAIL – Light elk hair.
RIB – Fine gold wire, counter wound over the body hackle.    
BODY HACKLE– Brown, undersize.
BODY – Yellow fur or synthetic dubbing.
WING - Light elk hair.
HACKLE – Grizzly wound over thorax.
THORAX – Amber fur or synthetic dubbing.


HOW TO TIE


  1. Debarb hook – mount in vise – start your thread two eyelets space from the eye of the hook and lay a thread base toward the bend of the hook shank and end just before the bend. Clip off a hunk of elk hair about the two to three times the thickness of the hook shank depending on the size of the hook, clean the fuzz out and then align the tips in a hair stacker then tie in at the rear of the hook shank, (This is your tail) the tail should be about half the length of the shank, then wrap the butt end down on top of the shank and end it about four of five eyelet’s from the eye and clip off the tag ends at a 45 degree angle, then go back to the rear of the shank with tight wraps, to hold the hair down.  
  2. Tie in three to four inches of gold ribbing wire at the base of the tail. (This will protect your body hackle), with the longer piece toward the bend of the hook (We will counter wrap this later). Put this in your material clip.
  3. Select a long brown hackle, either neck or saddle, with fibers just one hook gap long, strip the fluffy stuff off the lower part of the stem, and tie it in by the butt section of the feather at the base of the tail, with the concave side toward you so the fibers lean a bit forward when wound. Twist some yellow dubbing onto the thread for your body (abdomen), and wind a stout, untapered body over the rear two thirds of the hook shank.
  4. Wind the brown body hackle forward in evenly spaced wraps to the end of the body (Where dubbing ended). Tie off and clip off your tag end. Make sure to leave plenty of room for the wing and final hackle. Counter wind the ribbing wire through the body hackle. Wobble the wire back and forth as you wind it to prevent knocking down too many hackle fibers, though you’ll always catch a few.
  5. Select a patch of elk hair about twice the thickness of the tail, clip it from the hide, clean the fuzz from the butts, and align the tips in your hair stacker. Hold the wing in a firm pinch in your tying hand (Right handed person it’s your right hand), and measure it to the end of the tail. When tied in, you want the end of the wing to stand either even with or just short of the end of the tail.  The tail, when the fly is on the water, represents the back end of the wing, not the actual tails of the insect, which are insignificant to an imitation.
  6. Transfer the wing pinch to your other hand and hold the wing tie-in point firmly in place at the end of the body (Front of abdomen dubbing- So it won’t spin). Tie in the wing with several loose thread wraps forward over the flared hair butts. Gather the butts and clip them on a 45 degree angle (So they don’t leave a step- that makes it hard to make the head).With firm wraps, Cover them with thread all the way up to the eye.
  7. Select a single grizzly feather or two neck hackles with fibers one and a half to two hook gaps long, strip the fluff from the bottom of the feather. It you’re using one saddle, tie it in with the concave side toward you so the fibers tilt forward when wound. If you use two neck hackles, pair them back-to-back so the fibers are well spread when wound. Tie in at front of wing.
  8. Dub a small noodle of amber fur for the thorax and wind it on to just behind the eyelet, and with a slight taper toward the front. Spiral the grizzly hackle forward and tie off just behind the eye and clip your tag end off. Build a small thread head and whip finish.      
  9.   Tie up a bunch - then take a photo of your best one and e-mail it to me and I can critique it for you if you want.  


*** But remember to practice    C.P.R.   (CATCH – PICTURE – RELEASE).

THE BLUEGILL IT’S –A-BUG

fotm-may-2014

GARY R. YADEN Translated by CARL WUEBBEN

When you tie this pattern expect to catch a few fish with it - even bass like this fly. There are some unique traits to the Bluegill its –a- bug, starting with the foam eyes on the sides of the fly. The second is that the pattern sits on the water with the butt of the fly sinking under the surface; when retrieved with a slight twitch, the entire body rocks on the surface. But best of all, the bluegill it’s-a-bug is easy to tie and is very durable.

PATTERN

HOOK – Mustad 3906b, sizes 10 to 6 for bluegills, larger for bass.
THREAD – Danville’s size A waxed fly master, black or color to match the body.
OVERBODY – Black 1/8 – inch Closed cell foam.
UNDERBODY – Black small to medium chenille, or color to match the overbody.
LEGS – Four 2- inch strips of black square rubber legs.
HEAD – Yellow 1/8 inch closed cell foam.

HOW TO TIE

  1. Debarb hook – mount in vise – start your thread at just in front of the hook bend – cut a strip of black foam ¼ inch by 1 inch, then cut a pointed tip on one end and tie this end in at the rear of the hook – tie in the chenille on top of the foam and wrap your thread forward to about mid shank.
  2. Tie in the rubber legs by taking one of the 2 inch legs and double it over the thread in a “v” shape and it facing away from you - then using only the leg material and the thread hanging downward pull the legs up and over the hook shank and onto the side close to you – that’s one pair now advance the thread two or three wraps and tie in another pair – then rotate your vise so you can do the same thing on the other side and you should end up with four legs on each side.
  3. Cut a strip of yellow foam ¼ inch wide by ¾ inch long for the head – cut a “v” point on one end and tie this end on at the front of the hook with the other end facing toward the eyelet – keep it on the top and don’t crowd the head.
  4. Wrap the chenille underbody forward making sure to get one wrap between the legs going forward and backward – you can adjust the position of the legs later. Wrap all the way forward and tie off behind the eyelet (don’t crowd the head) clip off the tag end of the chenille.
  5. Pull the black foam up and over the chenille to form the overbody and tie off where you ended your chenille (by the eyelet). Keep the strip tight and secure it with three or four snug wraps - too tight and it my cut or bend the foam the wrong way. Trim the excess but leave about 1/8 inch.
  6. Pull the front (yellow) strip back over the 1/8 inch black foam and secure with about three or four good wraps like before – this is the eye – whip finish – clip the thread – trim the excess yellow foam leaving a 1/8 inch long case. Adjust the rubber legs on each side of the body – you should have two sets of legs on each side with one set “V” shaped toward the back and the other “V” shaped toward the front Tie up a bunch - then take a photo of your best one and e-mail it to me and I can critique it for you if you want.


*** But remember to practice C.P.R. (CATCH – PICTURE – RELEASE). 


ELK-HAIR CADDIS EMERGER

fotm-april-2014
SHANE STALCUP Translated by CARL WUEBBEN

Caddis are the meat and potatoes of most trout diets. This important group of insects is found in just about every river, stream, and pond in which you might cast flies for trout. Caddis have several life stages, all of which can be imitated by artificial flies but we will concentrate on the emerger stage with this one. Emerging caddis larvae leave the Lake Bottom or streambed to swim to the surface, where they become winged adults. The swimming caddis pupae are weak and vulnerable, and they drive trout nuts. It’s best to keep floatant off of the bodies of this fly; for a realistic presentation, you want the body to hang down in the surface. This fly is just the ticket for catching tough – highly pressured trout.

PATTERN

HOOK – Daiichi 1130 or a similar bent – shank nymph hook, sizes #10 - #16
THREAD – 8/0, color to match the body
ABDOMEN – D-rib, color to match the body or clear to allow the color of the thread to show thru.
THORAX – Ice dubbing, color to match the body.
UNDERWING – Ice dubbing, color to match the body.
LEGS – Partridge hackle fiber.
WING – Elk or deer hair.

HOW TO TIE

  1. Debarb hook – mount in vise – start your thread in at about three eyelets from the eye and wrap a nice thread base going a little bit into the hook bend, then take your D-rib and cut it at a slight angle at the tip – tie it in at the bend of the hook and bring your thread forward to the tie in point, then wrap the D-rib forward also with nice close wraps and end it where your thread is and tie it off (this is your abdomen) now clip off the tag end of the D-rib.
  2. Tie in a pinch of dubbing by the tips In front of the abdomen – leave it hanging toward the rear as this will be doubled over later for the underwing – put some dubbing wax on the thread then add a small pinch of dubbing to the thread and with your fingers twist the dubbing onto the thread to make a rope like thread and dub a thorax (a small one) by wrapping the thread rope around the hook just a couple times. Leave room for the elk hair.
  3. Using your bodkin , fold the dubbing underwing over it and tie it in front of the thorax – clip off any tag ends of dubbing and any stray pieces in the underwing loop (The loop creates a little air pocket).
  4. Take a partridge feather and strip off the fuzz so you have just the good fibers on the shank. Gently pull the fibers on one side straight out but don’t strip them off – now tie in a small section of the fibers on the bottom of the thorax and in front of it (The thorax) for the legs – fibers should extend no farther than the hook point.
  5. Clip out a clump of elk hair from the hide (About the thickness of a pencil – you can remove what you don’t need later) then comb out the fuzz and put it in a hair stacker then tap it on the table a few times to even the tips of the hair - pull the hair out by the tips and size up the thickness according to the hook size. Tie in with the tips facing toward the bend of the hook (The hair should extend to just a bit before the hook bend). Take your hair in your left hand and with the bobbin in your right hand wrap the thread around the hair where you will be tying it in and take one full turn then bring it all down to the hook shank and tie it on in front of the thorax with soft wraps (2or3) to help control the hair on top then with a little more tension and wrapping forward about 3 or 4 wraps to corral the hair a little then as you go back to where you stated tying in the hair pull tighter and the butts of the hair will really flair out – try to keep them on top by pulling them back up with your fingers.
  6. Clip the hair butts at an angle just like an elk hair caddis but don’t cut it too short – you can always clip more but you can’t add any more on to it. Now just a few more thread wraps then a whip-finish and you’re done. Clip the thread off. Tie up a bunch - then take a photo of your best one and e-mail it to me and I can critique it for you if you want.


*** But remember to practice C.P.R. (CATCH – PICTURE – RELEASE).


THE FOAM MINNOW

fotm-march-2014
PHIL ROWLEY Translated by CARL WUEBBEN

Predatory trout accustomed to supplementing their diet with minnows, fry or other baitfish often herd and chase their prey into shallow areas or drive them to the surface where they ambush them from below. In order to be successful using minnow or fry patterns it is important to keep your fly high in the water. Line choice helps but having a buoyant pattern is a definite asset. This is very easy and fun to tie – you can get very creative in the colors also 

PATTERN

HOOK – mustad R74-9672, #6 - #10
THREAD – GSP, white – 6/0 white works also
TAIL – UV2 grizzly soft hackle, olive or brown. Regular marabou and fur clumps can also be used. The barred markings of a dyed grizzly feather suggest the banded markings common to trout or salmon fry and many small minnows.
UNDERBODY – 2 mm sheet of white foam cut into strips the size of the hook gape
OVERBODY – Mylar piping, pearlescent or pearlescent dyed olive.
EYES – Stick on eyes – bend the eye in half to better form to the body.
GLUE – Gel zap-a-gap or gel superglue and thin UV glue and a curing light for it.

TYING NOTES

  1. Use permanent marker to color and mark the body to match your local baitfish or fry.
  2. You can put the markings on the underbody or the overbody but I have found that if you do it on the underbody (foam) first it worked better as long as you put one color on then a thin coat of thin UV glue and a quick curing with the light then the next color and a curing and so on with each color then bring the Mylar piping over the underbody.
  3. After curing the last coat of UV glue take a little bit of hand sanitizer and lightly rub it on the fly body to remove the tacky feeling that the glue gives off then put a coat of Sally Hansen’s hard as nails (Head cement) on it and let it dry fully.


HOW TO TIE

  1. Debarb hook only if you want to on this one – take the 2mm white foam and cut into strips the size of the hook gape. Now hold the strip up to the hook shank and measure out a piece the length of the shank (behind the eye to just in front of the hook bend) then double it and cut it. Now take the doubled over foam and put the hook point thru the center of the foam in the bent over part – then bring it forward to the eyelet.
  2. Use some gel superglue or zap-a-gap gel and put it on the shank of the hook and a little on one of the inner sides of one side of the foam. This glue helps things stay in position and not run all over the place. Now bring the two sides together along the side of the hook shank and make sure it is centered then press firmly on the body to hold the foam together and onto the hook shank. Make sure it all stays together and remove any glue that may have squished out. Leave about two eyelets space from the eyelet so you can tie in the piping.
  3. Shape the foam underbody so it tapers at each end resembling the basic shape of a baitfish. Don’t worry if it’s a little squared off on the corner because the piping will cover them and give it the nice rounded shape. Just shape carefully because with each cut you are removing floatation and you can’t glue it back on.
  4. (See tying notes #1 and #2 for an option at this point). Attach the thread behind the eye then grab your Mylar piping and tie it on in front of the foam and wrap your thread up close to the eyelet (but not so close as to crowd the head) then loosely spiral wrap over your body to get to the back of the foam – then strip a small clump of soft feather from the base of a dyed olive or brown grizzly hackle (can use regular or grizzly marabou as I did) and tie in the hackle tuft at the rear of the shank. The tail should be no more than half the shank length. The barred markings of the feather suggest the banded markings common to trout or salmon fry and many small minnows.
  5. Darken the back of the foam (top) dark olive using a permanent marker – let it dry a few minutes then coat it with a little thin UV glue and cure it with the UV light – then using your thumb and forefinger, stroke and pull the Mylar piping back over itself along the shank. Pull the Mylar piping tight at the rear of the hook. Now using a bodkin pick thru the fibers in the Mylar where the hook bend is so you can tie in the piping. Put a few thread wraps down to hold the piping in place. You now either clip out the piping filaments in the tail or leave a few or clip them out altogether. Don’t worry about the blunt nose this method creates it better mimics the look of many minnows or fry. Color the thread holding the tail parts together with the marker (same color as the back). Whip finish the fly at the tail area -clip off the thread –apply a small dab of superglue or zap-a-gap at the rear tie off point for added security.
  6. Now using the permanent markers apply the body markings like a dark olive back you already have on, red gill slashes and black vertical bars along both sides of the body. Now wait for it to dry. But I like to apply one color then some thin UV glue with a UV light curing then another color then more thin UV glue and a curing and so on. This keeps the colors from bleeding so much.
  7. With a bodkin, apply the stick on eyes to each side – fold the eye a little bit in half while it’s still on the paper so it fits the rounded body profile better.
  8. Coat the entire fly (accept the tail and eyelet) including the eyes with 2 to 3 coats of thin UV glue and a curing after each coat- do small sections at a time so it won’t run and leave bumps- thin coats ensure a smooth even build up. Now see tying tip #3 and you’re done.


*** But remember to practice C.P.R. (CATCH – PICTURE – RELEASE). 


SPLIT-TOP EMERGER (OLIVE AND GRAY)

fotm-february-2014

SCOTT SANCHEZ
Translated by CARL WUEBBEN

Multipurpose emerger patterns have a permanent home in my fly box. By multipurpose, I mean patterns that match characteristics common to various species of emergers. These patterns help me combat a variety of difficult situations, including fishing unfamiliar waters of facing multiple hatches that are occurring at the same time. Tying the split-top emerger in olive and gray covers a wide range of insects and the pattern is effective in a variety of ways. It imitates not only more than one species but also an emerger that is vulnerable, and it appeals to a trout’s sense of safety.  Some emergers become stuck in the shuck or take too much time escaping the meniscus of the water and air. This is the stage the split-top emerger imitates, and it is bad for the bug, but good for the fish. Most aquatic insects in the state of emergence look more alike than different caddis, mayfly, midge, and small stones all blend together one way or another. Dull orange or pink polypropylene is a good compromise of visibility without being gaudy. Also try using CDC for the indicator.

PATTERN
HOOK – Dai-Riki 125 curved emerger hook, or Tiemco 2488 sizes #12 thru #20
THREAD – Olive 8/0
SHUCK – Olive brown Antron
ABDOMEN – Stripped grizzly hackle stem
WING CASE – Gray 1.5 mm or 2mm foam
HACKLE – 1 ½ gap grizzly
INDICATOR – Orange poly.
THORAX – Callibaetis UV2 dubbing
GLUE – Zap-A-Gap

HOW TO TIE

  1. Debarb hook – secure in the vise- start your thread about 3 eyelets space from the eyelet then secure the shuck (olive brown Antron) on the top of the hook shank and wrap your thread back toward the bend of the hook while binding down the Antron on top of the hook shank and stopping a little bit into the bend.(This keeps from getting lumps in the abdomen later.) Don’t cut the tag end yet we will do that last so you get the proportion right.
  2. Grab a not so good quality of grizzly hackle and strip the fibers off the stem by pulling them downward toward the butt of the feather. (Save the good feathers).     
  3. Tie the hackle stem in by the tip along the top of the hook shank at the shuck. Put a small amount of ZAP-A-GAP on the hook shank and wrap the hackle stem up to mid-shank. (This will reinforce the stem).
  4. Cut a foam strip for the wing case as wide as about ½ to ¾ of the hook gap. Tie the foam strip in at mid-shank.
  5. Now tie on the better hackle (1 ½ the gap size) at the base of the foam and wrap counterclockwise just a few wraps 2 or 3 ( keep it sparse) around the foam base and tie off in front of the foam – pull back the wrapped hackles on the foam so you can tie off the hackle easier. If you feel it puts too much hackle on you can use a smaller fiber feather or strip one side of the feather off and wrap it on – again 2 or 3 wraps.
  6. Bring your thread forward and tie in your indicator (Orange poly) in the center of the thorax (In the middle between the foam base and the rear of the eyelet) tips facing forward. Clip off the tag ends and post it by lifting the poly upward and putting a small dam of thread in front of it to keep it standing upward, then bring your thread right up to the front of the base of the poly and going counterclockwise and keeping very close wraps at the base lay down a small bunch of very close wraps (But soft ones) then going up the poly, not to far up though –then back down with a little tighter wraps. You will have to hold the foam and hackle back out of the way to get the posting done without binding down some of the hackle.
  7. Bring your thread to the base of the foam. Grab your UV2 dubbing and dub a very thin noodle (You can add more if needed) from the foam base to the indicator base and then crisscross under the indicator and just a very small section right in front of the indicator. You will need the space to tie off the foam wing case.
  8. Take the foam wing case and with a pair of scissors split it down the center and stop just before the base of the foam. Be careful not to clip the hackle. You can also cut the foam before tying it in.
  9. Pull the two wing case sections (Split foam) around the indicator and over the thorax, and tie off right about in front of the indicator and this should give you enough space so you don’t crowd the head. If the hackle does not end up toward the rear (Like wings) and out the sides (Like legs) you can try putting a little pressure on them as you pull them back and or down or If you have enough hackle out the back and sides (Just a little) then you can clip out what you don’t need. Pull the foam strip a little (One side at a time) tight and clip off close to the base then do the other side the same way.   Whip-finish and put a very small amount of ZAP-A-GAP on the thread then clip your shuck (A gap) and you’re done.

*** But remember to practice    C.P.R. (CATCH – PICTURE – RELEASE).  


DOUBLE PARACHUTE MIDGE

 fotm-january-2014

JEREMY DAVIS


 This parachute style dry sits in the film like a hatching insect. The advantage of a double midge pattern is that adult midges often cluster together in groups of two or more. Midges can be as tiny as size 28 and feeding trout often target these clusters in order to get enough to eat.

PATTERN
HOOK – 2 XL dry fly hook #8 - #12.
THREAD –   Black 8/0 uni-thread.
TAIIL – Black antron yarn.
BODY – Natural peacock Arizona dubbing.
POSTS – White antron yarn.
HACKLE – Grizzly.


HOW TO TIE

  1. Debarb hook – secure in the vise- start your thread about mid shank and wrap back to the bend of the hook and tie in your black antron for the tail   ( Just a little shorter than the shank length).
  2. Now tie in a thick piece (doubled over) of white antron yarn for the first post starting at the base of the tail and wrapping forward (This will build up the body a little) to just a little bit before the middle of the hook shank. Then post it by holding the top of the white antron with your left hand and keeping real close to the base of the post and hook shank wrap your thread up the antron yarn to form the post – use light wraps going up then a little tighter going down. Now grab the grizzly hackles with the barbs on it about the size of the hook gap then pluck out the fuzz on it and tie it on in front of the post with the bare shank of the feather going up the post. Now wrap the thread up the post one more time with close wraps then back down (This reinforces the post). Don’t wrap the hackle yet.  
  3. Advance your thread a little bit in front of your first post then tie in some more white antron for the second post and stop just about two or three eyelet’s from the eye and post it and tie in the hackle like in step two.  
  4. Spiral wrap your thread back to the tail and dub the first body right up to the first post. Now wrap the hackle feather down the post then tie off in front of the post base- clip the tag end off and put some more dubbing on the thread and wrap forward to the second post then do the same as the first post and tie off the hackle in front of the post and dub some more but don’t crowd the head. Whip finish and clip the thread and you’re done.

TIP – Gently pull back the fibers on the parachute to dub and to whip finish the fly.

   *** But remember to practice    C.P.R. (CATCH – PICTURE – RELEASE).