Mini Sulphur Hi-Vis Comparadun
By Ted Fauceglia

fotm march 2018

Translated by CARL WUEBBEN


For the seasoned fly fisher, preparing to meet most mayfly hatches is a relatively easy task – it’s simply a matter of reviewing last year’s log and correcting any problems associated with the previous year’s hatch. If there are none, it’s no big deal; just restock your supply of your best patterns. For fly fishers without a backlog of knowledge, it’s a little more complicated. Tying a selection of patterns for any hatch obviously requires us to choose the correct size and colors for each pattern, but it’s equally important to choose the right style of pattern that suits a particular hatch. Where on the water the hatch happens also has a direct influence on the style of pattern selected. If duns emerge in fast – flowing riffles, you’d imitate them with buoyant, hackled, high-floating patterns that remain high on the water whereas, if the duns surface in calm water or side pools, a more realistic, flush-floating pattern is appropriate because the trout will get an up close view as it drifts downstream. In addition to where the hatch occurs, the timing of the hatch raises further concerns (time of year). I have found that the simpler the pattern I use, the better. I’m a big fan of parachute patterns, but parachutes don’t lend themselves well to small dun patterns (sizes 18 and smaller). The materials overcrowd the pattern, and there simply isn’t enough definition to my satisfaction. I prefer the Comparadun style for my mini-sulphur imitations, besides matching the size and color of the natural; Comparaduns match a naturals profile and duplicate a naturals imprint on the water, which is crucial in low water conditions. As an added bonus Comparaduns are easy to tie.

PATTERN

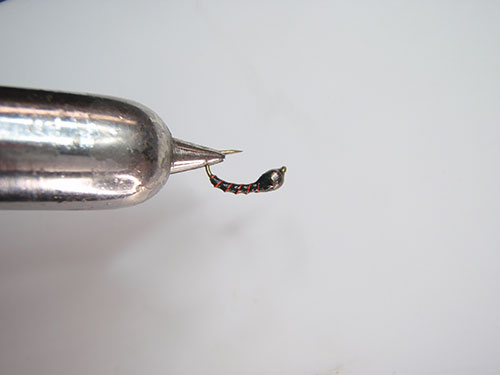
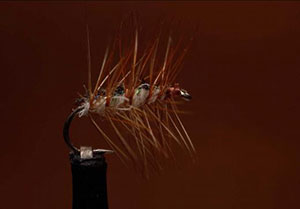
HOOK – Tiemco 100 BL, size 18 to 20
THREAD – Light Cahill 8/0 Uni-thread (70 denier)
WING- Sulphur Hi-Vis Antron
TAIL – Stiff cream colored hackle barbs
BODY – Pale morning dun Orvis Spectrablend dry fly dubbing or ?
HEAD – Light Cahill 8/0 Uni-thread (color it red with a Copic marker or other permanent marker)

HOW TO TIE

  1. If using a barbed hook debarb it and mount in the vice. Start your thread in about at the mid-shank point and wrap rearward to just a little before the bend of the hook.
  2. Tie in the hackle for the tail (about the same size as the hook or just a bit larger). About 5 or 6 barbs should do, coming straight off the hook shank.
  3. Bring your thread forward to a little bit past the halfway mark on the shank and tie in your Hi-Vis Antron for the wing by laying the Antron on the top of the shank with what will be the wing part going about a hook length long (hook shank upward), and tie it down on the shank with the tips facing forward. Lay a few wraps down then clip the tag ends off (butt section). Pull the front part of the wing upward and bring your thread forward in front of the wing, then lay some wraps in front of it to keep it upward. Then fan your wing out with your fingers to get the wing to spread out from side to side like a fan. Bring your thread rearward and end it just before the bend.
  4. Make a dubbing loop by pulling about 2 inches of thread downward, then put a dubbing twister (tool) on the thread and then bring your thread back up to where your thread comes off the shank and tie both pieces of thread on the shank. Bring your thread forward and stop by the eyelet, then place a small amount of dubbing in between the thread loop and using your dubbing twister, spin it into a noodle or just your index finger and thumb to twist the dubbing onto the single piece of thread coming off the shank. You can use dubbing wax to help. Use small chunks, if you need more you can add more on.
  5. Wrap the noodle forward; when you get to the wing base do a figure 8 around the front and rear of the base to cover the bottom side below the wing and keep close to the front of the wing to help keep it upward also. Wrap all the way toward the eyelet but leave a space for the head of the fly. Tie off and clip off the tag end of the noodle.
  6. Take a red permanent marker and run it up and down about a 2 inch section of your thread then wrap a small head behind the hook eye. Whip finish and clip your thread, then add a very small dab of head cement.

TIE UP A DOZEN OR TWO – AND GO FISHING*** But remember to practice C.P.R. (CATCH – PICTURE – RELEASE)


Anorexic Zebra
By Aaron Jasper

fotm febraruy 2018

Translated by CARL WUEBBEN

This fly is perfect for a dry fly – dropper style of fishing. Attach a large dry fly to the end of your leader, tie another length of tippet to the hook bend of the floating fly, then add an anorexic zebra or a nymph. Streams with high angling pressure are generally well suited for a dry – dropper technique. In many of these streams, the trout are very wary of people. Because of these factors successful anglers present fly’s from a distance. Suspending your fly under dry flies is the best way to do this and not spook the fish. When fishing with the correct leader system, dry flies and small flies or nymphs can increase your catch rates even under some surprisingly tough conditions. Dry – dropper combinations works especially well during mayfly and caddisfly hatches. Many nymphs and pupae are vulnerable near the surface, and trout frequently feed right under the surface. Also try tying the second fly to the eye of the dry fly for less drag and better floatation of the dry.

PATTERN

HOOK – Tiemco TMC 2487, size 18 or 16
HEAD – Black tungsten, matched to hook size
THREAD – Black 8/0 (70 denier)
BODY – Tying thread
RIB – Hot orange copper wire

HOW TO TIE

  1. Debarb hook. Put the bead onto the hook, small hole first and mount in vise. Start thread in right behind the beadhead which is pushed up against the eyelet and then grab a hunk of wire and tie it in behind the beadhead and keeping the wire on top of the hook shank by using your thread to secure it and making a thread base using the wire to keep close wraps, then continue to wrap to just a little bit into the bend of the hook then put the wire into your material clip to keep it out of the way for a little bit.
  2. With your thread wrap forward to the beadhead with very close wraps to create the body, then when you are at the beadhead wrap backward again and make a taper the size of the beadhead long and end your thread back at the beadhead.
  3. Now with the copper wire spiral wrap forward clockwise and tie off just before the beadhead (tapered part before bead) and helicopter the tag end of wire off. Whip finish –clip off the thread tag end then put some head cement or U.V. glue on the entire fly less the beadhead.

TIE UP A DOZEN OR TWO – AND GO FISHING*** But remember to practice C.P.R. (CATCH – PICTURE – RELEASE)


Nosepicker Blue Winged Olive
By Kevin Price

fotm septembet 2017

Translated by CARL WUEBBEN

When it comes to flies that imitate small Mayfly nymphs, many fly tiers routinely turn to the trusty pheasant tail nymph and its’ derivatives. It’s a fly that is easy to tie and tends to get the job done. It’s such an effective mayfly nymph imitation that creative fly dressers are hard pressed to arrive at anything better. The challenge was to find a fly that lasted more than two or three fish. That’s the one problem with the P.T. nymph: it is made from inherently brittle materials- namely peacock herl and pheasant tail fibers. The answer is a pattern dubbed the Nosepicker, designed to be a true guide’s fly: a fly that not only fools trout, but also stands up to a beating. Moreover, the pattern is easy to tie. Its’ colors and size are easily adapted to match a variety of mayflies. Depending on the bead color, thread, hook size and wire, the Nosepicker can imitate Blue-winged Olives, Pale Morning Duns, Green Drakes, and March Browns. Emu herl is used for the tail and legs because not only does it look buggy and lifelike, and holds its shape in the water, but it’s also amazingly durable. A small strip of pearl flashabou run through a piece of hollow ultra-lace tubing adds just the right amount of flash and creates a nice bulletproof wing case that resembles epoxy, but without the mess of working with epoxy, and it remains intact for the life of the fly. The wire thorax, virtually indestructible, allows for a consistent-sized upper body while also enabling the fly to sink fast. The Nosepicker is as tough as they come. You’ll lose it to a big tippet-busting trout before it’ll fall apart.


PATTERN

HOOK - TMC 2488 heavy, sizes #16-#20
HEAD - Gold bead, matched to hook size
THREAD – Olive-Dun UNI thread, size 8/0
TAIL – Olive Emu
RIB – Small olive Ultra wire
SHUCK – Olive CDC
WING CASE – Tan Ultra lace tubing with a strand of pearl Flashabou inside
ABDOMEN – Brassie-size black Uni-wire
LEGS – Olive Emu
NOTE – photo is a pale mourning dun colors but pattern is the same

HOW TO TIE


  1. Debarb hook. Put gold bead onto hook, small hole first and mount in vise. Start thread in right behind beadhead and create a thread base on the hook shank then tie in 3 strands of the Emu fibers for the tail, about ½ to ¾ the hook shank long. Wrap thread back to the beadhead.
  2. Tie in a length of small olive wire behind beadhead and wrap it down with the thread to the base of the tail with close wraps, keeping it in a straight as possible on top of the shank. Then bring your thread back up to the beadhead (close wraps again). Now make four spiral wraps of the wire and tie off. Helicopter the tag end off. Your thread should be about mid-shank now. Tie in a small clump of olive CDC for the shuck in at the mid-shank area facing rearward. (Tie it a bit long so it’s easy to handle, and then trim to length – about the length of your beadhead.)
  3. Insert a single strand of pearl Flashabou into a length of tan Ultra lace, and tie it in starting up against the beadhead. With the thread, wrap rearward and on top of the larva lace and stop in front of the shuck (olive CDC), leave it facing rearward. We will use it later for the wing case.
  4. Tie in a strand of black Ultra wire at the base of the shuck and make about six wraps (very close) to form the abdomen. It should end very close to the beadhead. Tie it off and helicopter the tag end off.
  5. Tie in three strands of olive Emu on each side of the abdomen (black wire) to form the legs. They should extend to about midway of the shuck and tilted slightly upward. One or two thread wraps rearward will keep them facing rearward. Cut off tag ends of Emu.
  6. Pull the Ultra lace tubing forward, splitting the Emu legs more to the side, and tie off right behind the beadhead. With tight wraps to hold it down well. Clip off the end of tubing and whip finish. Add a small amount of Zap-a-gap to secure the thread.

TIE UP A DOZEN OR TWO – AND GO FISHING*** But remember to practice C.P.R. (CATCH – PICTURE – RELEASE)


Firetail Wolly Bugger
By Chad Mason

fotm septembet 2017

Translated by CARL WUEBBEN

In an ideal world, fish would always be active. Getting them to strike would be a matter of imitating their favored food. Now, welcome back to the world we live in. some days fish put their bellies on the bottom, or hang lazily suspended, seeming to vegetate like hungover fraternity pledges. What then? It’s time to stop thinking temptation and start thinking provocation. Trout, panfish, and bass are sometimes a bit lethargic. At such times, you can almost bounce a non-descript imitative fly off their noses, and they won’t budge. Then we must reach deeper into those pea brains (theirs, not ours) and provoke a deeper instinct. Certain visual cues seem to awaken a predatory, territorial, self-defensive or other striking impulse in fish. Incorporate fluorescent colors into your favorite streamer pattern, the wolly bugger with accents of chartreuse, hot pink, fluorescent orange, or purple, the firetail wolly bugger is designed to provoke strikes from reluctant biters.

PATTERN

HOOK – 2x long, heavy wire, size #6 or #8
THREAD – black 6/0 (140 denier)
TAIL – black marabou over chartreuse marabou or any other fluorescent color
BODY – medium chartreuse chenille (or the color you used for the tail) followed by medium black chenille
HACKLE – wide, webby, black saddle hackle
COLLAR – black hen-back (saddle) feather
NOTE – Fluorescent orange, hot pink and purple are other good colors for the bright part or the tail and the rear section of the body.

HOW TO TIE

  1. Debarb hook-mount in vise – start thread in at about mid shank and tie in your chartreuse marabou for the tail – about 1 ½ the hook size hanging out from just before the hook bend and you can tie down the rest of the feather onto the hook shank to form a thicker body if you want to. Then tie in the same amount of black marabou on top of it to complete the tail. Clip off the tag ends with enough space in front for a collar and the head. Bring your thread back to the hook bend and tie in a black saddle hackle by the tip. Just leave it be for now you will use it latter.
  2. Now grab your medium chartreuse chenille and tie it in right before the bend of the hook – clip your tag end off then make two close wraps and tie it off and clip off the tag end. Tie in your medium black chenille and clip you tag end off and bring your thread forward to the eyelet then wrap your black chenille closely forward and tie off at about one eyelet space from the eye (remember you still have to put in a collar and a small head so don’t crowd the head) clip of the tag end.
  3. Spiral wrap the black hackle at the back of the hook forward and tie off by the head- clip the tag end off (as you wrap the feather stroke the fibers rearward).
  4. Tie in a black hen-back (saddle) feather where you ended your black chenille by the tip and clip off the tag end. Now take two or three close wraps of the feather forward stroking the fibers rearward with each wrap then tie off and clip the tag end off. Take a few tread wraps over the base of the front part of the feather collar to lock them in a slight rearward position- make a small head – whip finish and clip you thread off – add a little head cement and you’re done.

TIE UP A DOZEN OR TWO – AND GO FISHING*** But remember to practice C.P.R. (CATCH – PICTURE – RELEASE)


The Slumpbuster

By Chris Hunt
Originally by John Barr

fotm july 2017

Translated by CARL WUEBBEN


The slumpbuster is a john Barr creation, and its intent is exactly as the name implies. It’s big .Its heavy. It pushes water; it’s the “LOOK AT ME!” fly that we all search for when things are slow; the action suddenly ceases or under high water when finding fish might be a bit of a challenge. You can also tie in smaller sizes. While it certainly works in big sizes, on smaller freestone streams, the smaller profile seems to more representative of small baitfish. Tied in olive and on a size 10 hook, it’s a great imitation of swimming damselfly or dragonfly nymph on small lakes. The fish literally eat it up. And it’s an easy tie at the vise.

PATTERN
HOOK – Dai-riki #700 #8 or equivalent
CONEHEAD – Nickel cone head (large) can use gold also your choice
WEIGHT – Lead free wire (.020)
THREAD – UTC 140 denier (6/0) brown olive
RIB – UTC ultra-wire brassie in chartreuse or color of your choice
BODY- Sparkle braid in silver or gold
WING & COLLAR - Pine squirrel zonker strip in chartreuse or color of your choice ( the photo looks like olive but use what you want)
OTHER THINGS - Fly tyers z-ment or your favorite glue like zap a gap


HOW TO TIE

  1. Debarb hook – put cone head on the hook small hole first then add some .020 lead free wire to the hook shank starting just in front of the bend of the hook and put about 20 wraps on then helicopter the wire to break it off. Apply some z-ment (or zap a gap) to the wrappings before sliding it up against the cone head – this will help hold the cone against the hook eye. 
  2. Start your thread in right behind the wire weight and clip off your tag end. Take thread wraps forward to further secure the wire wraps (back and forth wraps to cover the weight) then build a thread ramp from the wire weight to the hook shank. 
  3. Now tie in your brassie wire right where you thread is now (back of wire weight) and tie it down to the hook shank and down to the bend of the hook (on the top of the shank). Then bring your thread forward to just behind the wire weight again. 
  4. Clip a 5 to 5 inch piece of sparkle braid from the card and tie it in right where your thread is now and wrap back to the bend (on top of shank) like you did with the brassie wire then wrap your thread forward again to the rear of the cone head. Put a little z-ment on the thread wraps for durability. 
  5. Take the sparkle braid and wrap forward with slightly overlapping wraps and ending at the back of the cone head – tie off and clip the tag end then put a couple more good strong wraps down to secure the braid well.
  6. Clip off a strip of pine squirrel from the hide – grab ahold of the butt end of the strip (part that was attached to the hide – hair going downward) and pull off a small section of the hair to leave a bare hide. Now push the bare hide into the cone head and on the top and tie in with tight wraps and then wrap backward a little. Tug on the back of the strip to stretch it a little then wet your fingers and pet the fur forward to get the moisture in it so it’s more manageable then preen the fur upward. 
  7. Part the fur right above the ribbing wire and start making wraps between clumps of fur to secure the strip all the way up the shank (spiral wrapping) then take several wraps of wire to secure it in place then put several thread wraps down to secure the wire even more. Now helicopter the wire to remove the tag end. Clip the tail the length about a ½ hook length long.
  8. Now using the remaining pine squirrel strip from the tail section pull off a small piece of fur just like you did in the tail piece and tie in right behind the cone head and wrap the thread rearward over the strip just a little then bring your thread forward and up against the cone head. Now start wrapping the hide forward with close wraps and petting the fur rearward as you go (this is your collar). Pack it in tight to the cone head then tie it off. Clip off the tag end of the strip then make 5 or 6 more tight wraps to make sure it’s well seated. Whip finish then clip you thread off and you’re done.

 TIE UP A DOZEN OR TWO – AND GO FISHING*** But remember to practice C.P.R.  (CATCH – PICTURE – RELEASE)


CRACKLEBACK

By Tim Flagler
Originally by Ed Story

fotm june 2017

Translated by CARL WUEBBEN

While we all love spending time at the vise, were always looking for ways to cut down on the number of patterns we tie regularly. ED STORY’s crackleback fits that style of fishing perfectly; part dry fly, part wet fly and part micro-bugger. This easy to tie pattern mimics naturals on the surface, emerging caddis and just looks buggy. It’s a perfect prospecting fly, but match the size to the naturals and you can easily fool actively feeding fish. Use this fly to cover water quickly, fishing it dry until the end of the drift and then swinging it back down below me. Skitter it across the surface like a caddis or give it a slight tug to pop it under the surface and swing it like a soft hackle.

PATTERN

HOOK – Dai-riki #300 #6 or equivalent
THREAD – UTC 70 denier (8/0) rusty brown
BACK – Peacock herl (natural)
HACKLE – Neck furnace hackle was the original but a brown hackle will work
BODY – Cream rabbit fur dubbing


HOW TO TIE

  1. Debarb hook – mount in vise – start your thread in one eyelet from the eye and go rearward three or four wraps and clip off the tag end of the thread.
  2. Now select two peacock herls and tie them in by the tips right in front where your thread is and continue wrapping rearward to the start of the bend, now clip your tag ends of the peacock herl that are at the front of the hook by the eye.
  3. Select a hackle feather but before plucking it out measure it to the hook size with a hackle gauge then pluck it from the neck. Strip off the fuzzy stuff and clip the shank leaving about an eighth of an inch of bare stem. Now take the feather in your hand with the dull or backside is facing you. Now with the feather facing rearward tie the feather in where your thread is now leaving a small amount of bare stem between the thread and peacock fibers . Lay the stem on near side of the hook and take firm thread wraps to hold it in place. Continue wrapping over the stem forward to hold it in place.
  4. Now dub the body with the cream rabbit fur but just a small thin noodle will do about two inches long. Now start wrapping the noodle starting at the hook bend and going forward leave a bit of space to tie in the rest of the materials.
  5. Bring the peacock herl forward and tie off (straight down the middle of the back) clip off the herl tag ends.
  6. Grab your hackle with some hackle plyers and start spiral wrapping forward about five or six turns (the fibers will be facing forward) tie off and clip the tag end of the feather. Form a small thread head – whip finish and clip your thread.


TIE UP A DOZEN OR TWO – AND GO FISHING*** But remember to practice C.P.R. (CATCH – PICTURE – RELEASE)