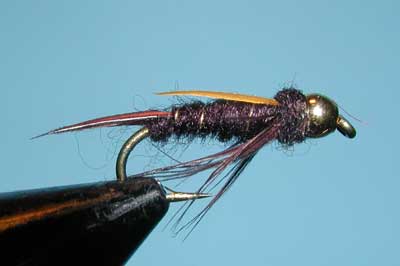
CDC-Enhanced Poor Man’s Copper John

FOTM March 2023

SCOTT HANSON
Translated by CARL WUEBBEN


If you’re a fan of John Barr’s Copper John series of flies but don’t like tying them, then here’s a simple one to make.  The CDC-enhanced Poor Man’s Copper John.  You can use a lot of different colored wire for the abdomen and Cul de canard (CDC).  It is a simple addition to a lot of flies, like a Gold-Ribbed Hare’s Ear or Pheasant Tail Nymph. I believe it can really improve a nymph’s fish-catching ability.  CDC-enhanced nymphs will make a positive difference in your fishing.  Fish them during hatches and when there are no hatches going on.  It doesn’t matter what is hatching, they work equally well during Mayfly, Caddisfly and even Midge hatches.  And the best thing about using CDC on nymphs is that it doesn’t matter how slimy the feathers get when you catch fish because it’s just going right back under the surface on the next cast.   So no need to “de-slime”.

PATTERN

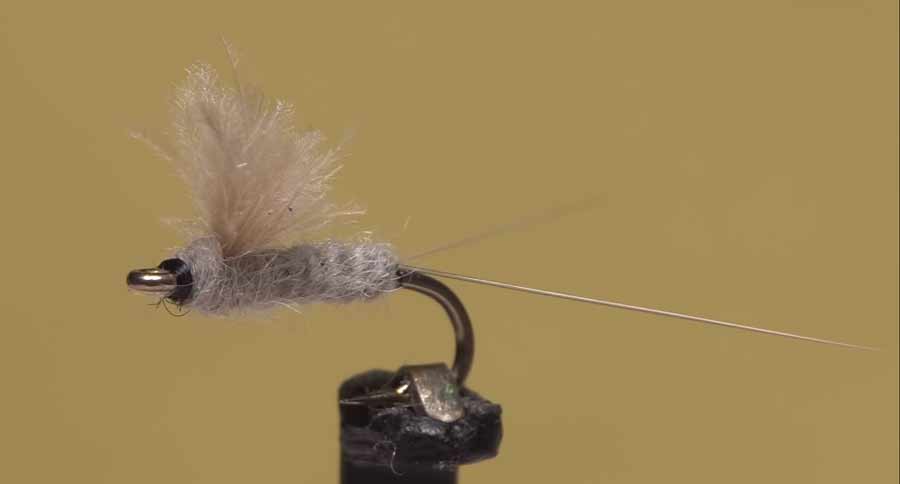
HOOK –
Your favorite 1X-long nymph hook, sizes 18 to 10
BEAD – Copper bead
THREAD – 8/0 (70 denier), color to match the abdomen
TAIL – Pheasant Tail fibers
ABDOMEN – Small of medium wire: copper, gold, red, wine, chartreuse or your favorite color
HACKLE – Natural Dun CDC feather
THORAX – Olive-brown or peacock-ice dub

HOW TO TIE

  1. Debarb hook. Slip the bead on small hole first, place hook in vice and start your thread behind the beadhead up by the eyelet. Grab 6 to 10 pheasant tail fibers for the tail and measure out your tail to about a hook shank length hanging out the back and use the rest to tie down on the hook shank with your thread. End your thread at the beadhead.
  2. Tie on a piece of wire for the abdomen: tie it on right behind the bead and then wrap your thread over it back to the tail. Keep the wire along one side of the hook shank to ensure a flat body. Bring your thread back up to the beadhead. 
  3. Wrap the wire up the hook shank with very close wraps (try for no gap between the wire). Take it to the beadhead and tie off. Then helicopter the tag end of wire off.
  4. Tie on a CDC feather by the rear of the beadhead. Clip off your tag end and then wrap the CDC feather to form a sparse collar. Tie off and clip your tag end.
  5. Dub a small thorax by twisting the dubbing between your index finger and your thumb. Then wrap onto the hook behind the beadhead, this will push your CDC rearward. Whip finish and clip your thread.

    A very simple and effective fly!
   
****REMEMBER TO PRACTICE C.P.R. CATCH – PICTURE – RELEASE AND KEEP THEM WET

RS2 Adams February 2023

fotm 1 february 2023

Translated by Carl Wuebben
TIM FLAGLER (www.flytyer.com) 

Rim Chung created the pattern we call the RS2 in the 1970’s, and since then this fly has developed an extremely loyal following. I believe the main reason for its popularity is that regardless of conditions, place, or time of year, it almost always catches fish. Try tying it in smaller hooks like a size 28 or 30. Tim developed his own technique for creating a nicely segmented abdomen similar to Mr. Chang’s. He also ties on the microfibbet tails a little differently, but for the most part he stays fairly true to the original pattern. The RS2 is a very adaptable fly. You can create incredible variations by switching materials for the tail, body, and wing. If you haven’t tied or fished the RS2, you’re missing out.

PATTERN

HOOK – Lightning Strike DF3 or an equivalent regular dry fly hook, size #20
THREAD – Black 12/0 gel spun.
TAIL – Medium gray Microfibbets.
ABDOMEN – Adams gray beaver dubbing.
WING – Natural dun Cul De Canard puff feather.
THORAX – Adams grey beaver dubbing.

HOW TO TIE
  1. De-barb the hook (if you want) and mount in the vice. Start your thread in on the hook about 2 eyelets space from the eye of the hook and clip your tag end off. Make a smooth thread base ending just before the bend of the hook. Next, tie the Microfibbet tail to the top of the hook shank at the rear where your thread is now; the tails should be about equal to the length of the shank.
  2. Take a small piece of doubled over thread to form a small loop and put the loop end under the hook shank then bring it rearward up against the bend of the hook and under the tail area; the loop should be on the bend of the shank below the Microfibbets. Bring the loop of thread up by its ends from under the end of the hook shank (loop will stay in at the hook bend) and in-between the tails then lightly pull the ends of the loop up and forward to split the tail fibers. Tie the loop ends to the top of the hook shank and clip any excess.
  3. Spin a pinch of dubbing on the thread to form a small noodle about two inches should do. Put one wrap on the body right at the base of the tail. Make sure to get a full wrap of dubbing around the shank. Now hold one finger on the thread where the dubbing ends on the thread then bring your thread up to the fly at where you started your thread in step one and tie it off then clip the side of the thread the noodle is on but keep ahold on the noodle end and put your hackle plyers on the noodle end and using a dubbing spinner attach it to the hackle plyers and spin it clockwise to form a tight noodle. Spin it tight this will help create a nicely tapered body. Now remove the twister tool and use the hackle plyers to wrap the noodle up the hook to create the abdomen of the fly. End it where your thread is now, tie it off and clip off any excess dubbing next to the shank.
  4. Tie on a Cul De Canard puff or other suitable material for the wing right where your thread is now with the tips facing forward then secure firmly and clip tag ends off and put a wrap or two of thread in front of the wing to keep it upward then bring your thread behind the wing.
  5. Spin another, smaller pinch of dubbing on your thread; but there’s no need to spin this tight like the other noodle (just spin with your fingers only). Wrap the noodle around the base of the wing (figure eight) front and rear to form the thorax but don’t crowd the head, whip finish and clip the thread off.
  6. Using your fingers, hold up the Cul De Canard wing and clip it off at an angle. It should be about a hook gape in size.

****REMEMBER TO PRACTICE C.P.R. CATCH – PICTURE – RELEASE AND KEEP THEM WET

Sierra Bright Dot

fotm 1 jan 2023

Translated by CARL WUEBBEN
UNKNOWN – from website, stevenojai.tropod.com


The Sierra Bright Dot is a Fore and Aft pattern. The pattern has been used primarily on the eastside of the Southern sierra for many years going back to the 1950’s.It has remained popular as an attractor pattern yet has not extended its popularity beyond the Sierra. The Fore and Aft pattern goes back to the early 1900’s as its origins have been disputed between the French and the English. Jean-Paul Puguegnot’s book, French fishing flies, cites a doctor Juge who created Fore and Aft patterns in 1918. His Taquine pattern consists of a red thread body with grey hackles. Horace Brown of England also laid claim to designing Fore and Aft flies in the 1930’s. Either way, the pattern eventually made its way to the Sierra Nevada and became a major pattern for the region. Trent Pridemore wrote about the Sierra Bright Dot in his article “Trout Flies Unique to California” (California Fly Fisher July/August 2008). He indicates that the “Bright” of Bright Dot is in honor of Dorothy Bright, the wife of a mine owner at Convict Lake, also known as Monte Diablo Lake at the time. The Bright’s owned the mining village while it was attacked by 6 escaped prisoners in 1871. This episode led to the name change of the lake. It is unknown who originated the Sierra Bright Dot pattern but it has been a preferred pattern for high elevation lakes and streams of the Sierra, particularly good with Golden Trout. 

PATTERN

HOOK – TMC 100 #14-18
THREAD – Danville Black 6/0 (140 denier)
BODY – Red floss
TAIL – Golden Pheasant Tippets
HACKLE – Grizzly

HOW TO TIE
  1. Start your thread in at about mid shank then attach 10-15 Golden Pheasant Tippets at the bend of the hook for a tail. Even the tippets so that the markings align. The tail length should be equal to the shank length. Wrap the tags of the tippets up to the ¾ position and clip off the rest.  
  2. Tie in a grizzly hackle with the fibers about a gap and a ¼ to 1 ½ long by its butt end but don’t forget to remove the fluff then wrap 4-5 turns forward with close wraps, secure and trim the tag end.   
  3. Clip 2 strands of red floss and position it in at about three eyelets from the eye and wrap the floss back to the hackle and forward again to where you started tying in your floss. Try to maintain an even layer of floss. Secure and clip off the tag end.  
  4. Tie in another grizzly hackle that has about 2 gaps long fibers /remove the fluff and tie in by the butt end right where your thread is now, clip off tag end and your thread and hackle should be a little bit into the floss.
  5. Bring your thread forward to just behind the eyelet, wrap the hackle forward with close wraps 4 or 5 will do, secure and clip the tag end, whip finish and you’re done. You can put a very small drop of head cement if you want.
 
       ** This has been a hot fly last year around Bishop and mammoth area so tie up plenty ** 
     TIE UP A DOZEN OR TWO – AND GO FISHING*** But remember to practice          C.P.R.      =CATCH – PICTURE – RELEASE=            KEEP THEM WET                                 

Stewarts Black Spider
fotm november 2022 2     fotm november 2022

Translated by Carl Wuebben
W.C Stewart – Originator
Dave Hughes Version

One of the first deliberately minimalist wet flies was William c. Stewart’s Black Spider. He was a Scottish lawyer and soft hackle aficionado. He published a book in 1857 called the practical angler, or, the art of trout fishing. Stewart had little interest in making flies pretty for his own enjoyment. His interest was catching fish, and he knew that a simple fly, properly presented, would do the trick. This fly is so simple, it’s probably hard to tie one wrong. Although this pattern calls for brown thread you can also use black as in one of the photos.

PATTERN
HOOK – #12 - #16 Daiichi 1550 or any standard wet fly hook.
THREAD – Brown 70 denier (8/0). You can use black also
HACKLE – Starling


HOW TO TIE
  1. Debarb hook - mount in vise then start your thread in one eyelet space behind the eye and wrap close thread wraps to mid-shank and back to the starting point.
  2. Strip the fuzz from a starling feather; lay it on the hook shank with the concave side facing up. Tie it in by the butt with the tip extending past the hook eye. Bind it down with close touching turns and snip the excess stem. Return the thread to the mid-shank area.
  3. Grab your hackle pliers and grab ahold of the starling feather (by the stem butt) but be gentle – starling stems are fragile. Now take three to five wraps of the feather backward toward mid-shank. Tie off the tip with the thread and snip off the excess.
  4. Carefully wind the thread forward through the hackle, back to the eye, zig – zagging it to avoid binding down any feather barbs. Make a small head and tie off with a whip finish. Clip your thread and you’re done.


TIE UP A DOZEN OR TWO – AND GO FISHING*** But remember to practice C.P.R. (CATCH – PICTURE – RELEASE)

Harts Dark Lord
Ron Hart / FLYFISHINGTHESIERRA.COM

fotm october 2022

Translated by Carl Wuebben

This nymph, a variation of the Prince nymph, was created by a MT. Shasta guide, Ron Hart in 1986. It became quite popular within the northern sierra during the mid-1990’s and the popularity of this nymph seems to be growing as yet. The Dark Lord tries to imitate the natural nymphs by utilizing darker colors yet still retains the contrast of the wings to the body – the same character that makes the Prince Nymph quite effective as an attractor nymph. The wings are a ginger color which imitates the naturals and contrasts well against the black body. The gold wire ribbing offers a segmented appearance. The black hen hackle fibers are tied in small bundles downward on each side of the thorax to give the appearance of legs. Ron’s original pattern uses stiffer neck hackle fiber extending to the base of the tail for the legs. Some variations of this pattern will apply the legs by wrapping a neck hackle twice, trimming off the upper fibers.


PATTERN
HOOK –
TMC 3761 or equivalent in sizes #12 - #16
THREAD – Danville black 6/0 or equivalent
BEAD – Gold bead
WEIGHT –
Lead or non – lead (diameter of hook shank)
TAIL – Brown goose biots
RIB – Gold wire
BODY – Black rabbit dubbing
COLLAR – Black rabbit dubbing
LEGS – Black hen cape hackle fibers
WING – Amber goose biots


HOW TO TIE

  1. Debarb hook – slide the gold bead onto the hook with the small hole first then move it up against the eyelet and mount in the vise. Attach three wraps of lead or non lead wire on the hook shank and slide it up into the bead hole.
  2. Start your thread in behind the bead and lay down a thread base to just above the hook barb area. Make a small dubbing noodle by twisting some black rabbit dubbing between your thumb and index finger (just a little) and wrap the noodle to form a small butt to help split the tail biots (this keeps the tail spread out).
  3. Select two brown biots and tie them in tips rearward just in front of the butt dubbing by doing one at a time and crossing over the shank top and in the front of the butt dubbing to give you a “X”. The tail should be about half the hook shank out the rear. Now clip off the butt ends of the biots and wrap forward to about midshank.
  4. Grab a hunk of gold wire for the ribbing and tie it in on the side near of you and with your thread wrap the wire down rearward to the dubbing butt. If any of the wire tag ends you can’t wrap over just clip it off. Leave the wire hanging rearward for now.
  5. Make another dubbing noodle (but larger) with the black rabbit dubbing and wrap it forward making a tapered body almost to the bead leaving a small space for anchoring the wings and legs.
  6. Wrap the ribbing forward about 4 – 5 wraps and secure it just behind the bead. Clip the wire tag end off.
  7. Pull two bundles of hen hackle fibers from a feather and attach to one side of the fly behind the bead. Now do the same for the other side. The fibers should not extend beyond the bend of the hook and should sweep rearwards in a downward position by putting some thread wraps over the fibers to help brush them rearward. Clip any tag ends off.
  8. Attach each ginger biot behind the bead criss crossing like the tail and with a downward curve and the split angle being about the same as the tail. Clip the wing biot tag ends off and put some wraps on to secure the wings.
  9. Make another small dubbing noodle with the black rabbit dubbing and wrap a collar behind the bead then whip finish and clip your thread.

TIE UP A DOZEN OR TWO – AND GO FISHING*** But remember to practice C.P.R. (CATCH – PICTURE – RELEASE)


Klod Hopper

Paul Stimpson

6 grand hopper taped feather

Translated by Carl Wuebben

Its hopper season again and grasshoppers and crickets often fall or are blown into the water by summer winds and are taken with enough regularity that trout become eager for their imitations. On hot days, a hopper or cricket dressing fished on a meadow stream or near the shoreline of a big river can cause an instant detonation, even when just a few naturals are around. Hoppers and crickets have approximately the same body build. A dressing style that works for one can be tied in a different color to match the other. The KLOD HOPPER is tied in a tan color not your traditional yellow or olive. The red grizzly legs seem to be the key to this fly’s success. So try this one for yourself on selective fish, I’m sure you’ll be pleasantly surprised.

PATTERN

HOOK – Dry fly, 2x long, size #12 - #6
THREAD – Brown 6/0, Flat waxed nylon
BODY – Tan, closed-cell foam (1/8 inch – 3mm)
OVERBODY –
Brown dubbing (I used super fine)WING – Elk hair or fine white tail deer hair
HACKLE – Brown dry fly saddle
THORAX – Tan, closed –cell foam (1/8 inch -3mm)
LEGS –
Red, grizzly legs


HOW TO TIE

  1. Debarb hook – mount in vise – start your thread in at the rear of the hook (just before the bend of the hook) – cut a piece of 1/8 inch (3mm) tan closed – cell foam into a strip about 2 inches long and as wide as the gape of the hook. Trim one end to a point. Lay down a thread base to the front. Tie in the strip of foam just behind the eye on top of the hook (this is the front of your thorax) and the pointed end coming off the bend of the hook and hanging just a little bit longer than a hook gape from the bend of the hook. Leave a ½ inch or more extending over the eye. Pull the foam forward and bring your thread behind the foam and wrap a few wraps rearward (about 5or6 eyelets from the eye) then bring the foam back down onto the top of the hook shank and secure the foam again (this is the back of your thorax). Now with evenly spaced spiral wraps, move the thread over the foam to the back of the hook (loosely). Now go forward to the spot you started the spiral wrapping again evenly spaced and not too tight. Even though we are going to cover this part of the fly with dubbing in a following step, do not wrap the foam down with any more turns of thread, we want the foam to retain as much of its shape to help the fly float. Now cross over the entire bottom of the fly to the rear of the hook shank where you started your thread.  Put a little ZAP-A-GAP on the bottom thread wraps and let it seep some onto the foam, this will keep things from moving but let it dry before the next step.      
  2. Prepare and measure a rooster hackle with the barbs length the same as the width of the gape of the hook. Tie in at the rear of the hook (where your thread is now). Dub the body by placing a small piece of dubbing (I used super fine) up against the thread ( you can use dubbing wax if you want) and twisting it between your thumb and index finger in a clockwise direction, then wrap it onto the body and add more and wrap as needed and end it behind the thorax.  
  3. Palmer (spiral wrap) the hackle forward and tie off behind the thorax. Clip your tag end off (extra hackle stem). 
  4. Clean a stack of elk hair with a hair brush about the thickness of a large wooden match stick then put them in a hair stacker (tips first) and tap the stacker bottom on the table 2 or 3 times to even up the tips and then remove them by the tips. Now tie them in on top of the hook shank by the butts right behind the thorax with the length just a little bit smaller than the rear body (don’t go past the rear pointed foam end). Make a thick thread wrap right behind the thorax to secure the wing and give it a spot to secure the legs.  Clip off the tag ends of the elk hair (The butts).   
  5. Secure one leg on each side by the rear of the thorax and make a couple wraps to hold them in place and spread your front leg forward and your rear leg backward. The rear legs should be longer.     
  6. Pull the front foam back over the front part of the fly to form a bulky, hopper head then clip off the extra foam. Now whip finish it and trim the legs to size and you’re done.      
  7.  

TIE UP A DOZEN OR TWO – AND GO FISHING*** But remember to practice C.P.R. (CATCH – PICTURE – RELEASE)