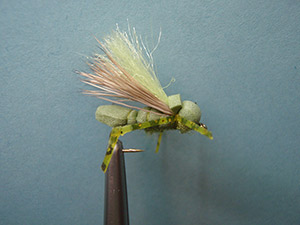
JR X HOPPER (OLIVE)
SCOTT SANCHEZ
Trout anglers love hopper season. The fishing can be really good, and seeing trout crush big surface patterns is a genuine thrill. Big hoppers, however, are not always the best option. In reality, not all natural grasshoppers are big, and circumstances often prohibit the bigger varieties from reaching maximum size. Further, pressured fish that see a lot of large hopper flies seem to respond better to the abbreviated patterns. Sizes range from minute quarter-inch specimens to enormous three-inchers, and their sizes are the result of multiple factors. Foremost their sizes depend on their species. The length of the growing season is the most important secondary influence. The longer they have to grow, the bigger they become. But adverse spring latitude can contribute to short growing seasons and a preponderance of diminutive hoppers. It pays to keep small hoppers in your fly box, especially in areas of short growing seasons. The JR X HOPPER’s material list is short and readily available, and the technique simple. The pattern floats well and is easy to track.
PATTERN
HOOK – Dai-Riki 320. Standard dry fly, sizes # 10 - # 16.
THREAD – Light olive, 8/0 (or 70 Denier).
UNDER BODY – Light olive antron dubbing.
BODY AND HEAD – Olive 2-millimeter foam.
WING- Dark elk hair.
OVER WING- Chartreuse polypropylene
LEGS – medium black- barred chartreuse rubber legs on sizes # 10 and #12, small on sizes # 14 and # 16. Glue a joint for the hind leg.
NOTE – This hopper can be tied in many colors. Tan, Cream, Brown, Chartreuse, and Rust are all good options as well as a black cricket. To further simplify leave out the rear leg joint.
HOW TO TIE
- Debarb hook – Mount the hook in the vise - start the thread a couple of eyelets from the eye. Then coat the hook with some ZAP-A-GAP or super glue and make a thread base all the way back to just before the bend of the hook. (This helps the foam from twisting). Make a dubbing loop with the thread, and secure it at the rear of the hook shank. Place the loop to the rear of the hook in a material clip and we will use this later on.
- Put some Antron Dubbing onto your thread then wrap forward and tie it off where you started your thread , then spiral wrap your thread back to the rear of the hook shank.
- Round the back of a gap-wide strip of foam, and secure it to the hook shank just above the barb of the hook. The foam butt should extend past the bend of the hook just a little.
- Put some more dubbing onto the thread then pull the foam back and dub in front of the foam strip up to two eyelets from the eye (don’t crowd the head). Pull the foam strip forward and secure it to the front quarter of the hook shank, this will be your thorax. Leave the front end of the foam for the head.
- Use the dubbing loop from step 1 to rib over the foam body and dubbing underbody, but not too tight, just a little tension will do. This will take only two or three wraps on small flies. Secure the rib with the thread and clip the tag end off.
- Clean and stack a bundle of dark elk hair and tie it in on top of the foam to make the wing. The tips should extend about a hook gap length past the round foam end and not hang over the sides of the foam. Clip off butt ends.
- Tie in a bundle of polypropylene fibers over the elk, the tips should be even with the elk hair. Clip the tag ends off. If you need to you can fluff the poly fiber with your hair comb.
- Bring your thread forward to two eyelets from the eye then lightly dub over the butts of the wing with a slight taper toward the eye. Now with your thread at just in front of the tie in point of the wing, pull the foam back to make a bullet head and secure with just a couple wraps. Clip off any excess foam (Straight cut).
- Tie in a rubber leg on both sides of the head (Where your thread is now) to make a set of X-shaped legs. Whip-finish, clip thread and cement.
*Glue a rear rubber leg joint to the rear legs. Cut two small pieces of rubber leg material and use some ZAP-A-GAP to glue it to each end of the rear legs at an angle (down and rearward) on the outer part of the leg. Trim the joint clean when dry.
*** But remember to practice C.P.R. (CATCH – PICTURE – RELEASE).