Meat Whistle
John Barr

fotm feb 2019

Translated by Carl Wuebben

CHARLIE CRAVEN (www.charliesflyboxinc.com)

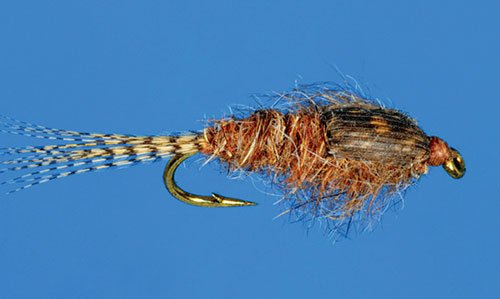
This is John Barr’s Meat Whistle a pattern he developed for bass fishing in Colorado to replicate the pig n’ jig used by conventional tackle anglers. John is one incredibly creative guy and coupled marabou and rabbit strips with a Gamakatsu jig hook to craft a fly rod worthy comparison. In the time since John hatched the Meat Whistle concept he, and the rest of the world, have found that this pattern is equally effective on trout in both still and moving water. While a great imitation of a crayfish, the Meat Whistle can be tied in a variety of colors and sizes to imitate small baitfish as well. The unique jig hook application makes for a pattern that can be stripped quickly or hopped and dropped much more slowly. It seems to me that the key to fishing this fly is to keep it slow. Tie a few of these up and try them- they work, just remember … slow is better!

PATTERN

HOOKS – Gamakatsu 90 degree jig hook # 1/0
CONE – Large tungsten copper cone
THREAD – UTC 140 denier (6/0), rusty brown
RIBBING – Brassie sized UTC Ultra wire, copper brown
BODY – Copper sparkle braid
WING – Rusty brown rabbit strip
LEGS – Pumpkin barred sili legs
FLASH –Copper flashabou
COLLER –Brown marabou
 

HOW TO TIE

  1. Place the cone on the hook and place the hook in the vise with the point down. Start your thread in at about a quarter shank length back from the back edge of the cone and wrap a smooth thread base to the bend of the hook. Return the thread back to the starting point keeping close smooth wraps
  2. Tie in the copper braid and wire at the same time at the back of the cone (facing rearward) and wrap back over the braid and wire to the bend of the hook. Return the thread to the front again.
  3. Wrap the braid only forward from the bend creating a slender body. Tie off the braid and clip the tag end off.
  4. Remove the hook and turn it upside down and place it back in the vise.
  5. Clip a hunk of rabbit hide a little bit longer than 2 hook lengths then pierce the strip with the hook point right in the center of the strip. Make sure there is enough length for the strip to reach from the bend to the front of the hook. Pull the hook through the hide and slide the strip down to the base of the body at the rear of the hook. This entails removing the hook from the vise to butt the strip up to the back of the body then remounting it again the same way (point up).
  6. Tie the front end of the rabbit strip down tightly at the front edge of the body (2 eyelets space behind the cone). Be careful not to build up too much bulk here. Clip the excess rabbit strip and cover the butt end with a smooth thread base. Using the end of the wire like a needle, thread the tip of the wire through the rabbit strip and holding the hide down to the hook shank only, this keeps from binding down the rabbit hair like a Matuka style wing. Continue ribbing the wire forward at evenly spaced intervals through the wing/body assembly. Once at the front of the body, wrap the wire around the shank two times and tie off with the thread. Clip the excess wire flush.
  7. Turn the hook over in the vise once again. Be careful as the hook point is very sharp (use a #2 pencil eraser to cover the hook point) now wet your fingers and pet the rabbit hair rearward to get it out of the way.
  8. Double over two strands of sili-legs onto your thread and tie them in over the shank at the front edge of the body (behind the cone and on top with the rabbit strip) with a few thread wraps and keeping them off to the side, butt on the top (2 on each topside) you should now have two legs on each side of the fly. Place the long ends of the sili-legs into your material spring to keep them out of the way.
  9. Cut a small clump of flashabou from the hank and tie it in behind the cone at the center of its length. The flash should extend about a half-inch past the hook bend. Work the flash all the way around the shank with your finger so it is evenly distributed 360 degrees around the shank. Push back the long ends toward the rear of the hook and bind all the flash in place with several tight turns to keep them in place.
  10. Select and measure a marabou feather so the tips reach back just past the bend of the hook. Tie the marabou feather down at the back edge of the cone on top of the hook shank. Try to spread the feather out so it encompasses the top half of the shank. Do not cut the butt end of the marabou yet. Invert the hook and tie in another marabou feather on the bottom of the shank equaling the length of the first. Clip the butt ends of the marabou as close to the shank as possible. It is imperative to keep a clean tie down here to eliminate bulk. Cover the butt ends with a few tight, smooth wraps of thread. Now whip finish and clip off the thread and put a little head cement on the thread wraps.
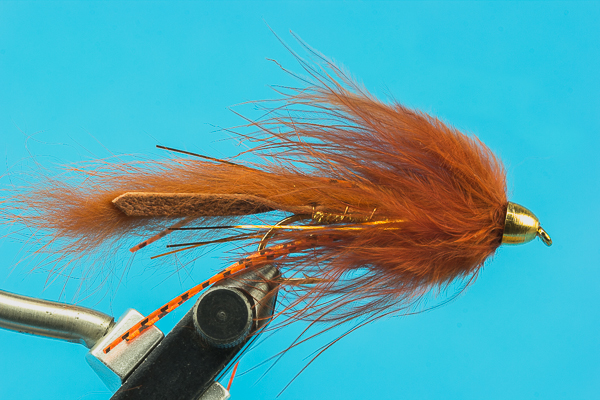
  11. Shove the cone back up against the butt ends of the marabou collar as tightly as possible then retie in your thread in at the front of the cone and build up a tapered thread base matching the taper of the front of the cone. Whip finish and clip the thread, add a drop of five-minute epoxy or clear cure goo (UV glue) on the thread wraps at the front of the cone. Coat all the thread wraps as well as the whole cone with a light, thin layer of epoxy to protect it from coming undone.

TIE UP A DOZEN OR TWO – AND GO FISHING*** But remember to practice C.P.R. (CATCH – PICTURE – RELEASE)

Sierra Bright Dot
UNKNOWN – from website, stevenojai.tropod.com

fotm january 2019

Translated by Carl Wuebben

 The Sierra Bright Dot is a Fore and Aft pattern. The pattern has been used primarily on the eastside of the Southern sierra for many years going back to the 1950’s.It has remained popular as an attractor pattern yet has not extended its popularity beyond the Sierra. The Fore and Aft pattern goes back to the early 1900’s as its origins have been disputed between the French and the English. Jean-Paul Puguegnot’s book, French fishing flies, cites a doctor Juge who created Fore and Aft patterns in 1918. His Taquine pattern consists of a red thread body with grey hackles. Horace Brown of England also laid claim to designing Fore and Aft flies in the 1930’s. Either way, the pattern eventually made its way to the Sierra Nevada and became a major pattern for the region. Trent Pridemore wrote about the Sierra Bright Dot in his article “Trout Flies Unique to California” (California Fly Fisher July/August 2008). He indicates that the “Bright” of Bright Dot is in honor of Dorothy Bright, the wife of a mine owner at Convict Lake, also known as Monte Diablo Lake at the time. The Bright’s owned the mining village while it was attacked by 6 escaped prisoners in 1871. This episode led to the name change of the lake. It is unknown who originated the Sierra Bright Dot pattern but it has been a preferred pattern for high elevation lakes and streams of the Sierra, particularly good with Golden Trout.

PATTERN

THREAD – Danville Black 6/0 (140 denier)
BODY – Red floss
TAIL – Golden Pheasant Tippets
HACKLE – Grizzly


HOW TO TIE

  1. Start your thread in at about mid shank then attach 10-15 Golden Pheasant Tippets at the bend of the hook for a tail. Even the tippets so that the markings align. The tail length should be equal to the shank length. Wrap the tags of the tippets up to the ¾ position and clip off the rest.
  2. Tie in a grizzly hackle with the fibers about a gap and a ¼ to 1 ½ long by its butt end but don’t forget to remove the fluff then wrap 4-5 turns forward with close wraps, secure and trim the tag end.
  3. Clip 2 strands of red floss and position it in at about three eyelets from the eye and wrap the floss back to the hackle and forward again to where you started tying in your floss. Try to maintain an even layer of floss. Secure and clip off the tag end.
  4. Tie in another grizzly hackle that has about 2 gaps long fibers /remove the fluff and tie in by the butt end right where your thread is now, clip off tag end and your thread and hackle should be a little bit into the floss.
  5. Bring your thread forward to just behind the eyelet, wrap the hackle forward with close wraps 4 or 5 will do, secure and clip the tag end, whip finish and you’re done. You can put a very small drop of head cement if you want.

TIE UP A DOZEN OR TWO – AND GO FISHING*** But remember to practice C.P.R. (CATCH – PICTURE – RELEASE)

Son of Conehead
By Scott Sanchez

fotm october 2018

Translated by Carl Wuebben


In some situations, the biggest fly in your box is not the best, and the smallest might be the most appetizing.

Case in point is a fish’s disposition when it comes to food selectivity. It’s one of those facets that I have to admit I don’t consider often when I’m on the water. Sure, there are plenty of productive chuck-and-chance fly patterns out there, and a few work with dependable regularity. Fish can be opportunistic omnivores, and yet at other times, prefer something specific that replicates bait; size, shape, color or action (or a mix of all four). This becomes critical to success. Figuring out the trigger can be one of the most enjoyable aspects of fishing. Learning through experience what works and what doesn’t is a rewarding endeavor that far too many anglers don’t take the chance to encounter.

PATTERN

HOOK – DAI-RIKI 930 or Mustad 34007, size 2 to 8, bent to a bend back shape
THREAD – Red size 6/0 (140 denier)
HEAD – Nickel 3/16 to 1/4 inch conehead with recessed eyes
WING – White Bucktail, Glow-in-the-Dark Flashabou, Pearl Crystal Flash, Tan Bucktail
EYES – Orange 2mm adhesive eyes stuck into the eye bores on conehead
GLUE – Cyanoacrylate (Zap-a-Gap or Super Glue)

HOW TO TIE

  1. Bend the hook shank in the opposite direction of the hook gap about one-third of the length back from the hook eye. Then slip the cone on the hook and mount in your vise upside down.
  2. Keep the conehead toward the back of the hook and then add a little bit of Zap-a-Gap on the hook shank from the eye to where the hook was bent (about midshank). Start your thread in behind the eye and working rearward make a nice tight thread base to where you bent the hook, and back to the eyelet.
  3. Slip the cone forward to make sure it fits snugly over the thread base. When it does, make a small head in front of the cone, whip-finish, cut the thread and apply some Zap-a-Gap to the small thread head.
  4. Reattach the thread to the hook shank behind the cone.
  5. Add a sparse wing of bucktail and flash behind the cone. Then whip finish and cut the thread, add some head cement to the thread and base of the wing. (Length of wing should be almost 1 1/2 the hook size.)
  6. Adhere the adhesive eyes in the eye sockets of the conehead.

TIE UP A DOZEN OR TWO – AND GO FISHING*** But remember to practice C.P.R. (CATCH – PICTURE – RELEASE)

Charlie Boy Hopper
By Charlie Craven

fotm august 2018

Translated by Carl Wuebben


Charlie developed this pattern after a day with his clients as they went thru a lot of Dave’s hoppers and he figured there had to be a better option. While Dave’s fly works fine, it becomes waterlogged after a couple fish and is a pain to tie. The Charlie boy hopper (named after his son) meets all of the requirements in a hopper pattern: active rubber legs, incredible durability, realistic silhouette, good visibility, and great floatation. The best part is it is especially easy to tie. The standard tan color seems to be the most common color of the naturals, as well as in yellow, green, olive and even blue/green. The blue/green (with red rubber legs) matches the hoppers found in the mountain streams in Colorado. The Charlie boy hopper also works great as an indicator dry with a dropper. Its high visibility and superior floatation make it a natural for this application.

PATTERN

HOOK – Tiemco 100sp-bl #8 -#10 or TMC 5212 or TMC 5262 #4 - #8. He uses the 2XL TMC 5212 & 5262 for larger sized hoppers and has recently switched the smaller Charlie boy hoppers over to the standard length, wide gaped TMC 100sp-bl to improve the hook gap while still making a smaller sized hopper. The normal length of the size #8 100sp-bl is the same as the 5212 in a size #12, but with a much bigger hook gape. In smaller sizes the narrower gap of the 5212 is filled in by the foam body, where the 100sp-bl leaves plenty of bite.
THREAD – Tan 3/0 monocord (great for the binder strip) 
BODY – 2mm X 2mm piece of foam body (tan or your choice of color)
LEGS – Brown medium round rubber legs
UNDERWING – (optional) mottled tan web wing
WING – Natural deer hair 
OTHER THINGS NEEDED - ZAP-A-GAP and a double edge razor blade

HOW TO TIE

  1. Mount hook in vice, begin by cutting a strip of 2mm foam so it is as wide as the gap of the hook. I use a cutting board, metal straight edge and a razor blade to cut it, as scissors make it much harder to get a clean straight cut. The strip of foam should be at least three inches long.
  2. Remove the hook from the vise and poke the hook point through the foam about ¾ of an inch from the end of the strip. Make sure the hook point is centered in the foam. Now place the hook back in the vise and the smaller end of the foam rearward and centered in the middle of the hook point
  3. Start the 3/0 monocord thread at the eye of the hook and wrap to the bend then back to the hook eye.
  4. Cut another strip of foam from the sheet. This should be about 2mm X 2mm. Tie this thinner “binder” strip of foam to the hook shank immediately behind the hook eye. Spirals wrap back over the foam strip to the bend of the hook and then break off the excess. Run the thread up the hook shank over the binder strip and back again to the bend, compressing the foam to the shank. This binder strip is going to give us some shank diameter and texture to glue to later, so it need not be pretty. Leave the tying thread hanging at the bend of the hook.
  5. Lift the wide strip of foam up under the hook and pull it up to the peak of the hook bend so it touches the back of the binder strip. Note that the foam will tilt slightly upward. If yours doesn’t do this, your binder strip is not bound down far enough back. Pull the foam strip taut under the hook shank and measure where the hook eye lines up with the foam. Poke a hole through the foam from both the top and bottom where the eye lines up you can use a bodkin to do this. Push the foam over the hook eye so the eye protrudes through the front side of the foam.
  6. Put a thin coat of ZAP-A-GAP CA glue on the entire upper surface of the foam, including the hook shank/binder strip. Smear a bit more glue along the foam that extends out past the bend of the hook too. Keep in mind, with CA glue, too little is better than too much.
  7. Quickly, before the glue starts to dry, fold the front end of the foam back over the top of the shank, pinching it together all the way back off the bend of the hook. Try to get the edges of the foam to line up together along the sides of the shank. The top portion of the foam should mirror the original angle of the foam sticking up from the bend of the hook. That is, the foam should be slightly elevated at the rear of the hook, not coming straight out from the bend. Also note that the tying thread is still hanging at the bend of the hook.
  8. Make three tight wraps over the foam right at the bend of the hook. These turns of thread should compress the foam right down to the hook shank. Try to make these wraps as upright as possible and right on top of each other. Cross the thread lightly across the top of the foam body about one fourth of the way forward. Make another upright segment one fourth of the way forward on the hook shank with three more tight turns of thread. Continue forward by crossing on the top of the shank and make two more evenly spaced segments for a total of four bands of thread and three crosses.
  9. You should now have a fly with all the crosses on the top of the fly, and the bottom of the fly will only show a nicely segmented body. Make sure the foam part hanging off the bend of the hook is bent slightly upright …. Otherwise ya gotta start over!
  10. Use a double edge razor blade to make a straight cut through the extended foam (behind the bend)by keeping the blade level with the body , make one straight cut through the foam without sawing back and forth. The double edge blades are sharp and thin and will slice right through the foam with only light pressure. The cut should come straight off the top of the body.
  11. Now, we have the extended portion of the body to clean up a bit. The back end of the fly is now a bit wider than the rest of the fly… so we are going to cut a bit from each side of the fly forming a tapered end to the fly. Don’t try to cut the body to a point, but merely taper it a bit toward the back end. Now as we look at the fly from the top we see the last segment near the hook eye is also a bit wider than the rest of the fly. We are going to use the same razor blade to cut a sliver of foam from each side of the head squaring the head off a bit so it is the same width as the rest of the fly.
  12. Now, your thread should be hanging in the last segment behind the head of the fly now and we are ready for the legs. Take a single two-inch long strand of round rubber leg and tie it in place along the side of the fly in the last segment with a single turn of thread then cross the thread back along the top of the fly into the second segment back. Catch the rubber once again along the side of the hook in this segment with another single turn of thread. Make sure that the rubber leg is centered from top to bottom along the side of the foam body.
  13. For the legs on the far side, we are going to take another single two-inch strand of rubber and attach it in the reverse order of the first one. Lay the rubber along the far side of the shank and catch it with one turn of thread in the second segment. Cross the thread forward on top of the hook back into the first segment. Catch the front end of the far leg with another single turn of thread on the far side of the hook in the joint behind the head. You can see now why a single turn is all that is necessary for each point, as the wraps become cumulative as you go and any more would create unneeded bulk. Trim the back legs so they extend to the end of the foam body. The front legs are cut just slightly shorter than the back legs.
  14. WING TIME – if you’re going to put in a underwing this is the time to do it if not than lets continue cut, clean and stack a generous bunch of deer hair. Measure this clump of hair against the shank so it is equal to about a shank length long. Place the tips of the measured hair into your material hand and cut the butt ends as straight across as you can. You should now have a cut-to-length clump of hair in your material hand with the butt ends sticking out just a bit. Place the clump of hair flat on top of the hook with the butt ends just slightly in front of the thread at the head joint. Place two soft turns of thread over the hair in the head segment. Pull down on the thread slightly to compress and crimp the hair a bit. This will ensure the thread wraps lie right on top of each other.
  15. Place the index finger of your thread hand along the far side of the hook right up against the hair to keep it from rolling. With your finger in place, pull straight down on the thread with your material hand to flare the hair in place. make one smooth pull on the thread and the hair should flare up nicely.
  16. Make a three turn whip finish right through the butt ends of the hair. Cinch the thread down tightly after tying the knot and clip the thread close. No head cement is needed as the CA glue will leach onto the thread from the crease in the foam. Happy accident.
  17. Now, I know eyes on flies like this are just for the fisherman, but when they are this easy, how can you refuse? use a black sharpie marker to make an elongated oval on each side of the head, hoppers eyes are taller than they are wide so don’t just dot them In place.

TIE UP A DOZEN OR TWO – AND GO FISHING*** But remember to practice C.P.R. (CATCH – PICTURE – RELEASE)

Trout Crack
By John Wilson

fotm july 2018

Translated by Carl Wuebben


Freshwater shrimp (AKA scuds) thrive in many types of water, limestone streams and spring creeks, etc. They provide trout with a year-round food source. Scuds are also an important food source in major tailwater rivers. For many years I read about fly fishers using orange colored patterns to imitate dead or spawning scuds. Whether a trout knows an orange scud represents an easy lifeless meal to pick off or that it contains a belly full of extra protein in the form of eggs is anyone’s guess. Both are workable theories. What we know is that trout see orange scuds on a regular basis, especially in specific locations. Scuds are killed when they flush through the dam turbines. They turn orange and their corpses float through the upper reaches of many tailwaters. Bring a small section of orange scuds with you next time you fish near a dam release or any scud kill zone. You may find yourself with a few additional trout to net. The methods of adding orange to scud patterns are endless. Some tyers use all orange, a hint of orange through the entire pattern, orange hot spots in specific locations, or an orange beadhead. The trout crack was created by John Wilson and is called “a guide-style fly”, which means it takes only a couple minutes to tie. Not pretty to look at, but very effective.

PATTERN

HOOK – Tiemco 2457, or similar sizes #14 to #20
THREAD – UTC clear Mono 0.004, optional 12/0 tan
BODY – Tan or olive Antron or Haretron dubbing
SHELL – The original used orange V-rib but can use tan or brown UTC vinyl rib (small) or liquid lace (midge size)
RIBBING – Clear Mono 0.004 or wire. Thread is optional (in tan)
HEAD – Orange thread – gives the impression of a dead or pregnant scud

HOW TO TIE

  1. Debarb hook (optional) - Mount hook in vice, start thread in a little bit behind the eyelet and wrap rearward to just before the bend of the hook. If using wire this is the time to tie it in, if not continue just a little bit into the bend of the hook.
  2. Now tie in the orange V-rib shell with the end facing rearward, then pull the front half backward and advance your thread in front of it. Bring your thread forward to about two eyelets from the eye and dub a small noodle with your fingers or a dubbing twister tool. Then wind the noodle rearward with close wraps but not a thick body and stop up against the shell. Pull off any extra dubbing on the thread.
  3. Pull the shell forward over the top of the body and using the mono thread form the segmentation as you wrap over the top of the V-rib until you get to the front of the dubbing. Then tie off the shell and whip finish and clip the mono off.
  4. On each end of the shell, clip the ends off but leave a small tag-end on each end.
  5. Tie on the orange thread behind the eye and form a small head or hot spot (whatever you want to

TIE UP A DOZEN OR TWO – AND GO FISHING*** But remember to practice C.P.R. (CATCH – PICTURE – RELEASE)

TF’s Hares Ear Clinger Nymph
By Ted Fauceglia

fotm june 2018

Translated by Carl Wuebben


There is some sporadic mayfly activity that needs to be addressed. Lesser members of the heptageniidae family of mayflies hatch throughout the summer and while the adults (light Cahill look- alikes) hatch sporadically, their hatches are sparse and have rarely induced more than an occasional “rise”. There are however, enough heptageniidae nymphs present to warrant a nymph pattern that has annually worked for me as a “searching “fly. Heptageniidae nymphs are known as clingers. Measuring from 12 to 16 millimeters long they have flattened bodies with broad, blunt heads and muscular, spiderlike legs. Their strong legs and three long tails enable them to freely navigate in fast water where they live and flourish. Their colors range from a light to dark mottled tannish red-brown. The hare’s ear nymph is a staple in my nymph collection and easily one of the most productive all-purpose go-to nymphs that I fish. But just in case the trout get a bit selective and fickle, alter the fly just a little and tie up a couple TF’s hares ear clinger nymphs.


PATTERN

HOOK - Tiemco 5262, sizes #12 to #16
THREAD - Camel 8/0 (70 denier) uni-thread
TAILS - Lemon wood duck Brest feather
ABDOMEN - A mixture that’s three parts #4 hareline hare’s ear plus dub and one part rusty brown wapsi SLF (synthetic living fiber) squirrel dubbing
WINGCASE - dark brown wild turkey quill
LEGS - Picked out dubbing on each side of the wing case
HEAD - Camel 8/0 (70 denier) uni thread
TIP - Treat the turkey feather with softtex or other feather treatment before you start tying and let it dry overnight

HOW TO TIE

  1. Debarb hook - Mount hook in vice, start thread in at about mid shank then grab a small bunch of lemon wood duck breast feather fibers (about 12 or so fibers) and tie on top of the hook shank hanging out from the bend of the hook (about ¾ of the hook shank long) just make sure it stays on top by pinching the fibers down on the hook shank as you wrap your thread down to hold it in place
  2. Take your three parts #4 hareline hares ear plus dub and one part rusty brown wapsi SLF (synthetic living fibers) squirrel dubbing and mix together by pulling and putting back together then doing the same till it looks well blended.
  3. Now either twist a dubbing noodle onto the thread or use a dubbing loop with a dubbing loop tool but not too much you can add more as needed then wrap a tapered abdomen small to the rear and fatter at the middle then thin to the front thorax area (old cigar shape). But stop at mid shank first so you can do the next step (you may need to remove any extra dubbing at this time)
  4. Now grab a hunk of dark brown turkey quill (see tip in pattern part) about the width of the thickest part of the dubbed body then remove a few fibers and you should have a wing case just a little bit smaller than halfway over the side. Now with the shiny side facing down (top of feather) and the tips facing to the bend of the hook, tie down the fibers on the bare hook shank then bring your thread back to the mid shank area where you stopped your dubbing and now dub another noodle and wrap it forward toward the eye of the hook ( start the wraps tight up against the rear half of the body so you have no gaps between the two sections) but leaving a space to tie down the turkey fibers and make a head.
  5. Now using your bodkin to help you fold over the turkey fibers (be gentle you don’t want to have the fibers separate from each other) fold it forward and tie off behind the eye of the hook but don’t forget to leave a space for the head. Clip the tag end of the turkey fibers.
  6. Form a small head then whip finish and clip your thread, apply a small dab of head cement to the head then on each side and with your bodkin pick out a few fibers from the dubbing but only on the thorax sides. This will be the legs but be careful to not ruin the wing case or pull out too much.

TIE UP A DOZEN OR TWO – AND GO FISHING*** But remember to practice C.P.R. (CATCH – PICTURE – RELEASE)