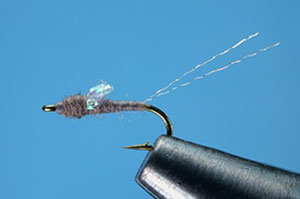
Sparkle Wing RS-2
Charlie Craven

fotm may 2019  

Translated by Carl Wuebben

The ubiquitous RS-2 has gained a bit of flash and sometimes this can make all the difference. Fish this fly as you would a regular RS-2. The sparkle wing RS-2 has become a standard pattern and I think you’ll find this to be a valuable variation to carry in your fly box.

PATTERN

HOOK – TMC 101 # 16-24
THREAD – Gray 8/0 (70 Denier) UNI
TAIL – White Fluoro Fiber
ABDOMEN – Adam’s Gray Superfine Dubbing
WING – Mini Flat Braid, Pearl
THORAX – Adam’s Gray Superfine Dubbing

HOW TO TIE

  1. Debarb hook, mount in vise, start your thread at about two eyelets from the eye then clip off the tag end of the thread.
  2. Tie in a single 4 inch strand of white Fluoro fiber right where your thread is now. Tie it in with only a turn or two of thread and at the center of the Fluoro fiber (one half forward the other rearward.) Don’t move rearward, you just want to capture the material only at the tie-in point. Pull both ends of the Fluoro fiber back along the top of the hook and wrap just slightly back over the bases of the Fluoro fiber to get them laying on top of the hook and pinned back.
  3. Leave the thread hanging just behind where you started your thread then dub the thread (twisting the dubbing between your fingers) with the slimmest amount of gray dubbing you can. We want to keep the body of this fly very slim. Be sure to leave a small portion (an inch or so) of the thread bare between the top edge of the dubbing and the hook shank. We will use this bare thread to work back over the tails to the bend of the hook, tying the tail down, forming a thread base and positioning the start of the dubbing all in one fell swoop!
  4. Hold the tail fibers up and slightly toward you as you wrap the bare section of the thread back to the bend over the top of the tails, keeping the tails centered on top of the shank as you go. The dubbing should not come into play as you wrap back (just the bare thread.) You should be right up to the start of the dubbing when you reach the bend of the hook.
  5. Make the first very thin wrap of dubbing under and behind the tail fibers. This will help lift the tails a bit from the bend of the hook. Pull the dubbed thread forward tightly to butt the dubbed thread up against the back of the tails. Make the next turn of dubbing immediately in front of the base of the tail and then continue wrapping the dubbing forward, up to where you started your thread, in a smooth even layer.
  6. Wrap the dubbing back to the midpoint of the abdomen, building a taper on the front half of the body. The dubbing must be very thin for this to work (just barely cover the thread.) Then make a couple more turns of dubbing over the front third of the abdomen to finish off the taper. You want a nice sharp shoulder at the front of the dubbed abdomen. Wrap the bare thread forward from the front edge of the abdomen to the hook eye and back again, making a thread base for the wing that comes next (taper is small in front and large in rear.)
  7. Cut a 1 inch length of mini flat braid and fold it into a loop. Fold the loop down flat and pinch it against the hook at the front edge of the abdomen. It should be one third the length of the abdomen. Press the thumb of your material hand down on top of the loop to hold it in place while you make a couple firm wraps of thread over the base of the flash loop at the front edge of the abdomen. Clip the wing butts as close as you can behind the hook eye.
  8. Dub the thread with another very thin layer of dubbing and begin wrapping it, with the first turn immediately behind the hook eye. Then dub the thorax from the hook eye to the base of the wing and back again, tapered thin to front and fatter toward the abdomen. Dub another thin dubbing noodle and wrap back to the base of the wing again. You should see a nice taper by now. Bring the noodle forward again to the hook eye, finishing off the thorax shape and ending with bare thread at the very back edge of the hook eye.
  9. Whip finish right behind the eye and clip the thread tag end. Pull the tails forward over the top of the fly and trim them so they are about one and a half shanks long. You can also tie this with a black or olive body. Just change the dubbing color.

TIE UP A DOZEN OR TWO – AND GO FISHING*** But remember to practice C.P.R. (CATCH – PICTURE – RELEASE)

UF Texas Fly Worm
Jorge Garcia

fotm may 2019  

Translated by Carl Wuebben

Bass gobble up worms when presented properly it just seems to be in their DNA to suck up large worms. Conventional anglers use plastic worms from 3” long up to 12” long in some states. This fly is a more durable and weed less it’s a version of the traditional Texas rigged plastic worm. If you want it to go deeper and faster down add more weight in by the eye area also try different colors like black, purple, and white.

PATTERN

HOOK – Worm hook extra wide gap #1/0 or 2/0
THREAD – 6/0 (140 denier) light green/olive or your choice to match the body color. 6/0 (140 denier) red for the head
EYES – Chrome dumbbell with green eyes
BODY – Light green/olive rabbit zonker strip
OTHER – Zap-a-gap or super glue

HOW TO TIE

  1. Mount hook upside down – start your thread in on the hook shank the part which is right behind the eyelet. Clip off tag end.

  2. Tie in dumbbell eyes on the back half of that small shank area and in the area that makes a U shape and not on top of the straight area using figure eight wraps , tie down firmly then add some zap-a-gap to the thread wraps to keep things together (top and bottom). Try moving the hook right side up if this gives you a problem.
  3. With the hide facing downward toward the larger shank area grab your zonker strip and measure it up to the hook with the fur facing toward the rear of the hook. The front part should stick out about a ¼ inch past the eyelet and the rear will be about one hook length past the bend of the hook. While holding your zonker with your left hand hold those measurements and with your right hand stab the zonker (in the middle) thru the hide where it meets the hook point. 
  4. Now bring the zonker flat on top of the small shank, which will be the opposite side of the shank where the eyes are. Push back the fur to allow you to tie in the zonker above the eyes – tie it in with firm wraps and in the front area above the eyes – use some zap-a-gap on the thread wraps – clip off the tag end of zonker even with the front of the eye area so you won’t build up to much in the head area (behind eyes). If you have not already clip off the rear section of the zonker one hook size past the bend of the hook and at the end clip off the corners to form a more rounded look on the hide. Whip finish and clip the thread. 
  5. Take the red thread and tie in at the head area in front of the eyes, clip off the tag end and form a small head from the thread - whip finish and clip off the thread and add some zap-a-gap or UV glue to the head and you’re done.

TIE UP A DOZEN OR TWO – AND GO FISHING*** But remember to practice C.P.R. (CATCH – PICTURE – RELEASE)

Bead Butt Hare's Ear
Kelly Galloup

fotm april 2019 a  fotm april 2019 b

Translated by Carl Wuebben

This particular fly was developed in the 80’s. As opposed to traditional beadhead flies, these flies do not emerge with their heads downward as they come to the surface. Most face upward to the surface with their air bubble. This fly accomplishes this with the bead in the rear. The tail gives it the great movement most fish are looking for in an insect. You can also try this method on other flies as well. Also try one size bigger than actual fly.

PATTERN

HOOK – #16 Tiemco 200R or Diachie 1250 (Deeper Gap) – (photo is a 200r #12)
THREAD – original was 12/0 Brown or Olive (I used 8/0 so it won’t break as easy)
BEAD – Gold to match hook
TAIL – Original muskrat but you can use Ostrich plumes, Marabou or a hare’s ear mask
BODY – Hare’s ear mask (Can use packaged dubbing and works better) Can also try light, dark, or olive hare’s ear packaged dubbing.
LEGS AND WING CASE – Pheasant Tail
RIBBING – Gold wire
OPTIONAL – Ox mono tippet or 15lb mono (if doing 1B way)

HOW TO TIE

  1. A. Put bead on hook with the small hole first. Mount hook in vise and start thread in just before the bend of the hook. With the bead forward and by the bend of the hook, make a small dame of thread just a little bit into the bend of the hook. Check that the bead will not go past it, just snug onto it. Whip finish and clip thread. Put some zap-a-gap on the thread dam and slide your bead up against it. Restart your thread just in front of the bead. Continue to step 2.
    -OR TRY THE NEW STYLE-
    B. This method gives you more of a gap. Mount hook. Start thread in rear by the bend of the hook. Make a thread base about half way forward. With some 0x (15lb) tippet, thread through the bead and double it over so you have one mono strand through the bead and the other on the outside. Tie the bead and mono on with the bead hanging just a little bit off the bend of the hook (On top of hook)and the tippet should be facing forward toward the eye and secured with thread wraps keeping the mono on each side, stop about 1/2 shank. Clip off tag end of the tippet put a little zap-a-gap on the thread wraps. Wrap your thread back to the bead. Continue to step 2.
  2. Grab a hunk of gold wire and tie in on the top with the longer end facing rearward to just about half way up the shank, this will be the ribbing. Bend the front tag end over and secure it with the thread. Then with the thread wraps secure the ribbing down to the rear by the bead. Make sure not to have it too close though. 
  3. Grab your hare’s mask. Clip out a small clump of lighter color hair with the guard hairs and some under fur. Tie it in with the tips facing rearward, secure the tail well (tail is ½ shank length) and coming off the top of the bead. Clip tag ends off and bring your thread close to the tail. Make a dubbing loop by making a large loop downward and putting a dubbing tool in the loop. After that, use the thread to tie off the loop on the hook shank then bring your thread forward (Not the loop). Put the bobbin in the bobbin rest
  4. Pull some hare’s ear fur and guard hairs from the mask, a small 1”hunk will do. Spread it out in between the dubbing loop, and then twist your tool to make a small noodle. Wrap the abdomen (rear body) with the noodle and stop a little past half shank. Tie off and clip off noodle tag end. You should have a small taper (small to the front)
  5. Counter wrap your gold wire ribbing forward 4-5 turns over the abdomen. Tie off, helicopter or clip tag end off. Fluff up the abdomen with a dubbing brush.
  6. Grab your pheasant tail and clip off a small batch with longer fibers about 12 of them. Tie in a little bit behind the eyelet with the tips forward and the butts rearward and the shiny side facing down, about half shank length, not too long this will be your legs. Wrap your thread rearward up against the abdomen. Do not clip off rear butt ends as this will be your wing case.
  7. Clip off some more hare’s ear for the thorax. Make another dubbing loop, spin it, and wrap it forward to the eyelet and legs (pheasant tail tips)continue the taper forward, tie down, clip tag end of loop off.
  8. Split the pheasant tail legs (tips) in half. Tie them down to keep them rearward and to the side with a few thread wraps. Bring the rear pheasant tail fibers forward (on top). This will be your wing case. Tie off in front of the eyelet, clip the tag ends, whip finish, clip the thread and use a dubbing brush to fluff up abdomen and thorax. Apply head cement.

    TIE UP A DOZEN OR TWO – AND GO FISHING*** But remember to practice C.P.R. (CATCH – PICTURE – RELEASE)

Meat Whistle
John Barr

fotm feb 2019

Translated by Carl Wuebben

CHARLIE CRAVEN (www.charliesflyboxinc.com)

This is John Barr’s Meat Whistle a pattern he developed for bass fishing in Colorado to replicate the pig n’ jig used by conventional tackle anglers. John is one incredibly creative guy and coupled marabou and rabbit strips with a Gamakatsu jig hook to craft a fly rod worthy comparison. In the time since John hatched the Meat Whistle concept he, and the rest of the world, have found that this pattern is equally effective on trout in both still and moving water. While a great imitation of a crayfish, the Meat Whistle can be tied in a variety of colors and sizes to imitate small baitfish as well. The unique jig hook application makes for a pattern that can be stripped quickly or hopped and dropped much more slowly. It seems to me that the key to fishing this fly is to keep it slow. Tie a few of these up and try them- they work, just remember … slow is better!

PATTERN

HOOKS – Gamakatsu 90 degree jig hook # 1/0
CONE – Large tungsten copper cone
THREAD – UTC 140 denier (6/0), rusty brown
RIBBING – Brassie sized UTC Ultra wire, copper brown
BODY – Copper sparkle braid
WING – Rusty brown rabbit strip
LEGS – Pumpkin barred sili legs
FLASH –Copper flashabou
COLLER –Brown marabou
 

HOW TO TIE

  1. Place the cone on the hook and place the hook in the vise with the point down. Start your thread in at about a quarter shank length back from the back edge of the cone and wrap a smooth thread base to the bend of the hook. Return the thread back to the starting point keeping close smooth wraps
  2. Tie in the copper braid and wire at the same time at the back of the cone (facing rearward) and wrap back over the braid and wire to the bend of the hook. Return the thread to the front again.
  3. Wrap the braid only forward from the bend creating a slender body. Tie off the braid and clip the tag end off.
  4. Remove the hook and turn it upside down and place it back in the vise.
  5. Clip a hunk of rabbit hide a little bit longer than 2 hook lengths then pierce the strip with the hook point right in the center of the strip. Make sure there is enough length for the strip to reach from the bend to the front of the hook. Pull the hook through the hide and slide the strip down to the base of the body at the rear of the hook. This entails removing the hook from the vise to butt the strip up to the back of the body then remounting it again the same way (point up).
  6. Tie the front end of the rabbit strip down tightly at the front edge of the body (2 eyelets space behind the cone). Be careful not to build up too much bulk here. Clip the excess rabbit strip and cover the butt end with a smooth thread base. Using the end of the wire like a needle, thread the tip of the wire through the rabbit strip and holding the hide down to the hook shank only, this keeps from binding down the rabbit hair like a Matuka style wing. Continue ribbing the wire forward at evenly spaced intervals through the wing/body assembly. Once at the front of the body, wrap the wire around the shank two times and tie off with the thread. Clip the excess wire flush.
  7. Turn the hook over in the vise once again. Be careful as the hook point is very sharp (use a #2 pencil eraser to cover the hook point) now wet your fingers and pet the rabbit hair rearward to get it out of the way.
  8. Double over two strands of sili-legs onto your thread and tie them in over the shank at the front edge of the body (behind the cone and on top with the rabbit strip) with a few thread wraps and keeping them off to the side, butt on the top (2 on each topside) you should now have two legs on each side of the fly. Place the long ends of the sili-legs into your material spring to keep them out of the way.
  9. Cut a small clump of flashabou from the hank and tie it in behind the cone at the center of its length. The flash should extend about a half-inch past the hook bend. Work the flash all the way around the shank with your finger so it is evenly distributed 360 degrees around the shank. Push back the long ends toward the rear of the hook and bind all the flash in place with several tight turns to keep them in place.
  10. Select and measure a marabou feather so the tips reach back just past the bend of the hook. Tie the marabou feather down at the back edge of the cone on top of the hook shank. Try to spread the feather out so it encompasses the top half of the shank. Do not cut the butt end of the marabou yet. Invert the hook and tie in another marabou feather on the bottom of the shank equaling the length of the first. Clip the butt ends of the marabou as close to the shank as possible. It is imperative to keep a clean tie down here to eliminate bulk. Cover the butt ends with a few tight, smooth wraps of thread. Now whip finish and clip off the thread and put a little head cement on the thread wraps.
  11. Shove the cone back up against the butt ends of the marabou collar as tightly as possible then retie in your thread in at the front of the cone and build up a tapered thread base matching the taper of the front of the cone. Whip finish and clip the thread, add a drop of five-minute epoxy or clear cure goo (UV glue) on the thread wraps at the front of the cone. Coat all the thread wraps as well as the whole cone with a light, thin layer of epoxy to protect it from coming undone.

TIE UP A DOZEN OR TWO – AND GO FISHING*** But remember to practice C.P.R. (CATCH – PICTURE – RELEASE)

Sierra Bright Dot
UNKNOWN – from website, stevenojai.tropod.com

fotm january 2019

Translated by Carl Wuebben

 The Sierra Bright Dot is a Fore and Aft pattern. The pattern has been used primarily on the eastside of the Southern sierra for many years going back to the 1950’s.It has remained popular as an attractor pattern yet has not extended its popularity beyond the Sierra. The Fore and Aft pattern goes back to the early 1900’s as its origins have been disputed between the French and the English. Jean-Paul Puguegnot’s book, French fishing flies, cites a doctor Juge who created Fore and Aft patterns in 1918. His Taquine pattern consists of a red thread body with grey hackles. Horace Brown of England also laid claim to designing Fore and Aft flies in the 1930’s. Either way, the pattern eventually made its way to the Sierra Nevada and became a major pattern for the region. Trent Pridemore wrote about the Sierra Bright Dot in his article “Trout Flies Unique to California” (California Fly Fisher July/August 2008). He indicates that the “Bright” of Bright Dot is in honor of Dorothy Bright, the wife of a mine owner at Convict Lake, also known as Monte Diablo Lake at the time. The Bright’s owned the mining village while it was attacked by 6 escaped prisoners in 1871. This episode led to the name change of the lake. It is unknown who originated the Sierra Bright Dot pattern but it has been a preferred pattern for high elevation lakes and streams of the Sierra, particularly good with Golden Trout.

PATTERN

THREAD – Danville Black 6/0 (140 denier)
BODY – Red floss
TAIL – Golden Pheasant Tippets
HACKLE – Grizzly


HOW TO TIE

  1. Start your thread in at about mid shank then attach 10-15 Golden Pheasant Tippets at the bend of the hook for a tail. Even the tippets so that the markings align. The tail length should be equal to the shank length. Wrap the tags of the tippets up to the ¾ position and clip off the rest.
  2. Tie in a grizzly hackle with the fibers about a gap and a ¼ to 1 ½ long by its butt end but don’t forget to remove the fluff then wrap 4-5 turns forward with close wraps, secure and trim the tag end.
  3. Clip 2 strands of red floss and position it in at about three eyelets from the eye and wrap the floss back to the hackle and forward again to where you started tying in your floss. Try to maintain an even layer of floss. Secure and clip off the tag end.
  4. Tie in another grizzly hackle that has about 2 gaps long fibers /remove the fluff and tie in by the butt end right where your thread is now, clip off tag end and your thread and hackle should be a little bit into the floss.
  5. Bring your thread forward to just behind the eyelet, wrap the hackle forward with close wraps 4 or 5 will do, secure and clip the tag end, whip finish and you’re done. You can put a very small drop of head cement if you want.

TIE UP A DOZEN OR TWO – AND GO FISHING*** But remember to practice C.P.R. (CATCH – PICTURE – RELEASE)

Son of Conehead
By Scott Sanchez

fotm october 2018

Translated by Carl Wuebben


In some situations, the biggest fly in your box is not the best, and the smallest might be the most appetizing.

Case in point is a fish’s disposition when it comes to food selectivity. It’s one of those facets that I have to admit I don’t consider often when I’m on the water. Sure, there are plenty of productive chuck-and-chance fly patterns out there, and a few work with dependable regularity. Fish can be opportunistic omnivores, and yet at other times, prefer something specific that replicates bait; size, shape, color or action (or a mix of all four). This becomes critical to success. Figuring out the trigger can be one of the most enjoyable aspects of fishing. Learning through experience what works and what doesn’t is a rewarding endeavor that far too many anglers don’t take the chance to encounter.

PATTERN

HOOK – DAI-RIKI 930 or Mustad 34007, size 2 to 8, bent to a bend back shape
THREAD – Red size 6/0 (140 denier)
HEAD – Nickel 3/16 to 1/4 inch conehead with recessed eyes
WING – White Bucktail, Glow-in-the-Dark Flashabou, Pearl Crystal Flash, Tan Bucktail
EYES – Orange 2mm adhesive eyes stuck into the eye bores on conehead
GLUE – Cyanoacrylate (Zap-a-Gap or Super Glue)

HOW TO TIE

  1. Bend the hook shank in the opposite direction of the hook gap about one-third of the length back from the hook eye. Then slip the cone on the hook and mount in your vise upside down.
  2. Keep the conehead toward the back of the hook and then add a little bit of Zap-a-Gap on the hook shank from the eye to where the hook was bent (about midshank). Start your thread in behind the eye and working rearward make a nice tight thread base to where you bent the hook, and back to the eyelet.
  3. Slip the cone forward to make sure it fits snugly over the thread base. When it does, make a small head in front of the cone, whip-finish, cut the thread and apply some Zap-a-Gap to the small thread head.
  4. Reattach the thread to the hook shank behind the cone.
  5. Add a sparse wing of bucktail and flash behind the cone. Then whip finish and cut the thread, add some head cement to the thread and base of the wing. (Length of wing should be almost 1 1/2 the hook size.)
  6. Adhere the adhesive eyes in the eye sockets of the conehead.

TIE UP A DOZEN OR TWO – AND GO FISHING*** But remember to practice C.P.R. (CATCH – PICTURE – RELEASE)