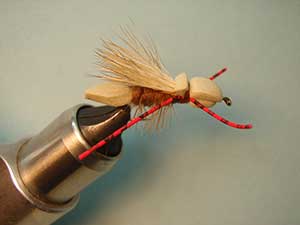
HALEY’S COMET

fotm-1-feb-2015 fotm-2-feb-2015 fotm-3-feb-2015

fotm-4-feb-2015 fotm-5-feb-2015
AARON JASPER Translated by CARL WUEBBEN
 

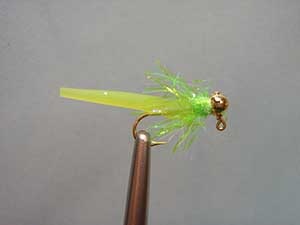
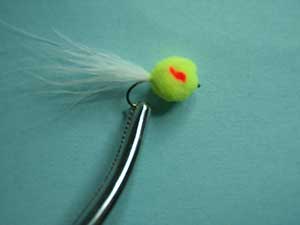
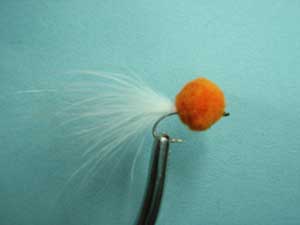
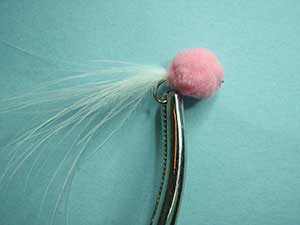
This is a simple but a little tricky to tie up – but very effective for catching fish feeding on other fish’s eggs when they are spawning. I call this a cheating fly because it seems like I’m bait fishing but it works so give it a try and see how you feel about it. Fish it on the bottom of your favorite stream. Try tying it in other colors like pink – red – orange – white and try it with a small dot on the side also and you can use the same tail or change the color on that also. Try tying on a piece of non-lead wire for weight on top of the hook shank it helps to sink the fly a little faster or leave it out and wait for it to soak up some water then sink (A split shot will work also). Just tie it in before you put the Mcfly foam on.   


PATTERN


HOOK – Tiemco. TMC #2499 SPBL, or similar sizes #14 to #8 (I used Mustad # 3366 for the photos ) or try Mustad #C49 or Tiemco TMC #2488 hooks.
THREAD – 3/0 but can use 6/0 if you are careful, color to match the egg.
TAIL – White marabou
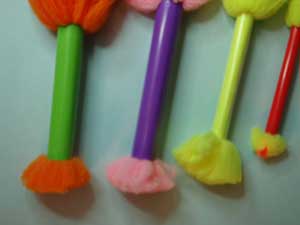
EGG – Mcfly foam in color of your choice
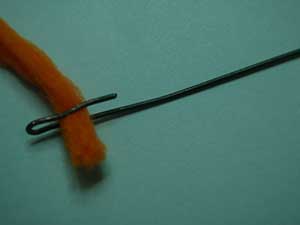
OTHER THINGS – Regular soda straw or milkshake straw that’s thicker (but the thinner the straw the less dense and smaller the egg).  A thin piece of stout wire to make a tool.


HOW TO TIE


  1. Debarb hook – mount in vise – start thread in just before the bend of the hook and tie in the white marabou. About the length of the hook itself. (just the fibers not the shank of the feather)
  2. Move the thread forward to about mid shank and tie in the Mcfly foam by using a piece of straw. Cut about a three inch piece of straw and then cut a six inch piece of thin stout wire and bend one end about one inch in a very close u shape, just enough to hold the thickness of Mcfly foam your using for that fly (You can try using your bobbin threader but when I did it the darn thing broke). Now put the Mcfly foam into the u shape of your new homemade  threader then pull it thru the straw and out the other end but just a small section, just enough to get a good hold onto it later to pull up on. The thicker the straw the more Mcfly foam you will need and the bigger the egg – just make sure you get a whole bunch into the straw real tight so it will come out real dense without any bald spots.
  3. Lay the straw with the foam in it up against the hook shank in the center where your thread should be and put a wrap over the straw loosely then bring it down and around to the front side of the foam then proceed to do two or three tight figure eight wraps – from where your thread is now (In front of the foam). Bring the thread under the hook shank then up from the back side then cross over the front side of the foam to the back of the foam (side facing you) and bring your thread over and under the back of the foam and back up the hook shank and your thread should be hanging right below the rear of the foam and on the side facing away from you. Now bring your thread across the front side of the foam and over the top of the hook shank and you will be right back where you started from - now do this once or twice more - then with your fingers on one hand pull up on the upper part and the other hand pulls down on the part with the straw to stretch the foam out so you can put more tighter wraps on. Now put some wraps on the foam to get the fibers closer together in the center by doing a posting type of wrap (Just a couple tight wraps) just go in a clockwise direction over the top part of the foam and very close to the hook shank and with every ¼ turn of thread pull it as tight as you feel you can without breaking the thread – this will coral the fibers and help hold it in place. Once you feel it’s secure bring your thread forward of the foam by using your fingers to move the fibers around the thread till you get it in front of the foam then whip finish and clip off the thread.       
  4. Now grab the top part of the foam and pull up real tight but don’t twist it or you’ll get uneven parts and with a good sharp pair of scissors make a dome shape cut (Top of egg). Then pull out a little more foam from the straw and do the same for the bottom just pull down not up. Keep your cuts close to the shank or you will have too big of an egg and you will have to do a lot of trimming. 
  5. Move the fibers around a little to get them to fill in the thinner areas and then clip anything that’s out of place or if it’s too big start trimming off just a little at a time so you don’t overdo it.    

TIE UP A DOZEN OR TWO – AND GO FISHING*** But remember to practice        C.P.R.     (CATCH – PICTURE – RELEASE).

Hook-Up Crayfish

fotm-january-2015
GREG HEFFNER Translated by CARL WUEBBEN


 Numerous studies have shown that in many waters, crayfish are the number one prey of smallmouth bass, and in some waters they are a predominant prey of trout. Not only are there many species (more than 300 In North America), but they all live and grow for several years. That means there are probably crayfish of various sizes almost anywhere we fish. Like all animals with exoskeletons, crayfish must periodically molt their shell and wait until new ones form. That “soft - shell “stage of development inevitably raises the question: Do fish like soft – shell crayfish more than one with a hard shell? If given a choice, they will eat soft – shell crayfish before their hard – shell cousins but during the molt, crayfish retreat into hiding places until their new shells harden. This makes it harder for fish to get at them. So even though the fish may prefer the soft-shells, the hard-shell crayfish, which are out and about on the river or lake bed, are easier to catch and eat. The HOOK-UP CRAYFISH is a hard-shell imitation and it is very effective. Make the claws fairly thin and equal to no more than half the length of the body. The larger fly in the photo was made on a 2/0 hook and I used tan craft fur and UV glue to make the claws and a saddle hackle for the legs plus I used orange chenille for the body all the rest is the same. 


PATTERN


HOOK – Tiemco. TMC 200R, Dai-Riki 270, or a similar 3x – long curved shank hook, size #6 or #4
THREAD – Brown 3/0 monocord
ANTENNAE – Two pheasant tail fibers
WEIGHT– .035 – inch lead free wire
CARAPACE – Natural oak mottled thin skin
THORAX – Dubbing, color to match the local crayfish
CLAWS – Brown rabbit fur
LEGS – Grizzly hackle dyed brown
ABDOMEN – Same dubbing as the thorax
RIB – Brown monocord thread or brown medium ultra-wire.  (Wire best)


HOW TO TIE


  1. Debarb hook – mount in the vise – Start the thread about two eye-widths from the eye of the hook. Secure a piece of .035- inch lead free wire to each side of the hook shank one at a time ( The length of the shank from where you started your thread to just before the bend of the hook.) By using light tension to get it in place then putting more tension on as it is held in the place you want it (On the hook shank side.) Put some cement on them and let it dry. Tie on two pheasant tail fibers for the antennae at the rear of the shank – the length of the hook shank.  
  2. Turn the hook upside down in the vise. Tie on a long strip of thin skin: the width of about half the width of the hook gap. At the point you have your thread now (Back of hook shank.)
  3. Spin a pinch of dubbing on the thread by twisting it on in a clockwise direction on the thread between your index finger and your thumb but just a little you can add more if needed (Just a one inch noodle is fine) then wrap the noodle of dubbing onto the shank on the rear and covering where you tied on the thin skin.
  4. Tie in two small bunches of brown rabbit fur for the claws (clip from a hide or strip) on each side of the hook right up against the dubbing ball, make them fairly thin and equal to no more than half the length of the body. Too dense and it can actually deter a fish from eating it (It looks like a crayfish in a defensive position.)
  5. Spin more dubbing on the thread and begin wrapping the thorax. Just a little bit bigger than the first ball of dubbing. Now tie on a grizzly hackle dyed brown by the butt section (Don’t wrap yet) and spin more dubbing on the thread and wrap about one-third of the body (About halfway up the hook shank.) Spiral wrap the hackle over the thorax two or three times, and tie off and clip the tag end off (Excess hackle.)
  6. Trim the hackle on the top and bottom of the fly; the hackle fiber legs extend from the sides of the pattern. Next, pull the thin skin over the thorax with just a little stretch and tie it down but do not cut the excess off. We still need the rest of it.
  7. Pull the thin skin backward and put a few wraps over it to give it more of a separation, and then tie on a 6-inch length of brown monocord thread or medium brown ultra-wire for the rib.
  8. Spin more dubbing on the thread and wrap the abdomen up to the hook eye (Small noodles.) pull the thin skin over the abdomen with light stretching and tie it down near the eye. Next spiral-wrap the rib of the fly (Clockwise direction) tie off the ribbing material. 
  9. Cut the surplus piece of rib material. Lift the thin skin and bring your thread in front of it and behind the eye of the hook then whip-finish the thread behind the hook eye. Trim the thin skin, leaving an appropriately sized tail (About one and a half eyelets space from the eyelet.) Clip your thread off and apply some head cement to the thread wraps.    


But remember to practice C.P.R. (CATCH – PICTURE – RELEASE).

Wee Willy Wiggler

 fotm-october-2014

CRAIG RIENDEAU Translated by CARL WUEBBEN


Simple to make – simple to use as you will see, the Wee Willy Wiggler is one of the simplest flies you will ever make.  Tie the fly on a jig hook weighted with a small bead head or a jig hook with the weight attached to it already, either way it makes it fall and hang horizontally in the water column much like something alive. The only thing that has changed from the original is it started with saddle hackle, switched to Cul De Canard during the hackle shortage a couple of years ago, and finally settled on Antron Trilobal hackle. The Wee Willy Wiggler is also easy to repair, just keep some superglue handy and you can fix a loose tail or even glue an entire new one. Cast and strip it like a streamer, or dead drift it like a nymph, use a indicator to keep the fly in the strike zone as long as possible without getting hung up or leaving the strike zone. Fish the fly very slowly, twitch it slightly once in a while if you don’t get a strike and vary your depth. Fish rarely spit out this soft- rubber pattern. The Wee Willy Wiggler works on almost every warm water species that get in its way. Bass, Bluegills, Crappies, Carp.  


PATTERN


HOOK – Sohumi 103 or your favorite 90-degree jig hook, size 8. (I used Bass Pro Shop jig head ball style 1 /64th #JHNO64 #8 with the weight already on it)
THREAD – 8/0 (70 denier) color to match the body or just white will do.
WEIGHT – 1/8 – inch brass or copper bead (exclude if your hook has it built into it)
UNDERBODY–   Krystal flash. (Color to match the body).
BODY – A spine clipped from a giant puffer ball or googly ball from a toy or craft store.
HACKLE – Trilobal Hackle with ¾- Inch fibers (color to match body or white) (I used UV Polar Chenille or palmer chenille or minnow body wrap (bass pro shop) and clipped it some after I was done with the fly).
OTHER - *Lighter (to heat up the bodkin).
              *Cup of cool water (To cool the body off).
              *Zap-A-Gap or superglue


 HOW TO TIE


  1. Debarb hook – put the bead on (small hole first) then mount in the vise. Push the beadhead forward up against the hook shank bend by the eyelet- start your thread behind the beadhead and build a thread dam behind the bead. Place a drop of Zap-A-Gap or superglue on the dam, and twist the bead until it adheres to the thread.      
  2. Cut two strands of Krystal Flash in half; fold the four strands in half, making a loop containing eight strands of flash. Cut the ends even and tie them to the hook shank behind the bead. Now with the thread wrap the Krystal flash down the hook shank until it’s opposite the hook barb.
  3. Make a dubbing loop by pulling out about 3 or 4 inches of thread downward and then put your dubbing twister on the thread, then bring your thread upward to the hook shank and starting about one or two eyelets from where you started your loop and wrap backward over your other piece of thread for the loop then forward and stop at the bead head.
  4. Place the Krystal Flash between the two pieces of thread for the loop and spin the dubbing tool to tighten the Krystal Flash and thread together forming a rope. Wrap the Krystal Flash rope up the hook shank staying close to each wrap and going forward toward the bead head and leaving a 1/8 inch gap behind the bead. Tie off and clip off the tag end.
  5. Clip a 1-inch –long spine from the toy ball. Place the spine flat on the edge of your bench. Using a lighter heat up an old bodkin then melt a 3/8-inch-long groove in the toy ball spine (about the same length as your Krystal Flash underbody that is on the shank now)the depth of the groove equals the thickness of the bodkin needle. Dip the warm spine and bodkin in the bowl of water to cool it then remove the spine body from the bodkin.
  6. Apply a bead of Zap-A-Gap or superglue to the Krystal Flash underbody (on the top) and with your rotary vise rotate the hook so that the glued edge is facing down, if you don’t have a rotary vise just pull the hook out of the vise and turn it over so the glued edge is facing down then remount the hook into the vise (upside down).
  7. Place the body on your index finger underneath the hook. Align the groove with the Krystal Flash underbody then quickly press the body into place. Allow the glue to dry fully before going onward.
  8. Tie the end of the hackle tight against the front of the body of the fly (the spine).
  9. Make three wraps of hackle between the body and the bead head of the fly and tie off and clip the tag end off then a half hitch if needed then whip-finish it and clip off the thread. A little head cement on the thread wraps can’t hurt.


*** But remember to practice C.P.R. (CATCH – PICTURE – RELEASE).

Fender

fotm-september-2014
BARRY CLARKE Translated by CARL WUEBBEN


This is an alternative method to tying the traditional parachute-style pattern. Deer hair replaces the hackle of a normal parachute. Make the post using deer hair as well, which enables the abdomen and thorax of the fly to sit deep in the surface film in a realistic manner while in a fish’s feeding window. The ribbed-moose- mane (quill like body) tying technique I am showing you is fairly old, but I revitalized the method with the help of bug bond UV resin (or any UV glue). We all know that the floating qualities of deer hair are hard to match, but it’s still worth giving this pattern a coat of floatant for extra buoyancy. This quick and simple parachute technique requires only deer hair and UV glue or a substitute adhesive.


PATTERN


HOOK – Mustad C49S, size to match the natural (I used a size #18).
THREAD – Dyneema (gel spun). Lays nice and flat.
ABDOMEN – Moose mane hair coated with bug bond UV resin (any UV glue will do) or a substitute adhesive.
HACKLE– Deer hair (short/fine deer hair best) and bug bond UV glue
THORAX – Two strands of peacock herl
 
HOW TO TIE


  1. Debarb hook – mount in vise with as much of the bend exposed as possible. Start your thread behind the hook eye and wrap a very close thread wrap down deep into the bend of the hook.     
  2. Select some long moose mane hair. You will need two one white and one black. Select one with as much white in the middle as you can and trim off the brown or black off the tip and trim the tip off the black one then match the tips together and tie the tips on at the bend of the hook with the points close to each other (black on bottom white on top of it).
  3. Wrap a tapered thread underbody with the thicker end near the back of the thorax (about mid shank).   
  4. Grasp both moose hairs at once making sure the black hair is at the bottom and begin wrapping the hairs up the hook shank- leave no gaps between the wraps. Stop about three or four eyelets space from the eyelet (middle of the thorax area) and tie off and clip your tag end off.   
  5. Although moose mane hairs are remarkably strong, you may strengthen the abdomen with a coat of UV glue (thin type the best) then cure it with a UV light.
  6. Cut-comb out fuzz and stack a small bunch of deer hair. Tie the butt ends of the hair to the top of the hook in front of the abdomen (tips facing forward). The hair should be about the same length as the hook. Trim off the tag ends (butts) and put a couple wraps down to secure it. Put a wrap or two in front of the hair to put it in an upright position.
  7. Reposition the hook in the vise with the eye pointing up. Using your thread wrap up the base of the hair to make a post then back down to the hook shank – use just enough thread to keep a little stiffness on the post.
  8. Select two more long black and white moose hairs and prep them like in step two. Tie them in at the base of the post (butt ends up against the hook shank) and wrap them up the post with the thread to secure them then back down to the hook shank. Now take the two moose hairs and wrap them down the post, keeping them close to each other and tie them off at the post base them trim the tag ends off. Use UV glue like in step five on post.
  9. Reposition the hook like from the start. Bring your thread to the rear of the thorax (behind the post) and tie in two long lengths of peacock herl. You can make a rope with the peacock herl by twisting it loosely onto the thread (clockwise) and then wrapping the herl rope to the eyelet (don’t crowd the eye) this reinforces the herl or just bring your thread forward to the eyelet and wrap the herl to the eye , ether way just make sure you criss cross under the post (figure eight) so you have no bald spots on the bottom or sides, tie off behind the eye and clip off the tag ends – whip finish and clip thread.
  10. Place your finger in the center of the deer hair post, press down until the deer hair flattens and flares outward. Fluff out the hair so you have equal amounts all around then place a small drop of UV glue or zap-a-gap in the center of the deer hair parachute hackle, use a UV light to cure it.


*** But remember to practice C.P.R. (CATCH – PICTURE – RELEASE).

Olive Matuka

fotm-august-2014
BRAD BEFUS Translated by CARL WUEBBEN


Developed in New Zealand, the Matuka has proven itself on American waters as a first-class streamer. Many believe that this fly’s big advantage over conventional streamers is its wing, which is bound all down the body and therefore doesn’t separate from the body when the fly is fished and won’t catch around the hooks bend. Although fishlike and normally tied in fishy colors, Matukas inhabit that gray area between attractors and imitators, leaning one way or the other as needed.  


PATTERN


HOOK – Streamer- heavy wire, 3x to 6x long sizes #10 to #2
THREAD – Olive or black 8/0 (70 denier) - 6/0(140 denier) - 3/0(210 denier)
RIB – Fine copper, gold or silver wire or oval gold tinsel
BODY – Olive chenille (or dubbed olive rabbit fur)
WING & TAIL – Four to six dyed olive grizzly hen neck or back hackles or just big rooster saddle hackles
HACKLE – Dyed olive grizzly hen neck or back hackle


HOW TO TIE


  1. Debarb hook – mount in vise – start your thread in at the rear of the hook (just before the bend of the hook), tie in about three inches of fine wire for the ribbing by the tip just in front of the hooks bend and leave it hanging toward the rear of the hook, then tie in about three inches of chenille their also the same way. Now bring your thread forward about two to three eyelets from the eye.     
  2. Thinly coat the thread wraps with head cement and wrap the chenille forward (clockwise) to where the thread stops. Tie the chenille off, half-hitch, and trim the excess chenille not the thread.     
  3. Select four to six (depending on the quality of the feather and the size of the fly) matching hackle feathers (two or three from each side of the cape if you have). The feathers should be at least one and a half shank lengths long, and the better they match, the better the finished product will be.
  4. Now size and trim the feathers by holding the matched feathers up to the hook shank and define a length equal to one and a half shank lengths. Cut off the excess portion of the butts. Now, strip off about one-eighth of an inch off the barbs from the butts by pulling the fibers backwards. This is the part you will be tying in later.  
  5. Hold the grouped feathers by the butts, and using the shank as a gauge, strip the bottom barbs off of the shaft of the feathers but only up to the bend of the hook. Leave the barbs on the portion of the feathers that will extend past the bend of the hook and on top of the fly.
  6. Tie down the butt ends of the feathers up front by the eyelet and on top of the hook shank (where your thread is now) keeping the stripped part of the feathers on the bottom and on the top of the hook shank. Now holding the tips of the feathers with your thumb and forefinger of your left hand, and with the thumb and forefinger of the right hand, groom the upper feather fibers (a moistened finger may help) so that they stand upright. Hold the feathers on top of the hook shank at the rear of the hook. Now with the fingers of the right hand, wind the ribbing material through the fibers of the feathers, spiral wrapping it forward. Use your bodkin to push the fibers forward and backward so you can get the ribbing between the fibers and onto the feather shank only at right angles (don’t bend any of the fibers). Keep going forward to the stripped butts and tie off the ribbing there and half-hitch.
  7. Find a hackle with fibers about half the hook shank long and strip off the fluffy stuff and tie in by the butt. The curve of the feather toward you (to make the fibers slant back), then wrap closely three to four wraps forward. Tie down the feather, trim the excess, and form a tapered head then whip finish and coat head with cement.


NOTE- If the hackle won’t slant back, pull them backward and put a few wraps of thread over the front portion of the hackle till they stay where you want them.


*** But remember to practice        C.P.R.     (CATCH – PICTURE – RELEASE).

Klod Hopper

fotm-july-2014
PAUL STIMPSON Translated by CARL WUEBBEN


 Its hopper season again and grasshoppers and crickets often fall or are blown into the water by summer winds and are taken with enough regularity that trout become eager for their imitations. On hot days, a hopper or cricket dressing fished on a meadow stream or near the shoreline of a big river can cause an instant detonation, even when just a few naturals are around. Hoppers and crickets have approximately the same body build. A dressing style that works for one can be tied in a different color to match the other. The KLOD HOPPER is tied in a tan color not your traditional yellow or olive. The red grizzly legs seem to be the key to this fly’s success. So try this one for yourself on selective fish, I’m sure you’ll be pleasantly surprised.


PATTERN


HOOK – Dry fly, 2x long, size #12 - #6
THREAD – Brown 6/0, Flat waxed nylon
BODY – Tan, closed-cell foam (1/8 inch – 3mm)
OVERBODY – Brown dubbing (I used super fine)
WING – Elk hair or fine white tail deer hair  
HACKLE – Brown dry fly saddle
THORAX – Tan, closed –cell foam (1/8 inch -3mm)
LEGS – Red, grizzly legs


HOW TO TIE


  1. Debarb hook – mount in vise – start your thread in at the rear of the hook (just before the bend of the hook) – cut a piece of 1/8 inch (3mm) tan closed – cell foam into a strip about 2 inches long and as wide as the gape of the hook. Trim one end to a point. Lay down a thread base to the front. Tie in the strip of foam just behind the eye on top of the hook (this is the front of your thorax) and the pointed end coming off the bend of the hook and hanging just a little bit longer than a hook gape from the bend of the hook. Leave a ½ inch or more extending over the eye. Pull the foam forward and bring your thread behind the foam and wrap a few wraps rearward (about 5or6 eyelets from the eye) then bring the foam back down onto the top of the hook shank and secure the foam again (this is the back of your thorax). Now with evenly spaced spiral wraps, move the thread over the foam to the back of the hook (loosely). Now go forward to the spot you started the spiral wrapping again evenly spaced and not too tight. Even though we are going to cover this part of the fly with dubbing in a following step, do not wrap the foam down with any more turns of thread, we want the foam to retain as much of its shape to help the fly float. Now cross over the entire bottom of the fly to the rear of the hook shank where you started your thread.  Put a little ZAP-A-GAP on the bottom thread wraps and let it seep some onto the foam, this will keep things from moving but let it dry before the next step.      
  2. Prepare and measure a rooster hackle with the barbs length the same as the width of the gape of the hook. Tie in at the rear of the hook (where your thread is now). Dub the body by placing a small piece of dubbing (I used super fine) up against the thread ( you can use dubbing wax if you want) and twisting it between your thumb and index finger in a clockwise direction, then wrap it onto the body and add more and wrap as needed and end it behind the thorax.  
  3. Palmer (spiral wrap) the hackle forward and tie off behind the thorax. Clip your tag end off (extra hackle stem).
  4. Clean a stack of elk hair with a hair brush about the thickness of a large wooden match stick then put them in a hair stacker (tips first) and tap the stacker bottom on the table 2 or 3 times to even up the tips and then remove them by the tips. Now tie them in on top of the hook shank by the butts right behind the thorax with the length just a little bit smaller than the rear body (don’t go past the rear pointed foam end). Make a thick thread wrap right behind the thorax to secure the wing and give it a spot to secure the legs.  Clip off the tag ends of the elk hair (The butts).   
  5. Secure one leg on each side by the rear of the thorax and make a couple wraps to hold them in place and spread your front leg forward and your rear leg backward. The rear legs should be longer.     
  6. Pull the front foam back over the front part of the fly to form a bulky, hopper head then clip off the extra foam. Now whip finish it and trim the legs to size and you’re done.     


*** But remember to practice    C.P.R.   (CATCH – PICTURE – RELEASE).