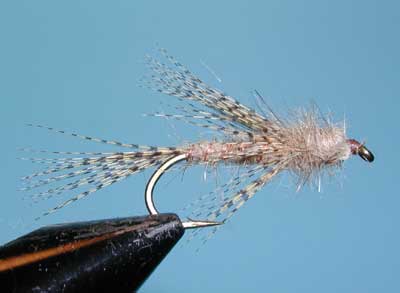
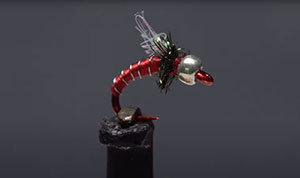
Manhatten Midge
Tim Flager
fotm feb 2022
Translated by Carl Wuebben

This is a variation of Forrest Dorsey’s Manhattan midge, which is, in itself, an enhanced version of other patterns in the Dorsey family of flies. What makes this version a little different is the red Umpqua u-series, size 20 scud/pupa hook. The Manhatten Midge, despite its diminutive size, includes a slew of proven fish catching materials and features. This version, because of the red hook, probably should be called the Brooklyn Midge.

PATTERN
  HOOK – Red Umpqua U-series size #20 or equivalent
  BEAD – Midge – sized, silver killer caddis glass bead
  THREAD – UTC 70 denier (8/0) in red, also try a black version
  WING BUD – Light pink; midge – sized sparkle braid
  RIBBING – Extra – small, silver ultra-wire
  THORAX – Peacock herl


HOW TO TIE

  1. Although the hook isn’t terribly small, plunger – style hackle pliers make handling them much easier. Just secure the shank on the hook of the pliers. You can then drag the hook through some midge – sized, silver Killer Caddis glass beads in hopes of catching one. With the bead on the hook, get the assembly firmly secured in the jaws of your tying vise and push the bead up to the hook eye.
  2. Start your thread in behind the eye and wrap rearward a couple wraps and clip the tag end off. (This pattern also looks great in black thread).
  3. Take an inch-long segment of sparkle braid. Secure the segment to the top of the hook shank with the longer part going forward and take a few wraps rearward to bind it down. Snip the rearward pointing part of the braid off close. Continue taking thread wraps to cover up the butt end then go well down into the hook bend.
  4. Take a hunk of Silver Ultra wire for the ribbing and place one end of the wire against the near side of the hook and take thread wraps to secure it. Continue taking wraps up the shank, binding the wire down as you go. Once the wires bound down up to the braid, wind back down the shank with your tying thread, then back up to produce a lightly tapered body. Try to get the butt end of the braid covered up without adding too much bulk. Give your bobbin a counterclockwise spin to uncord and flatten the thread. This will allow you to fill in any dramatic lumps and bumps on the body. End your tying thread right at the braid.
  5. Get a hold of the silver wire and start making open, spiral wraps with it to create the look of segmentation on the abdomen of the fly? When you reach you’re tying thread, use it to firmly anchor the wire then helicopter it to break the excess close. Pull rearward on the braid and take thread wraps to pin it back on top of the abdomen. Take a few more thread wraps to create some space between the braid and the back edge of the bead.
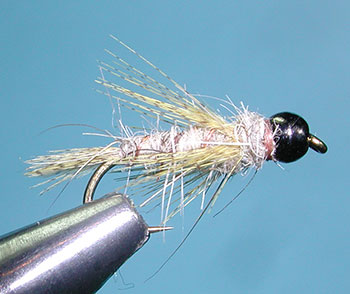
  6. A single peacock herl is used to produce the thorax of the fly. With the longer flues pointed down, snip an inch or two of the brittle tip off square. With the longer flues still pointing down, bind the herl to the near side of the hook using tight wraps of thread. Clip off the tag end and start taking touching wraps forward with the herl to build up a fuzzy little thorax and when you reach the back edge of the bead, use you’re tying thread to anchor the herl, and then clip your tag end off.
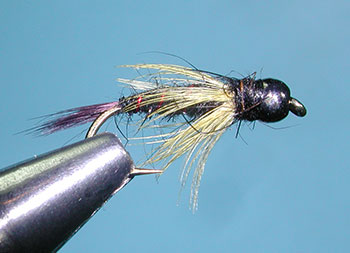
  7. Now no a 3 or 4 turn whip finish, seat the knot well and clip your thread off. Now trim the wing bud so it extends not quite to the back edge of the hook bend.

TIE UP A DOZEN OR TWO – AND GO FISHING*** But remember to practice C.P.R. (CATCH – PICTURE – RELEASE)

Birds Nest (TAN)
         fotm 1 jan 2022

Translated by Carl Wuebben

The birds nest is a nymph pattern designed by the late Cal Bird in 1959. Cal developed this fly for the Truckee River but it works all over. Usually tied in tan colors to imitate caddis pupae, other colors used are cream, brown, and olive. Cal actually used a blend of Australian opossum and died coyote for the dubbed body. He also insisted on wood duck flank for the tail and hackle to achieve the proper stiffness. He gave it its name due to an entanglement with a birds nest while on the Truckee. It’s generally considered an attractor pattern that can be fished on a dead drift, either weighted or unweighted.

PATTERN

HOOK –
Daiichi 1710 or equivalent in #10 - #16
THREAD – Danville camel 6/0 (140 denier)
RIB – Small copper wire
TAIL – Lemon wood duck flank
ABDOMEN – Natural Australian opossum
THORAX – Natural Australian opossum
HACKLE – Lemon wood duck flank

HOW TO TIE

  1. Debarb hook – mount in vise – start thread in just behind the eyelet. Then attach the wire ribbing to the bottom of the hook shank and with your thread wrap it down to the bend of the hook and above the barb. (Keep wire on the bottom all the way back and try not to let it get on the side as this will create an uneven body later).
  2. Now select a wood duck flank feather that is flat on the top. Clip the tip with about 15 – 20 fibers. Measure the tip for a length to be about the same as the hook shank and attach the fibers with the tips rearward hanging off the bend of the hook and this will be your tail. Clip off the butt end tag from the feather. Your thread should be at the rear of the hook.
  3. Grab a clump of the opossum dubbing and with your thumb and index finger twist it onto the thread then dub along the hook shank creating a tapered body to just past the midpoint of the shank.
  4. Then spiral wrap the ribbing to the end of the dubbing (midpoint) and tie off. Helicopter the tag end of the wire off.
  5. Using the feather that you clipped the tip from, utilize the remaining fibers for a collar hackle. Just in front of your dubbing, position the feather at the top of the shank with the tips protruding just beyond the hook bend. Using your thumb and index finger, distribute the fibers around the shank and tie off and clip the feather tag ends off. Lay down a couple more thread wraps to secure it all.
  6. Add more opossum dubbing for a thorax. This dubbed area should be larger in diameter than the body with a more buggy appearance. Cal would use his dubbing tool to create a dubbing loop that facilitated a looser appearance. Whip finish for a small thread head and clip your thread. You can also try tying the beadhead olive and black version.

TIE UP A DOZEN OR TWO – AND GO FISHING*** But remember to practice C.P.R. (CATCH – PICTURE – RELEASE)

ASSASSIN (light)
Tom Loe/variant (of a Cal Bird variant)

fotm 1 may2021         fotm 2 may2021

Translated by Carl Wuebben

Tom Loe came up with his version of the Cal Birds bird’s nest that you can tie in a dark and light variation. The tail material is tips of blood marabou which give a graceful action within Stillwater situations and can mimic small baitfish such as perch fry or damsel nymphs.

PATTERN
Light version
HOOK – Daiichi 1710 #14 -18 THREAD – Uni-thread tan 8/0 (70 denier)
HEAD – 3/32 gold bead
TAIL Marabou blood quills (ginger). Topped by dyed mallard barred flank (wood duck gold)
ABDOMEN – Hareline dubbing in hares ear
THORAX – Hareline dubbing in hares ear
RIBBING – Copper ultra-wire in small
LEGS – Dyed mallard barred flank in wood duck gold

Dark version
Same hook – black thread – same bead – black marabou blood quill for the tail – abdomen and thorax black dubbing – red ultra-wire for the ribbing – legs same feather.

HOW TO TIE

  1. Debarb hook – put bead on the hook small hole first then mount hook in vise and start your thread in behind the rear of the bead. Attach the wire ribbing to the bottom of the hook shank and with your thread wrap it down to the bend of the hook and above the barb.
  2. Now select a marabou feather and a mallard barred flank feather for the tail. Take the marabou and tie on half of the tip area only, about half a hook shank length long and then clip off the tag end, now take the mallard feather and clip out about 15 – 20 fibers from the tip and tie in on top of the marabou, make it the same length (half a hook shank). Clip off tag end. Your thread should be at the rear of the hook.
  3. Grab a clump of hare’s ear dubbing for the abdomen and with your thumb and index finger twist it onto the thread and wrap the dubbing forward along the hook shank creating a tapered body to just a little past the mid-point of the shank.
  4. Then spiral wrap the ribbing to the end of the dubbing (midpoint) and tie off. Helicopter the tag end of the wire off.
  5. Using the mallard feather that you clipped the tail tips from; utilize the remaining fibers for a collar/legs hackle just in front of your dubbing. Position the feather at the top of the shank with the tips protruding just beyond the hook bend. Using your thumb and index finger, distribute the fibers around the shank and tie off and clip the feather tag end off. Lay down a couple more thread wraps to secure it all.
  6. Add more hare’s ear dubbing for the thorax and wrap forward up against the bead. This dubbed area should be larger in diameter than the body with a more buggy appearance. Use a dubbing tool to create a dubbing loop that facilitates a looser appearance. Whip finish to form a small head and clip your thread off.

TIE UP A DOZEN OR TWO – AND GO FISHING*** But remember to practice C.P.R. (CATCH – PICTURE – RELEASE)

Massacre Midge
Max Pavel & Nava Keno
fotm may 2020
Translated by Carl Wuebben
Original By Matt Mc Cannel

This fly will work just about anywhere in the world. Fish it deep, fish it as a dropper, I don’t think it really matters. This fly can imitate a variety of emerging insects. The Massacre Midge created by Matt Mccannel has climbed to the top of the list for favorite patterns. It can be tied in a variety of different colors with different colored foams. This fly has a lot of “BUGGYNESS” when you rough up the dubbing a little bit. This makes it very dynamic to your fishing situation. Tie bigger like a chironomid for lakes.

PATTERN

HOOK – TIEMCO 2488h in size #18
THREAD – UTC70 olive
WIRE – small UTC olive wire
FOAM – thin fly foam tan 2mm or white
DUBBING – Dave Whitlock’s SLF in dragon fly color

HOW TO TIE

  1. Mount hook, start your thread in 2 eyelets from the eye and wrap a thread base back to just before the bend of the hook –clip tag end of thread off.
  2. Tie in your wire and with your thread wrap it down well back into the bend of the hook then bring your thread back toward the eye with close smooth wraps and stop where you started your thread and as you do make a slight taper toward the front.
  3. Wrap wire forward with evenly spaced spiral wraps and tie off at about 4 eyelets spaces from the eye then helicopter the wire tag end off.
  4. Cut a strip of foam about 3-4 mm wide and tie in where your thread is now with the longer part facing toward the eye and a small piece rearward that you will secure down on the shank – pull up on the rear part to put tension on it and clip the tag end off and cover any additional foam that may be showing on the rear side of the foam with your thread.
  5. Using some SLF dubbing make a small noodle by twisting the dubbing firmly between your thumb and index finger – wrap the noodle over the rear foam area and wrap forward up against the base of the front foam – tie off and clip the tag end off.
  6.  Bring your thread in front of the foam and lay a couple wraps down then put a small dab of Zap-A-Gap on the thread and make a couple wraps in front of the foam again to keep it upward and makes it more durable.
  7. Whip-finish – clip your thread – rough up the body a little with a Velcro brush and clip off the longer fibers – clip the foam about the thickness of the body or to your liking.

TIE UP A DOZEN OR TWO – AND GO FISHING*** But remember to practice C.P.R. (CATCH – PICTURE – RELEASE)

Checkerboard
Lee Baerman
fotm may 2020
Translated by Carl Wuebben

These surf flies, the green tailed, brown tailed, red tailed and orange tailed checkerboards have transformed over the years from a bad copy of a hasting’s surf rat to what you see here. The first day out it landed a very nice corbina and continues to be my go-to-fly. When wet, the orange tailed version looks like a new born perch; the halibut and leopard shark love it. It even landed calico bass. The brown version has since been joined by body colors of burnt orange/yellow, fluorescent red (pink)/black, chartreuse/black, pink/silver to go with the original red/black. All kinds of fish have been caught including surf perch, corbina, halibut, walleye, perch, shovelnose guitarfish and leopard shark.

PATTERN

HOOK – Gamakatsu SS15, size 4
THREAD – Ultra 140 (6/0), in red, orange, chartreuse or pink.
WEIGHT – Black 5/32 barbell eyes
TAIL – Brown, red or orange marabou
FLASH – Accent-grizzly flashabou in red/black, copper/black and pearl green/black
BODY - Red/black, fluorescent red/black, red/orange and chartreuse/black variegated chenille. Or you can make up your own by twisting up the color chenille you want with a black strand of chenille.

HOW TO TIE

  1. Mount hook in the vice. Start your thread in behind the eyelet and wrap back and tie on a black 5/32 barbell eye at about one barbell width behind the hook eye.
  2. Tie in one marabou feather, one and a half times the length of the hook shank, starting behind the weighted eyes.
  3. Tie in two strands of accent-grizzly flashabou to each side of the marabou tail. Trim to length of tail if needed.
  4. Tie the chenille in at the base of the tail, bring your thread forward behind the eye and wrap the chenille forward and wrapping around the eyes and tying off behind the hook eye to help build up the nose then clip off your tag end. Wrap the thread until it forms a cone shape in front of the eyes. Whip finish, clip your thread off and coat with head cement.

TIE UP A DOZEN OR TWO – AND GO FISHING*** But remember to practice C.P.R. (CATCH – PICTURE – RELEASE)

Chuck Caddis
Eric Leiser - Chris Hunt - Tim Flagler
fotm may 2020
Translated by Carl Wuebben

Caddis patterns come in all shapes and sizes – some are a little more artsy and impressionistic, and others appear more practical and representive of the flies that are actually on the water. Maybe the simplest of caddis patterns like the chuck caddis can be “extremely suggestive”, simple and a little bit elegant too and it’s tied using all natural ingredients. Put the chuck caddis to work, it’s an excellent pattern for spring caddis hatches.

PATTERN
HOOK – Fulling Mill # 35050 dry fly size #14 or equivalent (dry fly 1x wide standard wire)
THREAD – Black UTC 70 denier (8/0) or equivalent
BODY – Packaged hares mask dubbing (original was woodchuck underfur) but you should also feel free to substitute it out for whatever dubbing material you have on your bench.
WING – Woodchuck (with a good range of colors in it –bottom to tip of hair)
HACKLE – One Cree feather (dark barred dun color). Traditionally it was one grizzly and one brown feather used, you can get them easier and you may have already

HOW TO TIE

  1. Mount hook in the vice. Start your thread in on the hook about 2 eyelets space from the eye of the hook and clip your tag end off. Wrap rearward to make a smooth thread base ending at about the hook point.
  2.  Dub about a two inch noodle using the hares mask dubbing by twisting the dubbing between your thumb and index finger onto the thread leaving just a small amount of bare thread just before the hook so you as you start to wrap the body you will go rearward first to the bend of the hook till the noodle starts onto the shank then go forward to where you started your thread and tie it off –clip the tag end off.
  3. Grab your woodchuck and snip a small clump from the hide and grab the tips in one hand and with the other pull out the short hairs and throw them out. Place the longer hair into a hair stacker tips first – tap on the table a couple times, open the stacker so the tips are hanging out toward the rear of the fly - now grab the tips and keep them aligned and tie them in where your thread is now and the tips facing rearward (just a little longer than the hook.) Wrap down toward the eye with a neat tapper and holding tight as the hair is slippery. Clip the ends off and continue the thread taper. Then bring your thread back again to a little bit before the tie in area or where you ended the body.
  4. Now if you’re tying it the traditional way you will use one grizzly and one brown hackle or use a single Cree feather (dark barred dun) – size it up to the hook gape before plucking from the hide. Now flip the feather over so the dull side is facing away from you then strip off the fluffy fibers then remove about ½ dozen more fibers from the top. With the shiny side facing you lay the stem on the near side of the hook with the tip facing forward toward the eye and tie in with a short bare section of the feather showing – clip the feather tag end off and wrap forward toward the eye then back to the wing base forming a clean tapered thorax area. Grab a pair of hackle plyers then grab the feather by its tip with it and pull the feather rearward to crease the stem then take touching wraps rearward with it (this pattern works well with a fairly substantial hackle collar) then when you reach your thread give your bobbin a clockwise spin to cord it up and strengthen and decrease the size of the thread now use it to tie down the feather but don’t clip it yet. Now using the thread counter wrap the fragile feather stem and when you get to the eye pull back the hackle and put down a couple more wraps to hold it back then whip finish and clip the thread. Use a hobby knife to clip the hackle tip off as this will keep you from clipping off the feather fibers you want to keep just lay it up against the feather stem and pull back up against the knife to cut it cleanly.


TIE UP A DOZEN OR TWO – AND GO FISHING*** But remember to practice C.P.R. (CATCH – PICTURE – RELEASE)