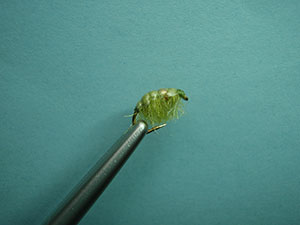
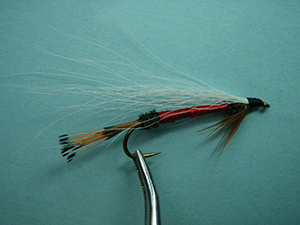
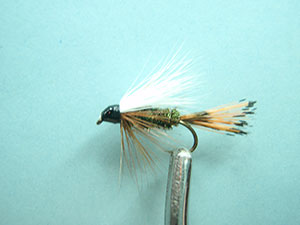
Royal Coachman Bucktail

fotm august 2015
Dave Hughes
Edited by Carl Wuebben


The golden age of streamers lasted two or three decades, ending in the 1960s. But these beautiful flies represent things that trout still eat, and they still catch trout. If you’d like to be armed to fish the full array of trout tactics, in order to take fish in all sorts of conditions, a few of these traditional dressings should be kept ready in your basic fly boxes. When you find big trout pursuing baitfish, you can coax them to these minnow like imitations and to little else. Traditional streamers also make excellent searching patterns. In early spring when the water is still high, unclear and cold, then again in fall, when the water is low and clear but cooling, trout are interested in feeding but don’t find much available in the way of natural insects. A streamer fished slow and near the bottom will entice them into a take if you place it where they can see it. Streamers are usually thought of as big flies, sizes 4 and 6; but I recommend that you tie them in sizes 8 and 10. You might be surprised at the results these smaller streamers bring.


PATTERN

HOOK – 6X long, TMC 300 sizes 6-8-10-12
THREAD – Black 3/0 (210 denier) or 6/0 (140 denier)
TAIL – Golden pheasant tippets
BODY – Peacock herl, red floss, peacock herl
HACKLE – Brown
WING – White bucktail
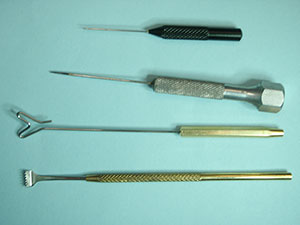
 

HOW TO TIE

  1. Debarb hook – mount in the vise – grab about eight fibers from a golden pheasant tippet then start your thread just in front of bend of the hook and then tie in the pheasant tippet (about ½ the size of the hook shank).
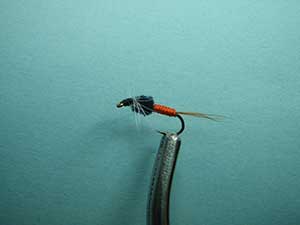
  2. Tie in about 2 or 3 strands of peacock herl at the back of the shank just before the bend of the hook. To reinforce the peacock herl, make a rope with it on the thread; twist the peacock clockwise around the thread, just about 3 or 4 turns should do. You can put more of if needed. Now wrap the rope forward about 3 or 4 turns or ¼ of the hook shank length; now tie down and clip of the tag end.
  3. Tie in some red floss up against the peacock and wrap it forward with close wraps to just a little past the half way mark on the hook shank, then tie off and clip the tie end off.
  4. Tie in some more peacock herl using the herl rope again (3 or 4 strands). Wrap forward again but stop about 4 or 5 eyelet space from the eye and tie off and cut the tag ends off.
  5. Find a hackle feather with the fibers about a gap and a half to two gaps long. Then you can do one of two different ways to tie on:
    1. Strip off a bunch of fibers from the stem of the feather and using the pinch knot/ soft loop (loop pinched between your thumb and index finger) tie it on the bottom of the shank right in front of the peacock herl but on the bottom of the hook shank, keeping some fibers out to the side also. Tie down or clip tag ends off.
    2. Using the whole feather, strip out the fuzz and tie it on by the butt and on the shank up against the front peacock with the concave side toward the shank, so the fibers will sweep back. Wrap forward 3-4 wraps then tie off and clip tag ends off. With a pair of sharp pointed scissors, clip off the sides and top hackle fibers as close to the stem as possible.
  6. Now grab a small bunch of white bucktail and comb out the under fur and tie it in just in front of the peacock that’s in the front hook area extending it over the top of the fly to just about even or just past the end of the tail.
  7. Make a nice bullet head (tapered thread, small in front, larger to the rear). Whip finish and apply some head cement.

    TIE UP A DOZEN OR TWO – AND GO FISHING*** But remember to practice C.P.R. (CATCH – PICTURE – RELEASE).

Carrot Nymph

fotm july 2015 1   fotm july 2015 2

fotm july 2015 3   fotm july 2015 4
Rube Cross
Translated by CARL WUEBBEN


Rube Cross remains a legendary fly tier among catskill anglers. Living from 1896 to 1958, his flies and tying methods are still discussed and emulated. Although he was better known for his sparsely tied dry flies, like all master anglers, cross also tied and fished nymphs. The original name for the fly was the Carrot Ant Black Nymph, which was more commonly called the Carrot Nymph. Orange bodied wet flies have always been favorite patterns and the Carrot Nymph is an easy-to-tie pattern that is a good choice if you want to experiment with an orange nymph or wet fly. Leave the full hackle collar if you’d like to tie it a dry fly, or trim the hackle on the top and bottom to create a pattern with the profile of a nymph.


PATTERN

HOOK – Mustad 9671 or equivalent, size #14 to #12
THREAD – Black 6/0
TAIL – Brown hackle fibers
ABDOMEN– Carrot floss (orange) or dubbing
THORAX – Black chenille (Standard)
HACKLE – Dun hen soft hackle, clipped on the top and bottom


HOW TO TIE

  1. Debarb hook – mount in the vise – Start the thread at about half way down the shank and make a thread base to the bend of the hook, now tie in your tail (one hook shank long) using about four or five brown hackle fibers and wrap the butt ends down on the shank with close wraps so your abdomen will be very smooth then bring your thread back to the rear of the hook shank. Clip off your tag ends of the hackle fibers .
  2. Tie in your floss then with close wraps bring your thread forward to a little past mid shank . Tie off and clip off the tag end of the floss. TIP= Twist the floss a bit to keep it together and you won’t have any gaps when you wrap it forward
  3. Now tie in some black chenille and wrap forward to about one and a half an eyelets space from the eye of the hook. Tie off and clip off the tag end of chenille.
  4. Select a hen feather with fibers one and a half the gape size and tie it in front of the chenille, then wrap it forward about two or three times and tie off and clip your tag end off ( leave enough space behind the hook eye to make a small head).
  5. Make a small head – whip finish and clip your thread. Add a little head cement to the thread head – then trim the hackle on the top and bottom leaving the fibers hanging to the side.

Try it in different color bodies also

TIE UP A DOZEN OR TWO – AND GO FISHING*** But remember to practice C.P.R. (CATCH – PICTURE – RELEASE).

Flashback Pheasant Tail Nymph

fotm june 2015 1     fotm june 2015 2
Frank Sawyer, MBE
Translated by Carl Wuebben


This is a version of the original conceived and tied by FRANK SAWYER, MBE, an English river keeper. The pheasant tail nymph is one of the oldest of modern nymphs. Frank devised the pattern for use on the chalk streams of southern England. He designed this nymph to imitate several species of the BAETIS family, generally referred to as the “olives”; it quickly became world famous. Franks pheasant tail suggests many of the skinny nymphs that flourish in various habitats, exciting riffles to alluring deep holes in rivers bed of chalk streams or spring creeks; and in Stillwater’s of all sizes


HOOK – Standard nymph, sizes #14 - #16 - #18 - #20 -#22. Try a scud hook also
THREAD – Brown- 6/0 or 8/0.
TAILS – Ring neck pheasant tail fibers.
ABDOMEN – Butts of ring neck pheasant tail fibers.
RIB – Fine copper wire.
SHELLBACK – Pearl flashabou.
LEGS – Pheasant tail fibers.
THORAX – Peacock herl.


HOW TO TIE

  1. Debarb the hook- mount in vise – start your thread behind the eye and lay a thread base all the way to just before the bend of the hook (this gives the material something to hang on to). Now select three or four longer fibers from the center of a ring necked pheasant tail feather. Measure the tips the length of the hook shank, and tie them in at the rear of the shank (This is your tail) secure the butts down on the shank. We will wrap this like herl later to make the body (Abdomen).
  2. Clip 2 or 3 inches of fine copper wire for the rib. Tie in at the base of the tail with tight wraps and the longer part hanging toward the rear of the hook. Now take the pheasant tail butts you should have at the rear of the hook and wrap them forward half way to two thirds up the shank of the hook, then tie off and clip off the tag end – If you end up not having enough herl just tie in another couple fibers and keep going. 
  3. Tie in your flashabou right up against the abdomen (wrapped pheasant tail fibers) two or three inches should do (two strands) and keep it on top of the shank. Advance your thread to about two or three eyelets from the eye, then even up the tips of the fibers of some more pheasant tail fibers (x6) and measure the tips about the length of the hook shank and tie in where your thread is now and the tips hanging over the eye of the hook and on the top of the shank (These will be reversed later for your legs of the fly). Wrap the thread rearward over the butts of the fibers and end tight to the front of the abdomen. Clip tag ends off.
  4. Tie in two or three peacock herl fibers by the tips and at the base of the shell back (flashabou). Make a herl rope by lightly twisting the herl around the thread in a clockwise direction then wrap the peacock herl rope forward and stop one eyelet space from the eye and tie off and clip off the tag end of the herl (You will need this slight gap between the eye and the end of the thorax to tie off the shell back). Counter wind the copper wire at the rear of the fly forward thru the pheasant tail abdomen and the peacock herl thorax and end it and tie off just behind the eyelet, the wire can be clipped off with some dull scissors or just put a little pressure with your finger on one hand at the point you want it to break off and with the other hand just bend the wire back and forth with a little pressure and it will give.
  5. Draw the shell back flashabou over the top of the peacock herl thorax, and tie them off tightly in the gap between the thorax and the hook eye then clip off the tag end of the flashabou (Make sure you leave enough room for the head of the fly).
  6. Separate three leg fibers (hanging over the eyelet) to each side. If you don’t have that precise number, don’t worry – trout can’t count. Pull the fibers back along the side of the fly. Take one turn of thread over them to lock them in place. Pull the fibers back and down along the side of the fly; take another turn of thread to lock them in place. They should slant back and slightly down. Form a need head behind the eyelet, whip finish and cement the head.


TIE UP A DOZEN OR TWO – AND GO FISHING ***but remember to practice C.P.R. (CATCH-PICTURE-RELEASE). 

CLOWN SHOE CADDIS

fotm-may-2015
 JAY ZIMMERMAN Translated by CARL WUEBBEN


Forget your Stimulator flies just tie up a bunch of clown shoe caddis flies the D-rib abdomen is indestructible. The bright Mcfly foam post makes it noticeable from space, but not too crazy from the fish-eye-view.  The way the hook drops off away from the butt of the elk hair/middle of the fly makes it a workhorse dry fly that can suspend heavy droppers. Because of Jay’s purposeful design, the Clown Shoe Caddis lends itself well to broken water and dry-dropper rigs as well as fishing from a drift boat or raft. The heavy hackle and colorful post make the fly both buoyant and visible in the roughest water, and that D-rib body is pretty darn buggy looking also.


PATTERN


HOOK – TIEMCO (TMC) #2487 in #12 - #18
THREAD – 8/0 (70 denier) Olive dun UNI-THREAD
BODY – Small clear D-rib
WING – Yearling elk, natural or dyed dun
HACKLE – Grizzly saddle
INDICATOR – Mcfly foam in your choice of bright colors
THORAX - Black Superfine dubbing

HOW TO TIE


  1. Debarb hook- place hook in vise – start thread in a little bit into the bend of the hook and wrap a thread base halfway up the hook shank (mid shank). Now tie in your D-rib with the flat side facing up.  While slightly stretching the D-rib keep the D-rib on top of the shank and wrap your thread back over it to the bend of the hook (close wraps), creating a smooth thread underbody as you go. Now bring your thread forward to the mid shank where you tied in the D-rib (close wraps).   
  2. Wrap the D-rib forward over the underbody keeping close wraps and tie off where your thread is now (mid shank). Clip off the tag end. 
  3. Build a thread base up to the hook eye and back again to the front of the abdomen      (d-rib).       
  4.  Cut, clean out the underfur and stack a clump of elk hair as long as the hook and as thick as about the diameter of the abdomen (D-rib). Tie it in place on top of the last turn of D-rib with the tips toward the back of the hook. Now make a narrow band of thread over the flared butts to lock them in place, and then trim off the butts of hair at an angle (45 degree). Lift the tips of the wing and make a single turn of thread around the back of the elk hair to group the hair together in a tight bunch.
  5. Wrap forward over the butt ends of the hair to the hook eye, creating a smooth base. Prepare and tie in an appropriately sized grizzly saddle feather (gap long fibers) at the base of the wing (strip off a small section of the feathers fibers at the butt side to tie on).  
  6. Separate a small bunch of Mcfly foam (any color) from the main clump and tie it down on top of the hook at the center of its length. Make the anchoring wraps one on top of the other at the center of the thorax area (the smooth base covering the elk hair butts). Lift the Mcfly foam up together and put a few wraps of thread at the base of the foam like posting it but not going up as far just about four or five wraps should coral it so you can do the next step easier. Bring your thread up to the eye of the kook.  
  7. Dub the thorax starting just behind the hook eye and continue back to the base of the wing. (twist your dubbing onto the thread by putting a little dubbing wax on the thread then using little pieces of dubbing at a time, twist the dubbing onto the thread between you thumb and index finger in a clockwise direction to make a small and slender noodle ( you can add more if needed ). Return the dubbing back to the hook eye, forming a robust thorax. If the foam gets in the way pull it back out of the way.
  8. Spiral wrap the hackle forward over the dubbed thorax with close wraps and tie it off at the hook eye. Clip the excess feather off and build a small thread head and whip finish.
  9. Stretch the Mcfly foam slightly upward and clip it just beyond the hackle length. Trim the hackle on the bottom of the thorax flush with the dubbing (bottom only).


TIE UP A DOZEN OR TWO – AND GO FISHING*** But remember to practice  C.P.R. (CATCH – PICTURE – RELEASE).

The Western Coachman

fotm-march-2015BUZ BUSZEK Translated by CARL WUEBBEN


The Western Coachman is without a question a very productive fly pattern it has produced bream and black bass; five species of trout; black crappie; and even golden shiners; chain pickerel and bowfins. The Western Coachman was designed by fly shop owner BUZ BUSZEK (The gentleman the IFFF award was named for) of Visalia, California in either 1939 or 1940, originally as a local pattern for taking Sierra rainbow and brown trout in the Kings River. He patterned the Western Coachman after the wet version of the Orvis Company’s royal coachman, which was designed in 1878. The various Coachman designs, including the Royal Wulff, Royal Stimulator and others, are all ancestors of the earlier original Coachman that was designed in the 1830’s by the driver or coachman for the royal family of England.


PATTERN


HOOK – Mustad 3906, Tiemco 3769, Daiichi 1550 size #10 - #16.
THREAD – Black Danville’s 6/0 or Gudebrod 8/0
TAIL – Golden pheasant tippet
RIB– fine gold wire
BODY – Peacock herl with the fine gold wire rib
WING – White deer hair 
HACKLE – Coachman brown rooster neck or hen saddle feather
HEAD – Black thread

 HOW TO TIE


  1. Debarb hook – mount in vise – start your thread about one eyelet from the eye and with nice close wraps make a thread base to about the middle of the hook shank- clip off tag end of thread then tie in the gold wire on the bottom of the shank and while using the wire to continue wrapping the thread base to just a little before the hook bend (This will be your ribbing).
  2. Now with the thread at the rear of the hook shank tie on a tail of golden pheasant tippets that is as long as the hook shank and about12 to 15 fibers. Now at the end of the shank wrap one turn of thread under and behind the tail to tilt it up slightly.
  3. Tie in several peacock herls (By the tips) on the bottom side of the shank at the rear of the tail (Were your thread is now). Then pull your thread down next to the herl and using good hackle pliers, clip the herl and thread together near the herl stems (Butts). Now take your thread back up and secure it to the hook and wrap it forward to approximately the 75 percent point (About 3 to 4 eyelets from the eye) on the shank. Next, twist the hackle plier’s counter- clockwise until you have a nice looking peacock chenille rope then wrap the peacock rope forward to meet the thread, tie off and trim off the peacock tag ends.  Wrap the gold wire ribbing forward using five turns (Winding in the same direction as the herl was wrapped); tie off and trim the excess wire to finish the body. Wrap the thread forward to the 25 percent point (2eyelets) and leave it there for the next step.
  4. Now strip the fluffy fibers from the base of a saddle hackle that is a gap and a half to two gaps long on the fibers and tie in the butt side at a 45 degree angle (curve side facing away from you) right in front of the peacock then wrap several close turns of the hackle, tie off and trim the tag end off. Be sure to leave room for the wing. 
  5. Put some white deer in your hair stacker (Not too much but not too thin) and with a few taps on the table you will have your wing tips nicely stacked and ready to tie to the shank in front of the hackle wraps, the wing should be long enough to reach the end of the hook bend. Trim the waste ends, then bind them in place with several thread turns.
  6. Wrap a tapered thread head, whip finish and trim the thread. Put a coat of head cement to finish the fly.


TIE UP A DOZEN OR TWO – AND GO FISHING*** But remember to practice C.P.R. (CATCH - PICTURE - RELEASE). 

Pregnant Scud

fotm-1-april-2015 fotm-2-april-2015

Translated by CARL WUEBBEN
 

According to ANDREW PULS who earned his master’s degree as a fisheries biologist, there are sound reasons for tying the pregnant scud. Scientific research has demonstrated that orange segmented scuds suffer increased predation from trout, probably due to the crustacean’s increased visibility in the water. The orange bead in the middle of the body of the pregnant scud mimics a scud that is either full of eggs or has become infected by a parasite. The pregnant scud works especially well when you need a pattern containing a dash of flash or when fishing heavily pressured water. The fly has a unique, realistic look that most other anglers overlook.


PATTERN


HOOK – Mustad C49S, Tiemco 2457 – 2487 – 2488 or any bent shank scud hook sizes #14 - #12
THREAD – Olive 8/0 (70denier)
BEAD – Orange glass bead (10/0 seed beads work from JO-ANNS)
BODY – Light – olive sow-scud dubbing
SHELLBACK – A strip clipped from a plastic freezer bag. 
RIB – 5X clear monofilament
 

HOW TO TIE


  1. Debarb hook- put bead on the hook – mount in the vise and start thread in at the rear of the hook (push bead to the eyelet). Now tie in your 5X ribbing.  
  2. Cut a piece of clear plastic freezer bag about a gape width (or side center to side center) then clip one end to a point and tie it in with the point forward and the rest hanging to the rear (slightly into the bend of the hook).
  3. Now dub the rear body one of two ways,

By hand = Pull a small length of thread out from the bobbin (about 3 inches) and put some dubbing wax on it, then twist on your dubbing with your fingers in either a clockwise or counterclockwise direction between your thumb and index finger just pick one or the other direction and stick with it.


With dubbing loop tool = bring about three inches of thread downward and put your dubbing tool on the thread then keep a hold on the tool with your left hand (for right handers) and bring your thread back up to the hook shank where your thread was started and put a few wraps back over the back part of what now is your dubbing loop. Put some dubbing in the entire loop and twist it till it’s tight. Bring your thread to the center of the hook shank. Now with either method wrap you dubbing forward to just before the halfway mark and tie and clip the end of the loop off then bring your bead up against your rear dubbed body and bring your thread over the top of the bead to the front of it and make a small dam in front of it to keep it in place better or you can whip finish the rear body –clip the thread- then push your bead up against the rear body and restart your thread then a thread dam in front of the bead.   

  1. Put some more dubbing on your thread like in part #3 and dub the front body but keep it close to the bead and wrap it forward to about 1 ½ eyelets space from the eye and tie off the dubbing thread or loop if you used it then use a dubbing rake or bodkin to pull out the fibers and pull them downward to the side.
  2. Bring your plastic shellback over the top of the fly and try to get as much fibers from the dubbing to go down each side then stretch it a little and tie of in front where your thread is now. Clip off any excess plastic.
  3. Now counter wrap your ribbing forward and tie off in front where your thread is now. You should space it out to have 3 sections behind the bead and 2 sections in front of it with a total of 6 with the bead. Build a small tapered head – whip finish it then add a little head cement or UV glue.
  4. With your bodkin or a dubbing rake pick out some of the hair on the bottom of the fly so it looks more buggy.


TIE UP A DOZEN OR TWO – AND GO FISHING*** But remember to practice  C.P.R. (CATCH – PICTURE – RELEASE).