Prince Nymph

WWW.AVIDMAX.COM

     
6 grand hopper taped feather

Translated by Carl Wuebben

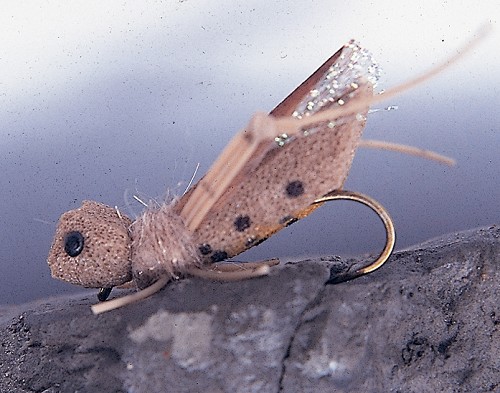
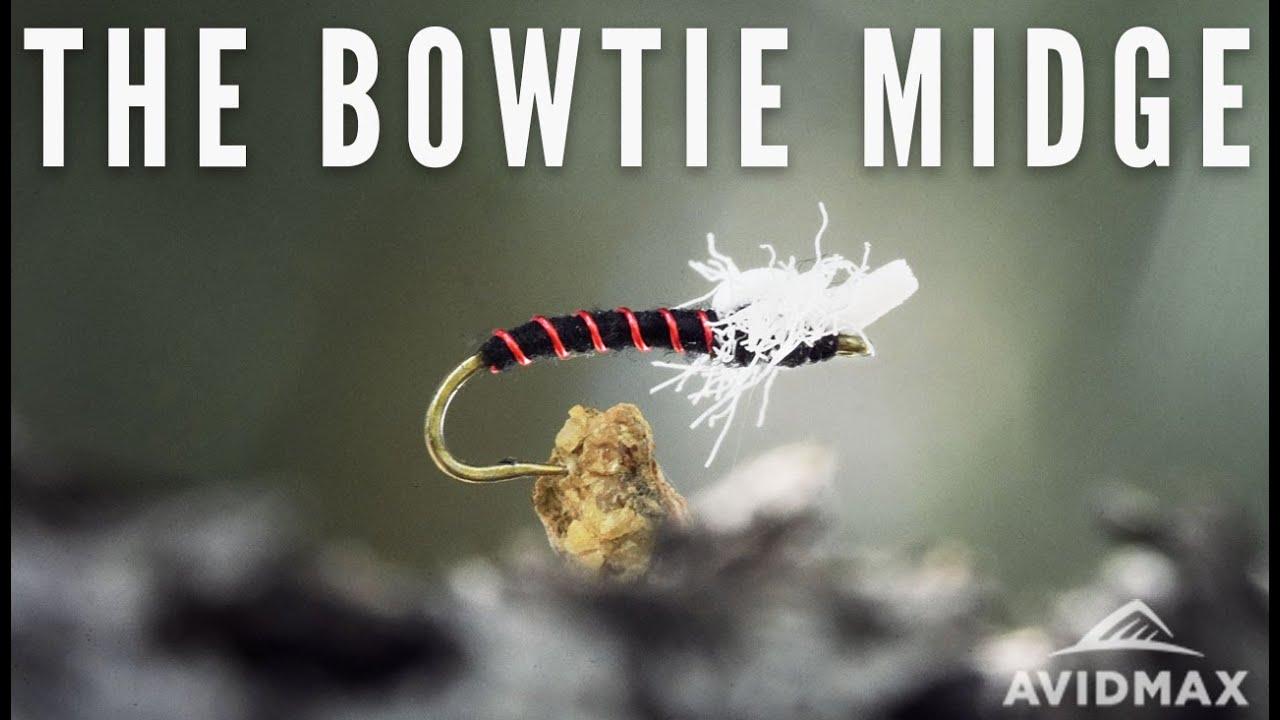
Aptly named the Bowtie Midge is a killer pupating midge pattern. This little bug may make your day on your next Stillwater excursion. It is an excellent midge pattern that also translates nicely to imitate their larger chironomid cousins. The foam splitting the emerger wing not only looks good but helps with presentation. This fly is deadly when fished on a sinking line that gets the fly down to depth. Once the line maxes out the fly will lift back up in the column perfectly mimicking the naturals that are on the move. Fish love to strike during these hatch occurrences. The Bowtie Midge will help you maximize your chances when the bugs are on the move.

PATTERN

HOOK – Tiemco 200R #16
THREAD – 30d (18/0) Semperfli nano silk or 12/0 thread (50 denier) in black
RIB – Red brassie UTC ultra-wire
ABDOMEN – Black Hareline Superfine dubbing
WINGS – White Mcflylon or antron yarn
WING BUD – 1mm white Razor foam cut in a strip about the size of the hook gap


HOW TO TIE

  1. Debarb hook – mount in vise – start thread in about one eyelet space from the eye and lay a nice close thread base to just a little bit into the bend of the hook. Clip your thread tag end off and wrap back to the tie in point.      
  2. Grab your red brassie wire for the ribbing and pull off about four inches (this will do for a couple flies) and tie it in on the nearside of the hook shank (your side) with the long part to the rear and secure it on the hook and end a little bit into the hook bend.  
  3. Grab your black superfine dubbing and dub a thin noodle and not to long just enough to barely cover the thread.  Now wrap the noodle forward to just In front of the center of the front half of the hook shank if you come up short on the dubbing just add more on. To make a dubbing noodle just twist the dubbing onto the thread between your thumb and index finger, you may want to try using dubbing wax on the thread or on your fingers if you want.
  4. Spiral wrap the red wire forward and tie off where your thread is now.
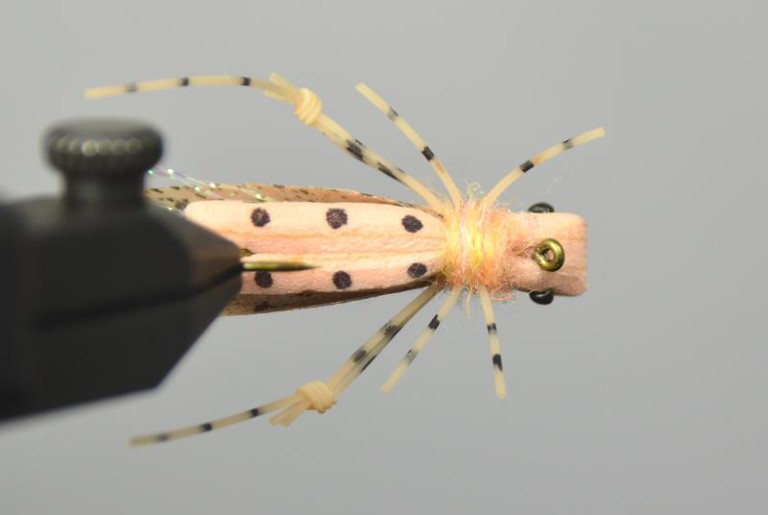
  5. Grab your white 1mm foam and measure a strip about the same size as the hook gap (a long strip will go for many flies) cut the strip and on one end cut each corner to form a point then tie that pointy end on where the thread is now (front of abdomen) with just a very small part facing forward and the longer piece rearward (not too tight of wraps or it will cut thru the foam)snug it down securely and clean up with thread wraps between the eye and rear of wing bud. Bring your thread up against the rear of the wing bud.
  6. Grab your white Mcflylon or antron yarn and clip off a hunk, about two inches will do, now tie it onto the hook with figure eight wraps to get it hanging off to each side.  Snug it down so it won’t slip around the hook, if you have problems with the yarn just trim it a little bit but not too much as it may be too much and it won’t look good when finished but don’t worry we will fine tune it later. Bring your thread to the rear part of the wing bud.
  7. Dub another thin noodle, just enough to cover the thorax area. Wrap it onto the hook and behind the wings and figure eight it around the base of the wings and just a little forward. Leave enough room to tie off the foam wing bud. Your thread should be about two eyelets space from the eye now.
  8. Slightly pull the foam forward and tie off where your thread is now while checking that you don’t crowd the head (don’t cover the eye) then pull the foam rearward and whip finish it and clip the thread. Clip off the foam tag end leaving about the same amount of foam as the wing bud (the part pulled forward). Trim the wings to your liking while trying to give them a very small roundness to the tip area.

TIE UP A DOZEN OR TWO – AND GO FISHING*** But remember to practice C.P.R. (CATCH – PICTURE – RELEASE)


Prince Nymph

Douge Prince – Skip Morris – Steve Mathewson

     
6 grand hopper taped feather

Translated by Carl Wuebben

This fly is not named for the flamboyant musician of “purple rain” fame rather the fly is named after its creator Doug Prince of Monterey, California, developed it in the late 1930’s or early 1940’s. His original Prince nymph had a black body, black soft hackle, and a black tail. A modification of his pattern, which he called the “Brown Forked Tail,” became the well-known Prince Nymph. It works in all seasons and in all kinds of water conditions. Doug Prince designed this as a stonefly imitation for fast water. Try adding a gold bead also to get down faster. The pattern is the same except the gold bead.

PATTERN

HOOK – Standard nymph in sizes #10 - #16
WEIGHT – 8 to 15 turns of non-lead or lead wire the diameter of the hook shank
THREAD – Black 8/0 (70 denier) or 6/0 (140 denier)
TAILS – Brown turkey biots or goose biots
RIB – Fine oval gold tinsel or silver
BODY – Peacock herl
HACKLE – Brown hen-neck (one and a half the hook gap size)
WINGS – White goose biots
FILLER – any type of dubbing and any color, it will not be seen.
TIP Biots are brittle so try using a damp paper towel to slightly moisten them and this will make them easier to work with. Don’t soak them, just a little moisture.


HOW TO TIE

  1. Debarb hook – ( if using a bead put it on the hook before mounting) -  mount in vise – start your thread in behind the eye and wrap a smooth thread base rearward to just before the hook bend using your thread tag end to make close wraps then clip your thread tad end off.
  2.  
    Grab your non-lead or lead wire and wrap some on the middle third of the shank 8 to 10 wraps should do but more or less is ok also. Helicopter the wire to remove and push down on the ends with your fingernail or a tool to flatten it against the shank. Now with your thread build a small dam up against the rear of the lead then spiral wrap the thread forward over the lead in wide spirals and build a second thread dam up against the front of the lead. The dams keep the lead in place and help to build a better looking body. Bring your thread back to the bend of the hook.
  3. Grab two brown turkey or goose biots and doing one side at a time and the tail length should be equal to one half to two thirds the length of the hook shank. Hold the biot against the shank on your side of the hook and flat against the side of the hook, with the tip facing rearward and the butt forward. Line up the length of the tail with the bend of the hook and in line with the shank. Biots have a slight curve so you want the biot curving towards you, so the tails will spread apart. Use your fingers to hold it in place then put a couple loose wraps on the pull them tight before removing your finger grip, wrap over the butt all the way up against the rear thread dam and cut off the extra butt end then do the same on the other side. Bring your thread to the hook bend.
  4.  
    Tie in your tinsel where your thread is now (hook bend) long end rearward for the ribbing, bind down securely and bring your thread back to the rear thread dam.   
     
  5. Grab about six peacock herls and align the tips then trim them back a little at the tips. Tie them in by the tips where the thread is now (rear thread dam) and with the bulk of the herl facing rearward use thread wraps to wrap down to the hook bend. Trim any stray herl by the lead. Bring your thread to the hook bend.
     
  6. Use any type of dubbing and any color to make a dubbing noodle by twisting the dubbing onto the thread with your thumb and index finger then wrap onto the hook from the bend to the rear dam (this helps make the body smoother) then with bare thread spiral wrap over the lead and then make another noodle and wrap it on in the front dam and leaving 1/8 inch behind the eye. Bring your thread to the hook bend.
     
  7. Now bring the herls and thread together and gently twist the herls around the thread (be careful the peacock breaks easily) this will reinforce the herl body. Hold the herl ends and thread then wrap it up the shank and lead with close turns to about 1/8 inch behind the eye, keep a hold of the herl ends and separate them from the thread and with the thread tie them down then clip off any herl tag ends.
     
  8. Spiral wrap the tinsel evenly forward about six to nine ribs. Tie off the tinsel in front of the herl body. Trim off tinsel tag end.
     
  9. Bring your thread forward to about halfway between the front of the herl body and the rear of the eye. Grab your brown hackle for the collar and strip off the fluff to bare the stem. Tie it in by the stripped butt to the shank at this halfway point with the tip facing forward over the eyelet and the concave (cupped) side of the hackle should face away from you. Wrap it down to the front of the body and clip the stem tag end off. Thread now by the body. Grab your hackle pliers or just use your fingers to wind the hackle rearward to the body with three or four turns, each turn up against the last. With the thread put a couple wraps on the hackle to secure it then spiral wrap the thread forward thru the hackle trying not to push down the hackle fibers (wiggle thread back and forth as you wrap) trim the hackle tip off.
     
  10. Using your thumb and index finger stroke back the hackle fibers and put a couple wraps just in front and slightly over the base of the hackle to hold it in place rearward.
     
  11. Grab two white biots then take one of them and hold it up to the hook to measure where to tie it in (full length of the hook). Hold the biot with this measured point just behind the eye, set it flat atop the hook, its butt forward and its tip back, its point angled away from you slightly. The slight curve should be up. Use light turns to secure it then three or four more tight thread turns to secure it. Do the same for the other biot but it should angle out to the same degree as the first one but towards you. Trim off the butt ends closely.
     
  12. Cover the cut ends of the biots with tight thread wraps, build a tapered thread head, whip finish and clip your thread then add some head cement to the head. 

TIE UP A DOZEN OR TWO – AND GO FISHING*** But remember to practice C.P.R. (CATCH – PICTURE – RELEASE)


Grand Hopper

Rainy Riding & Jeff Hostetler
www.rainysflies.com

fotm june 2022     fotm june 2022 2
6 grand hopper taped feather
Translated by Carl Wuebben

Grasshoppers inhabit the banks of many rivers from the east to the west coasts during late summer and early autumn, and imitations of these important terrestrials populate the fly boxes of many anglers during this time of the season. Many popular grasshopper patterns are tied using only hair and feathers, but they eventually become waterlogged and sink. With the acceptance of closed-cell foam as a fly tying material, it is possible to create a grasshopper, and other patterns, that float forever. Rainy’s Grand Hopper is ideal for fishing wherever trout feed on hapless grasshoppers that fall or fly onto the water. Change body colors to create imitations of any grasshopper you find along the river. Also try a small hunk of foam on top to create an indicator for you to see the fly better. Get creative it’s your fly.

PATTERN

HOOK – 2x long dry fly hook  #14 to #4 popular sizes are #8 and #6. Dai-Riki 270 or Tiemco 200r
THREAD – Tan 6/0 (140 denier)
BODY – Closed-cell foam ¼ inch thick (about 6mm)
UNDERWING – Pearl Krystal Flash
WING - Tan feather or pheasant church window feather placed on clear packing tape and clipped to shape. Add spots using a permanent marker.
LEGS – Tan rubber legs.
COLLAR – Tan dubbing (superfine will work).
EYES – Black marker – black pinheads or equivalent.
OTHER THINGS – Black or brown fine tipped permanent marker - clear packing tape – Zap-a-gap or super glue.


HOW TO TIE

  1. Hook in vise – start your thread in just in front of the bend of the hook and wrap a nice tight thread base going forward and stopping approximately ¼ the length of the hook shank from the eye. Do this twice and end by the eye where your thread base ends. This helps the foam stay put on the shank.
  2. From your sheet of foam, cut a strip that is ¼ inch wide and about 1/5 longer than the shank of the hook.  (1/4 x 1/4 x 1/5 long). 
  3. Cut a wedge shape in the rear of the foam using a razor or sharp scissors; make an incision down ¾ of the middle of the underside of the foam.  Now apply a good coat of Zap-A-Gap to the thread wrapped on the hook shank, then slip the foam body over the shank and give it a slight squeeze and it will bond to the thread on the shank (wedge facing rearward).  
  4. Where your thread is now slowly put a couple loose wraps over the foam, then some tighter ones but not to firm as it could cut thru the foam and you will need to start over. As you tighten the thread the front foam which will be the head should rise slightly, forming a buoyant and distinct head and body. The rest of the parts of the fly will be tied here also.  
  5. Take a clump of 10 to 15 strands of Pearl Krystal Flash and tie it on top so it extends slightly past the wedge shape on the rear of the fly. Trim off the tag ends.
  6. Now for the wing you can use lots of different things like Thin Skin, plastic sheet or whatever you prefer. We will be using a feather and clear packing tape today. Take a tan feather or pheasant church window feather and if you want to put some dots on it with a permanent marker this is the time to do so, then stick the top of the feather to the clear packing tape. Cut it to the wing shape you want (start with a large triangle and trim it a little at a time) it should end up looking like a heart at the rear and a small straight side in front. The length will be where your thread is now to just a little over the ends of the Krystal Flash. Fold wing in half lengthwise (front to back) and with the taped side facing upward tie it in behind the head (wing should be a little bit on the side of the foam also).   
  7. For the legs, use three or four strands of rubber legs. The main objective is to have a thick thigh portion that comes off the thorax, a knee, and then one strand that will wiggle and protrude into the water. To achieve this, take a long group of legs and tie an overhand knot in the middle (make two of them) this will become the knee. Securely tie the legs to the fly on each side, clip off the tag ends. Then trim the section behind the knee so that only one strand is pointing downward. Tie in one rubber leg on each side on the lower part of each side and trim to size (not very long). You should have a leg facing forward and one rearward and your jointed leg facing all the way to the back.
  8. Make a dubbing noodle with the tan dubbing by twisting the dubbing onto the thread with your index finger and your thumb then take a few wraps over the head/thorax area to cover all the thread wraps and add to the look of the fly. Whip finish, clip your thread and add a small dab of Zap-A-Gap to the thread with your bodkin.
  9. With a black or brown fine tipped permanent marker make bars on the rubber legs and small spots on the foam underside which gives it some superficial texture. You can also add eyes to it with the marker also. Try adding orange or red marker to the rear for a hot spot. 

TIE UP A DOZEN OR TWO – AND GO FISHING*** But remember to practice C.P.R. (CATCH – PICTURE – RELEASE)


Creeper Worm
Svend diesel.com
fotm may 2022
Translated by Carl Wuebben

I love taking a new material and using it on old patterns. A worm is nothing new to fishing or fly tying but with this fly you may learn a new trick of using chenille to make a nice wiggly tail. The variation using this material is as endless as one could imagine, but keeping worms simple is something we all believe is best. Try adding weight like a bead head or lead wire under the chenille even dumbbell eyes. Try a collar of ice dubbing or even a hot spot collar of thread. This fly can be used for trout, bass and even carp. Try it on a salt water hook and give it a try also.


PATTERN


THREAD –
Semperfli wax thread 8/0 (70 denier) in red or equivalent
TAIL/BODY – FNF creeper chenille in marshmallow pink (can get at bob Marriott’s in Fullerton)
CEMENT – Bone dry thin resin or equivalent.

HOW TO TIE

  1. Put weight on hook if using - mount hook in vise – start your thread in right behind the hook eye and lay a thread base to the bend of the hook and clip tour tag end of thread off.
  2. Grab your creeper chenille and tie in where your thread is now and by the tip with the bulk of the bunch hanging rearward, secure it firmly. Now measure out the tail by doubling over the chenille rearward to about two times the hook shank length or to what you want but not too long as the fish may just short strike it and not take the hook.  Cut the chenille about ¾ of the hook shank longer than the tail section. 
  3. Now it’s time for furling the chenille directly to the hook. Hold the tip of the chenille and using both hands twist it till it’s tight and wants to twist on its self. If you don’t twist enough it will be loose and bulkier. Once your satisfied with the quality of twists and diameter of the material, fold the material back toward the original tie in position. Reposition the hand nearest the hook shank, so that your thumb and forefinger pinch the material on top of the hook shank.  With the other hand holding the tail, give it a slight twist as you slowly let go of it and it should twist on its self-forming the tail. Now hold the tail at the base and secure it on the hook and wrap it down good.
  4. Grab your bag of chenille again and tie some on by the tip, at the base of the tail and bring your thread forward to behind the eye –put a half hitch on and put your thread in your bobbin rest. Put some zap a gap or super glue on the hook shank to make the body more durable. Wrap the chenille forward with close wraps and try not to get the rubber leg pieces on the glue, push rearward on the chenille wraps as you go and end behind the eye about on eyelet from it for the small head. Tie off and clip your tag end off.
  5. Pull back any parts going forward and put some thread wraps down to hold them rearward. Use the thread to make a nice thread head or even use another color thread for a hot spot. Clip your thread, add some UV glue and cure it maybe even two coats, brush out the body with a soft bristle brush and not a metal one as it will tear up the chenille body.  

TIE UP A DOZEN OR TWO – AND GO FISHING*** But remember to practice C.P.R. (CATCH – PICTURE – RELEASE)


Baby Fat Minnow
Clark Pierce / FLYFISHFOOD.COM
fotm feb 2022          fotm april 022 2
Translated by Carl Wuebben

Great for bass, it crushes fish, very durable; fish key in on this fly and is a perfect baitfish fly. It’s a sized down version of the low fat minnow. Very transparent and veny looking, the dubbing in front pushes water and allows fish to pick micro vibrations. The marabou tail gives this fly incredible movement. It’s also a very productive trout streamer. Cast out and let it sit a little then strip in. Try tying it in your favorite baitfish colors.


PATTERN

  HOOK – Fulling mill Bonio barbless carp hook #8 or Firehole 315 in #6 or#8, can also use barbed one but pinch off the barb before tying.
  THREAD – Danville flat waxed nylon 70 denier (8/0) in white
  BEAD – (Optional) Plummeting tungsten bead in nickel 7/64ths (2.8mm) to keel it.
  EYE – 3d holographic eyes 1/8 inch in super pearl.
  BODY – Ice dub UV Callibaetis (#ice50 from Hareline dubbing Inc.) can also use in UV pearl – UV tan –UV dark dun. You can also try a ripple ice dub.
TAIL – Fish hunter UV marabou fl. White / white spay hackle chickabou.
HEAD – Bruiser blend junior (very sparse) by Hareline dubbing / hareline.co TOP- holographic grey BOTTOM- cream.
MARKER – TOP – brown (sharpie or chartpak)
                    BOTTOM – marigold in sharpie or goldenrod in chartpak GILLS – red (fine point)
OTHER THINGS NEEDED - Loon UV glue in flow and thick and also UV clear fly finish and a UV light to cure it.


HOW TO TIE

  1. Put bead on hook - mount hook in vise – push the bead toward the eye and start your thread in at above the barb area on the shank and go forward toward the eye to just before the halfway mark on the shank then push the bead rearward to the halfway mark on the shank. Make sure you have enough room to place the eye on later (eye will sit between the hook eye and the bead). Now with your thread use crossover wraps (figure 8’s) like you’re tying in a dumbbell eye to put a thread dam in front and behind the bead. Bring the thread behind the bead.
  2. With your thread tie in a sparse single marabou feather for the tail in behind the bead with the tips hanging rearward to about two hook shank lengths long. Then clip off the marabou tag end.
  3. Grab a little UV dubbing and make a small dubbing noodle (twist between thumb and index finger) and wrap a small ball behind the bead to cover the thread some. Leave thread behind the bead.
  4. While still behind the bead and using the same UV ice dubbing pull some loose from the top of the bag but leave it wispy, then lay it on top of the hook and pinch it so you force it all around the shank with a slight twist of your fingers it will look like a mess. Make one or two loose wraps around the middle of the dubbing then a couple tighter ones to secure it. Then with your fingers brush it all rearward and put some wraps in front of it to hold it rearward (this is called a clump dub technique). Use a brush to comb it out. Bring your thread forward in front of the bead and cover the shank with thread from the eyelet to the bead.
  5. Grab a very sparse clump of the grey bruiser blend junior ( use your fingers to pull apart and put back to align the fibers) then tie it in on top with half of it forward and half rearward then do the same with the cream on the bottom. Fan the fibers out some. Push back the top fibers and tie off then do the same with the bottom fibers. Make a thread head then whip finish and clip your thread. Take the fibers and work some of them to the sides (both top and bottom) and brush them out.
  6. Now using the brown marker and on the top front end put a little on and using your fingers push it in rearward to blend it in (may have to do a couple of times) flip your fly over and on the bottom put a little marigold yellow color on (just a small section) then use your fingers to blend in rearward. With a red fine point sharpie make some gills on the lower half in above the hook point area.
  7. Grab a pair of plyers that have a flat jaw (no grooves) and flatten the thread head area on the sides so you can put the eyes on better. Stick one eye on each side and align them even then with some flow UV glue put some between the eyes on top and while squeezing the eyes hit it with a UV light. Now flip the fly over and do the same on the bottom of the eyes. Now with the thick UV glue put some on all around the eye area (top-bottom-sides) but not too much (but if you do put too much on use your bodkin to remove the extra ) using your bodkin push the glue rearward and into the area just behind the eyes. Hit it with a UV light. The thick glue is tacky so use some of the flow again to coat the eye area and hit it with the UV light and you’re done.

TIE UP A DOZEN OR TWO – AND GO FISHING*** But remember to practice C.P.R. (CATCH – PICTURE – RELEASE)


The Baby Leech
Chris W / fatfingeredflytyer.com
fotm feb 2022
Translated by Carl Wuebben

While this pattern is tied in black any natural color combination should work depending on the pray species in your local waters. Also try unnatural combos such as pink, yellow and crawfish orange. Retrieving with short, erratic strips as well as swing and lift retrieve will produce strikes. Work along weed lines and structure. It works well on most Stillwater fish like bass, sunfish and even trout.


PATTERN

  HOOK – Standard nymph #16 - 12
  THREAD – Black 70 denier (8/0). Also try other natural colors along with pink, yellow and crawfish orange.
  RIB – Ultra wire copper in XS size
  BODY – Dubbing mix in black 
  COLLAR – Rabbit fur in black


HOW TO TIE

  1. Mount hook in vise – start your thread in behind the eye and clip off the tag end of the thread. now grab a hunk of wire and tie it in, then using the wire to keep a nice thread base wrap rearward to the end of the shank, clip any tag end of wire off in front with a pair of wire cutters or use the rear of the blades on your scissors but this will dull the blade fast. Put the wire off in a material clip.
  2. With the dubbing mix dub a tapered body and wrap it forward and this will be covering ¾ of the hook shank. Do this by twisting the dubbing onto the thread with your thumb and index finger.
  3. Now with the wire counter wrap it to the front of the dubbed body. Secure it with thread wraps and clip the tag end of the wire off.
  4. Bring your bobbin down about 3-4 inches then bring the thread back up and tie down the loop on the hook to make a dubbing loop from the rabbit fur by Clipping from a hide or pull from a bag then with a dubbing twister to hold the loop open put the rabbit fur into the loop and twist the tool to make your dubbing loop noodle. Wrap the noodle forward and as you do pull the fibers rearward with each wrap but leave enough room behind the eye for a head and to whip finish. Just a couple wraps will do then tie off and clip your tag end of the noodle off.
  5. Build a thread head, whip finish and clip your thread off, add some head cement to complete your fly.

TIE UP A DOZEN OR TWO – AND GO FISHING*** But remember to practice C.P.R. (CATCH – PICTURE – RELEASE)