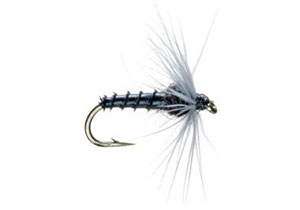
Biot Emerger - Dun or Black


by Charlie Craven

fotm may 2017

Translated by Carl Wuebben

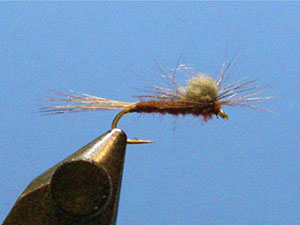
The biot emerger was originally intended as a midge emerger pattern, a slim, handsomely segmented turkey biot body with a few dangling filaments of soft hackle at the front to imitate the midge’s legs and sprouting wings. However, it also excels as an imitation for baetis and other smallish mayflies, and you can also tie them up in a size 16 in yellow tones to imitate pale morning duns. Because of this versatility, tying this pattern provides a quick, easy way to fill your fly box needs, while at the same time honing your skills in working with both biots and soft hen hackles.


PATTERN

HOOK – #16 - #22 TMC 101 or equivalent
THREAD – Black 8/0 (70 denier) uni
ABDOMEN – Black turkey biot
THORAX – Black superfine 
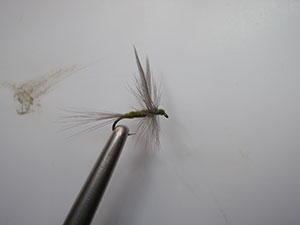
HACKLE – For black emerger use black hen neck hackle for dun emerger use medium dun hen neck hackle 


HOW TO TIE

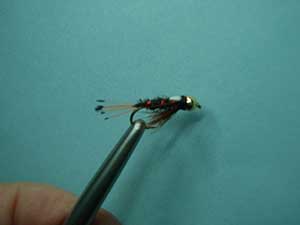
  1. Debarb hook – mount in vise – start your thread in about one eyelet from the eye and make a thread base to just before the bend of the hook then tie in a black turkey biot by its tip with the raised edge facing down so that it will be the following edge on each wrap.
  2.  Grab the end of the biot with your fingers or hackle pliers and make the first turn around the bend of the hook. Look closely at this first turn the stand-up edge of the feather which will be the rib should be on the back edge toward the bend, following the wrap rather than leading it. If yours isn’t, untie it and turn it over,
  3. Continue spiraling the biot forward, overlapping the wraps slightly to create the ribbed body and stopping a little bit past the half-way mark on the hook shank and clip off the tag end of the biot. Do a whip finished to cinch it down well.
  4. Dub a small noodle of black dubbing and wrap a small ball up against the biot body and go forward with it. Just leave about an eyelet’s space between the ball and the eyelet.
  5.  Make a thread base from the ball to the eyelet, then back to the base to make a hackle tie-in. Now select a hen feather that has barbs equal to about 1 ½ to 2 hook gaps. Clip; don’t pull off the fluff from the bottom of the feather (this helps the feather grip onto the thread better). Trim the barbs short on each side.
  6.  Tie the hackle feather in by its butt at the back edge of the hook eye and wrap back over it to the base of the thorax (dubbing ball). Make sure the inside (concave) side of the feather is facing the hook shank. Now bring your thread forward to just behind the hook eye, and then with the hackle fibers fold them rearward to one side. You don’t need to fold the whole feather because you will only take about two turns. Now make those two turns of hackle one in front the other up to the hook eye and tie it off and clip the tag end of the feather off.
  7.  With the thumb and forefinger of your free hand, squeeze the hackle down around the hook shank to help them lean rearward. Now while holding them in place, and taking care to evenly distribute the fibers around the hook shank, make a few turns of thread over the front edge of the wrapped hackle to make it slope back and hold it in place. Make the wrap smooth and slightly tapered as this is also the thread head. Whip finish and clip the thread.

TIE UP A DOZEN OR TWO – AND GO FISHING*** But remember to practice C.P.R. (CATCH – PICTURE – RELEASE)

BLUE-WINGED OLIVE FLOATING NYMPH

fotm april 2017

by ED ENGLE

Translated by CARL WUEBBEN

This method was first introduced by Doug swisher and Carl Richards in their book (Tying the swisher/Richards’s flies), they introduced a split – tail, dubbed body pattern that had what they call a “stacked “wing case of fur or polypropylene. The ball of dubbing keeps the nymph afloat on the surface or in the film. Since first introduced in 1970 their floating nymph has undergone several variations by several others like Fred Arbonna JR., Gary Borger among others. Try tying it with and without the hackle along with a pheasant tail version.

PATTERN

HOOK – standard dry fly, sizes 18 to 24
THREAD – olive, size 8/0 or finer
TAIL– medium dun hackle barbs
BODY – fine olive dubbing (super fine will do)
DUBBING BALL – grey polypropylene
HACKLE – medium dun, one size smaller than normal, tied parachute style

OTHER THINGS NEEDED 

  • dubbing wax

HOW TO TIE

  1. Debarb hook – mount in vise – start your thread at about two eyelets space from the eye and lay a thread base back to just before the hook bend then tie in several hackle barbs from a medium dun feather, it should be about a gape and a half long.
  2. Now using some fine olive dubbing (super fine will do ) dub a tapered body small to the back larger to the front by putting some dubbing wax on the thread (optional) then by twisting the dubbing between your thumb and index finger very tightly but just a small noodle (piece)you can add more if needed. Now wrap the noodle forward forming a small tapered body (thin at the rear and thick at the front) and stop at the spot you started your thread and tie off.
  3. Apply some dubbing wax to the thread and apply a small clump of grey polypropylene dubbing using the same dubbing method used in step #2.
  4. Compress the dubbing between your fingers to create a tight ball. Leave some bare thread between the ball and the hook; this will be used to tie in the hackle if used.
  5. Grab a hackle feather about a hook gape wide and strip off the fluffy stuff on the butt side then Use the bare thread to attach the hackle with the shiny side up and facing rearward toward the hook bend and the feather laying on the top and the bare shank of the feather toward the front facing you .
  6. Slide the dubbing ball into place on top of the hook shank and make a couple of thread wraps on each side of the ball and a few wraps around its base to help secure it in place then your thread should be in front of the ball. Now grab the hackle with your fingers or a pair of hackle plyers and wind the hackle around the base of the dubbing ball then tie it off where your thread is now and clip off the tag end of the hackle.
  7. Now with your non tying hand pull back the hackle and form a small tapered head (large to rear small to front) then whip finish –clip the thread – put a small dab of head cement on (optional). You can fluff up the hackle after you are done .

TIE UP A DOZEN OR TWO – AND GO FISHING*** But remember to practice C.P.R. (CATCH – PICTURE – RELEASE)

BLUE-WINGED OLIVE

fotm february 2017

DAVE HUGHES

Translated by CARL WUEBBEN

We tie this fly in memory of my very good friend and fishing buddy of mine BOB YANTA who loved to fish a Blue winged olive.

Traditional dry flies have hackle fiber tails, slender bodies, upright paired wings, and collars wound from the best rooster hackle. The shape is based on the form of the natural mayfly dun. The hackle represents legs and wings and it also floats the fly on fairly rough water. The tail, body, and hackle have the same footprint on the water and give the same light impressions as the natural. That’s often more important than an exact imitation of an insect, especially on riffles and runs where a trout doesn’t get a long look at a fly and must make a quick decision to take it or leave it for their neighbors to have. The Blue Winged Olive represents the widest array of hatches all across the continent. This is one of the traditional “Catskill” styles of dry flies.

PATTERN

HOOK – Standard dry fly sizes 12 – 20
THREAD – Olive 6/0 (140 denier) or 8/0 (70 denier).
WINGS – Blue dun hen hackle tips.
TAIL – Blue dun hackle fibers.
BODY – Olive fur or synthetic dubbing - can use Superfine.
HACKLE – Blue dun – rooster neck.

NOTES

  • May also use dubbing wax for dubbing material.

HOW TO TIE

  1. Debarb hook – mount in vise – start your thread in about one eyelet from the eye and wrap rearward to just about the halfway mark (make a thread base). Now chose two blue dun hen hackle tips and pair them up to the length of the hook and pull off the excess fibers from the lower half of the feather. Now using a soft loop and a few good turns going forward to tie the wings in one-fourth the shank behind the eye (tips rearward butts forward). With your fingers prop the feathers upward and use a few thread turns behind the wing to prop them up and use your bodkin to separate the feathers then a figure eight of thread between them to keep them separated. Clip off the excess wing stems (butts).
  2. Now using your thread wrap back to the bend of the hook making a close thread base. Even up the tips of five to ten long blue dun hackle fibers and peel or clip them from the stem then measure them the length of the hook and while using a soft loop, a few turns of thread going forward to tie the tails in at the bend of the hook and keeping the tail straight out from the hook shank while wrapping the butts down and going forward to about the midpoint of the shank, then clip off the excess tail fibers (butts).
  3. Bring your thread back to the tail area close to the bend of the hook (put dubbing wax on thread if you want to now) then grab some olive fur or synthetic dubbing and make a tapered dubbing noodle about 1 ½ to 2 inches long (thinner by the hook the fatter downward) – this is done by twisting the dubbing tightly between your thumb and forefinger (in one direction only). Now wrap the body noodle forward from the base of the tail to the wing – it should be slender and tapered but leave a gap between the end of the dubbing noodle and the wings about one turn will do – this will help you tie in the hackle.
  4. Select a blue dun rooster neck hackle feather with fibers the length of two hook gaps. The hackle should be just a little shorter than the wing tips when wound. Strip off the webby fibers from the base of the feather and tie it in by the butts with the concave side facing you and with the stem between the wings then take two turns of thread behind the wings then pinch the wings together and tug them upward and take five to six turns of thread in front of the wings. Clip off the excess stem.
  5. Grasp the tip of the hackle with your hackle pliers then take two or three turns (of the feather) behind the wings then three or four more in front of the wings (close wraps) leaving enough room for the head – tie off the hackle with three or four wraps of thread and clip off the excess feather tip. Gather all the hackle fibers back from the eye with your other hand and take a few wraps of thread up against the hackle to hold the hackle back and to form an even base for the head. Whip finish and clip the thread then apply some head cement to the head.

TIE UP A DOZEN OR TWO – AND GO FISHING*** But remember to practice C.P.R. (CATCH – PICTURE – RELEASE)

Gold Ribbed Hare's Ear Nymph
Translated by CARL WUEBBEN

A few fur nymphs form the core of any successful sunk-fly collection. I would be hard to imagine venturing out to any trout water without gold ribbed hare’s ear nymphs lined up in rows in your fly box. Like any of the best searching flies, they work so well because they are roughly the shape and colors of a wide variety of natural food forms. This is one of the greatest searching flies of all. Try tying it in olive also and with a bead head.

PATTERN

HOOK – Standard nymph sizes 10 – 16.
WEIGHT – 10 to 15 turns of lead wire (can use non lead instead) or a beadhead instead.
THREAD – Black 6/0 (140 denier) or 8/0 (70 denier).
TAIL – Hare’s mask guard hair –can use pheasant tail fibers.
RIB – Oval gold tinsel
ABDOMEN – Tan hare’s mask fur (can use light prepackaged rabbit dubbing).
WING CASE /SHELLBACK – Treated (see note below) mottled turkey feather section – omit on sizes 16 and smaller.
THORAX – Dark hare’s mask fur, with guard hair (can use prepackaged dark rabbit dubbing).

NOTES

  • Can use a bead head instead of the lead.
  • May want to buy a complete mask.
  • May also use dubbing wax for dubbing material.
  • Prep the turkey feather with some soft-tex (spread on) or feather tuff (spray on) the day before you’re going to tie (should be dry) this keeps the feather from splitting.

HOW TO TIE

  1. Debarb hook – if using a beadhead put this on first then mount in the vise – exclude lead if using a beadhead or wrap ten to fifteen turns of lead wire around the shank, center it between the eye and the beginning of the bend of the hook. Standard weighting calls for lead wire the diameter of the shank (can underweight one size) start your thread behind the eye and wrap a small tapered dam in front of the lead then jump your thread over to the rear of the lead by loosely wrapping rearward then form a small tapered dam to lock it in at the rear of the lead also. You can put some zap-a-gap on the thread dams if you feel a need to.
  2. Clip a small amount of hare’s mask fur from the cheek. Remove most of the underfur from the longer guard hairs. The tail should be rough so leave some underfur. Tie it in at the bend of the hook one-half or two – thirds the length of the hook shank. Layer the thread over the tail butts to the back of the lead wire, and clip the excess there. Tie in two or three inches of oval tinsel behind the lead wire then wrap the thread rearward over the tinsel to the base of the tail (this will be your ribbing later).
  3. Clip fur from various parts of the hare’s mask (lighter color), remove most of the guard hair’s, and mix it in a blender , or you can buy it premixed in a package then dub a noodle of dubbing (thinner and add another noodle as needed) onto the thread by taking a little bit of dubbing and twisting it onto the thread fairly tight between your thumb and index finger – some people like to use dubbing wax on the thread before putting the dubbing on as it helps the dubbing to stay on while you wrap it on the hook. Wrap the dubbing noodle from the base of the tail to just past the midpoint of the hook shank (tapered from the tail (thinner) to midpoint (thicker) let the fibers stick out don’t clip them off you want it rough. Now take the ribbing that you tied in on step two and take three to five evenly spaced turns over the fur but with reverse wraps (counterclockwise) to hold the fur in place and tie off at the front of the fur then remove the tag end by putting your thumbnail from one hand at the base of the wire and with the other hand grab a hold of the wire and give a tug while wiggling the wire from side to side.
  4. Clip a section of your treated turkey feather (see note on how to treat) about one hook gap wide. Tie the thicker or butt end of the feather in just in front of the abdomen and wrap back up against it with the shiny side or marking side facing down and later we will bring it forward and the shiny side or marked side will be on top. Wrap it close to the abdomen so you won’t have a gap between the thorax and the abdomen (the fur segments). Now clip off any excess butts of the turkey feather
  5. The thorax should be darker, fatter, and have loose fibers sticking out to represent the legs of the insect, blend a mix of hares mask fur that that includes more darker underfur than the mix for the abdomen, leave in most of the guard hairs or use the prepackaged darker rabbit fur. Dub a loose and fibrous section of this fur onto your thread but not too much on the noodle as you can just dub another noodle till you get the amount you want on the hook. Now wrap your noodle forward and start by making sure your thorax is up close to the abdomen (Abdomen = back of body & Thorax = front of body) going forward and with a tapper toward the eye – fat in the rear of the thorax (middle of the hook) and thinner to the front (behind the eye of the hook) stop about one eyelets space behind the eye to leave space to tie in the wing case and build a thread head.
  6. While gently using your fingers or bodkin to push up the wing case (turkey feather) at the base of the feather, slide it forward and along the sides, go slow so it won’t split and tie it in behind the eye of the hook-clip off the tag end – now form a nice slightly tapered (thin in the front and fatter to the rear) thread head-whip finish-clip your thread off then apply some head cement to the head. If the fibers of the thorax are not loose and spiky at this point, use your bodkin to tease out the fur to the sides and bottom, like legs on a natural insect. You can also tie it in an olive color too.

TIE UP A DOZEN OR TWO – AND GO FISHING*** But remember to practice C.P.R. (CATCH – PICTURE – RELEASE)

Peacock Doctor

fotm october 2015

Originator is unknown but first tied around the 1920’s 

Edited by CARL WUEBBEN


The origin of this streamer is vague, but it appears to have been created in the early 1920’s or late 1910’s. Pat Barnes relates on a plate of his favorite flies, now owned by his son Charles that he “fished this fly extensively in prohibition days.” One of his favorite places to use it was Ennis Lake, known in those days as Meadow Lake. In prohibition days, Barnes, who began fly fishing at the age of twelve and as a teen-ager like Most Montana fly fishers favored presenting wet flies in the 1920’s. Pat was no exception.

PATTERN


HOOK – Mustad 79580, or equivalent, size #4 - #8
THREAD – Black 6/0
BODY – Flat silver tinsel
UNDERWING – Red bucktail under medium blue bucktail or calf tail
OVERWING  Six or eight peacock sword herl (Don’t use regular peacock herl


HOW TO TIE


  1. Debarb hook – mount in the vise – start your thread in just a little bit behind the eye of the hook then tie in your silver tinsel on top of the shank and with very close wraps so you make a smooth underbody and using the tinsel to help you – wrap back to the bend of the hook with the thread and the tinsel then again with very close wraps bring just your thread forward and stop just about 4 of 5 eyelets from the eye.
  2. Wrap the tinsel forward keeping each edge real tight to the other (touch wraps) and stop where your thread is now and tie off and clip the tag end of the tinsel off.
  3. Now grab some red bucktail about the thickness of two hook shanks and one hook gape longer than the entire hook shank and tie in where your thread is now (4 or 5 eyelets from the eye) and on top of the shank (tips facing rearward) – this will be the bottom part of the of your underwing, clip off your tag ends of the bucktail at an angle so you will have a nice tapered head.
  4. Grab some medium blue bucktail about the thickness of one hook shank and the length of the hook shank then tie it in on top of the red bucktail (tips facing rearward) – clip at an angle again for that smooth tapered head.
  5. Tie in six or eight peacock sword herls (pull off of sword feather – don’t use regular peacock herls cause it’s not as vibrant and full) on top of the blue bucktail with the tips facing rearward and extending one gape length past the red bucktail – tie off then clip off your tag ends.
  6. Using the thread build up a tapered head to cover all the material tips and make a nice looking head – it should be about four or five eyelets space from the eyelet. Whip finish – clip off your thread then put some head cement on the head.


TIE UP A DOZEN OR TWO – AND GO FISHING*** But remember to practice C.P.R. (CATCH – PICTURE – RELEASE)

The Royal Flush

fotm september 2015

Skip Morris

Edited by CARL WUEBBEN


 The royal coachman dry fly stands as the flagship for all “attractor” fly patterns, flies designed not so much to imitate fish food as to satisfy flights of the imagination and the Royal Coachman is well known to any serious fly fisher and it has a record of over a hundred years of catching trout. So it was a great model for the Royal Flush nymph. Fanciful as it clearly is, the Royal Flush is arguably not entirely unnatural. The mayfly ameletus’s three nymphal tails are tipped with contrasting color along the lines of the Royal Flush’s golden pheasant tippets and the white wing case could remind trout of a whitish nymph having just shed an exoskeleton, as mayflies do numerous times throughout their underwater lives. The dark and shining herl body is a long proven approach to artificial nymph design, as is the brown hackle half-collar. Still, nothing is going to explain away that golden bead. Perhaps attractor flies work precisely because they look unlike anything a fish ever ate. No one knows for sure. But attractors do work, sometimes far better than solid imitations.


PATTERN
HOOK – Heavy wire, 1x long (standard nymph hook), humped shank is optional, sizes #16-#10
BEAD – Gold metal, 3/32 – inch for size 16 hooks 7/64 – inch for size 14, and 1/8 – inch for size 12 and 10
WEIGHT – Lead or lead – substitute wire, 0.015-inch (could go larger on bigger hooks)
THREAD  – Black or red 6/0 (140 denier) or 8/0 (70 denier). Try the red sometime it kicks up the brightness factor a solid notch.
TAIL – Golden pheasant tippets.
RIB – Fine red copper wire over red flashabou.
ABDOMEN  – Two or three peacock herls
WING CASE – Clear stretch flex, scud back, or medallion sheeting, 1/8 –inch wide (this clear strip is optional), over white duck primary, goose shoulder, or any white feather section.
THORAX  – Same peacock herl used for the abdomen.
HACKLE  – Brown hen neck, as a half-collar


HOW TO TIE

  1. Debarb hook – put the bead on the hook (small hole first) - mount in the vise then wrap your lead or none lead wire on up the full length of the shank. Make the ends tidy by pushing the ends up against the shank. Push the lead firmly into the rear of the bead. The lead and bead will now cover about two thirds to three quarters of the shank.
  2. Start your thread in just before the bend of the hook and behind the lead wraps. Tie in a small bunch of pheasant tail tippets on top of the shank (tips hanging rearward), at the hooks bend where your thread is now, this will be your tail and it should be half to two thirds the length of the shank. Wrap the thread up the fibers and shank to the rear of the lead. Trim off the butts of the fibers closely, so they lie right up against the lead.
  3. Tie in some fine red copper wire at the rear of the lead wraps to the bend of the hook. Hang the larger end toward the rear of the hook and put it in your material clip to get it out of the way for now. Keep all your materials right up against the lead wire for a smooth underbody.
  4. Double a full length of red flashabou over the thread then bind the doubled end against the rear of the lead (on top of the shank) and then down to the tail.
  5. Grab three peacock herls (two for smaller hooks) and align the tips, then clip off about a half inch of them (tips). Tie the herl in by their cut tips right behind the lead wrappings and wrap back to the tail again for that smooth underbody. Spiral wrap the thread forward to about a little past the halfway mark. Wind the three herls together halfway up the shank- toward you over the top and away from you beneath the hook, (counter clockwise) the opposite of the usual direction- and then bind them there, but don’t cut them.
  6. Put a couple more wraps on the herl then pull them back and put a few thread wraps on to hold them back. Now where your thread is now (mid shank – right in front of the peacock) tie in a strip of clear stretch flex or the like. On top of the clear strip tie in a section of white duck primary or any white feather will do. Make it slightly smaller than the hook gape wide and tie them in good and trim off any tag ends but remember to keep that smooth underbody.
  7. Spiral wrap the thread to the rear of the bead. Now wind the remaining herl to the rear of the bead also but remember to wrap in the reverse direction like before (start it close to the other herl).Tie off the herl behind the bead then clip the herl tag ends as close as you can.
  8. Pull the wing-case materials up and forward; then with a couple loose thread wraps bind them down (temporarily) behind the bead head. Now with one strand of the flashabou that’s at the rear of the hook (the second one is a backup strand) spiral wrap forward in three to five turns to the rear of the wing case (clear strip and feather) and going in a normal direction (clockwise) when you’re at the wing case back off your thread holding the wing case and lift the wing case up so you can continue wrapping the flashabou to the bead in two or three turns. Tie it down and trim off any tag ends. If all went well, trim off the second, back up, strand at the bend or if the first broke you get to use the second one.
  9. Pull the wing case materials forward again to temporarily hold the in place with a couple loose wraps. Now with the wire at the tail wrap over the flashabou, tightly, right in its tracks, to the wing case. Now back off the thread wraps holding the wing case and continue wrapping the wire over the flashabou all the way to the bead, then tie off and clip off the tag ends (wire or flashabou).
  10. Select a hen hackle appropriate to the size of your hook using a hackle gauge or just hold up to the hook shank and fold it over to see if it’s about a gape and a half size. Strip the fibers off the hackle base (butt side), and tie the hackle in by its bare stem up against the bead (butt side facing to the bend) and the main part of the feather facing forward over the bead and eyelet. Wrap the thread backward about three close turns and trim off the butt tag ends.
  11. Wind the hackle back in three close turns, then wind the thread forward, through the fibers to the bead (rock the thread back and forth as you wrap so you don’t lay down any feather fibers). This makes a very strong hackle collar – its stem is crossed and reinforced by thread three times.
  12. Pinch down the hackle fibers firmly, so they sweep back. Part the hackle fibers on top so they go to each side and then pull the white feather section forward and down – tie off behind the bead. Now do the same with the stretch strip and tie off on top of the white feather and behind the bead head. Trim off the tag ends of stretch strip and feather – whip finish – clip your thread – add head cement to the whip finish and your done.

    TIE UP A DOZEN OR TWO – AND GO FISHING*** But remember to practice C.P.R. (CATCH – PICTURE – RELEASE)