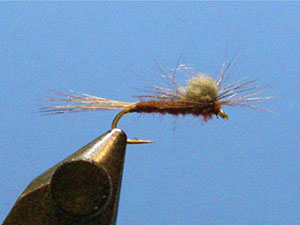
BLUE-WINGED OLIVE FLOATING NYMPH
by ED ENGLE
Translated by CARL WUEBBEN
This method was first introduced by Doug swisher and Carl Richards in their book (Tying the swisher/Richards’s flies), they introduced a split – tail, dubbed body pattern that had what they call a “stacked “wing case of fur or polypropylene. The ball of dubbing keeps the nymph afloat on the surface or in the film. Since first introduced in 1970 their floating nymph has undergone several variations by several others like Fred Arbonna JR., Gary Borger among others. Try tying it with and without the hackle along with a pheasant tail version.
PATTERN
HOOK – standard dry fly, sizes 18 to 24
THREAD – olive, size 8/0 or finer
TAIL– medium dun hackle barbs
BODY – fine olive dubbing (super fine will do)
DUBBING BALL – grey polypropylene
HACKLE – medium dun, one size smaller than normal, tied parachute styleOTHER THINGS NEEDED
- dubbing wax
HOW TO TIE
- Debarb hook – mount in vise – start your thread at about two eyelets space from the eye and lay a thread base back to just before the hook bend then tie in several hackle barbs from a medium dun feather, it should be about a gape and a half long.
- Now using some fine olive dubbing (super fine will do ) dub a tapered body small to the back larger to the front by putting some dubbing wax on the thread (optional) then by twisting the dubbing between your thumb and index finger very tightly but just a small noodle (piece)you can add more if needed. Now wrap the noodle forward forming a small tapered body (thin at the rear and thick at the front) and stop at the spot you started your thread and tie off.
- Apply some dubbing wax to the thread and apply a small clump of grey polypropylene dubbing using the same dubbing method used in step #2.
- Compress the dubbing between your fingers to create a tight ball. Leave some bare thread between the ball and the hook; this will be used to tie in the hackle if used.
- Grab a hackle feather about a hook gape wide and strip off the fluffy stuff on the butt side then Use the bare thread to attach the hackle with the shiny side up and facing rearward toward the hook bend and the feather laying on the top and the bare shank of the feather toward the front facing you .
- Slide the dubbing ball into place on top of the hook shank and make a couple of thread wraps on each side of the ball and a few wraps around its base to help secure it in place then your thread should be in front of the ball. Now grab the hackle with your fingers or a pair of hackle plyers and wind the hackle around the base of the dubbing ball then tie it off where your thread is now and clip off the tag end of the hackle.
- Now with your non tying hand pull back the hackle and form a small tapered head (large to rear small to front) then whip finish –clip the thread – put a small dab of head cement on (optional). You can fluff up the hackle after you are done .
TIE UP A DOZEN OR TWO – AND GO FISHING*** But remember to practice C.P.R. (CATCH – PICTURE – RELEASE)