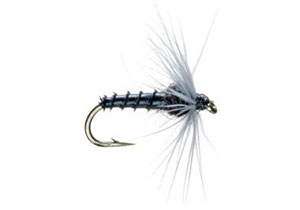
Biot Emerger - Dun or Black
by Charlie Craven
Translated by Carl Wuebben
The biot emerger was originally intended as a midge emerger pattern, a slim, handsomely segmented turkey biot body with a few dangling filaments of soft hackle at the front to imitate the midge’s legs and sprouting wings. However, it also excels as an imitation for baetis and other smallish mayflies, and you can also tie them up in a size 16 in yellow tones to imitate pale morning duns. Because of this versatility, tying this pattern provides a quick, easy way to fill your fly box needs, while at the same time honing your skills in working with both biots and soft hen hackles.
PATTERN
HOOK – #16 - #22 TMC 101 or equivalent
THREAD – Black 8/0 (70 denier) uni
ABDOMEN – Black turkey biot
THORAX – Black superfine
HACKLE – For black emerger use black hen neck hackle for dun emerger use medium dun hen neck hackle
HOW TO TIE
- Debarb hook – mount in vise – start your thread in about one eyelet from the eye and make a thread base to just before the bend of the hook then tie in a black turkey biot by its tip with the raised edge facing down so that it will be the following edge on each wrap.
- Grab the end of the biot with your fingers or hackle pliers and make the first turn around the bend of the hook. Look closely at this first turn the stand-up edge of the feather which will be the rib should be on the back edge toward the bend, following the wrap rather than leading it. If yours isn’t, untie it and turn it over,
- Continue spiraling the biot forward, overlapping the wraps slightly to create the ribbed body and stopping a little bit past the half-way mark on the hook shank and clip off the tag end of the biot. Do a whip finished to cinch it down well.
- Dub a small noodle of black dubbing and wrap a small ball up against the biot body and go forward with it. Just leave about an eyelet’s space between the ball and the eyelet.
- Make a thread base from the ball to the eyelet, then back to the base to make a hackle tie-in. Now select a hen feather that has barbs equal to about 1 ½ to 2 hook gaps. Clip; don’t pull off the fluff from the bottom of the feather (this helps the feather grip onto the thread better). Trim the barbs short on each side.
- Tie the hackle feather in by its butt at the back edge of the hook eye and wrap back over it to the base of the thorax (dubbing ball). Make sure the inside (concave) side of the feather is facing the hook shank. Now bring your thread forward to just behind the hook eye, and then with the hackle fibers fold them rearward to one side. You don’t need to fold the whole feather because you will only take about two turns. Now make those two turns of hackle one in front the other up to the hook eye and tie it off and clip the tag end of the feather off.
- With the thumb and forefinger of your free hand, squeeze the hackle down around the hook shank to help them lean rearward. Now while holding them in place, and taking care to evenly distribute the fibers around the hook shank, make a few turns of thread over the front edge of the wrapped hackle to make it slope back and hold it in place. Make the wrap smooth and slightly tapered as this is also the thread head. Whip finish and clip the thread.
TIE UP A DOZEN OR TWO – AND GO FISHING*** But remember to practice C.P.R. (CATCH – PICTURE – RELEASE)


