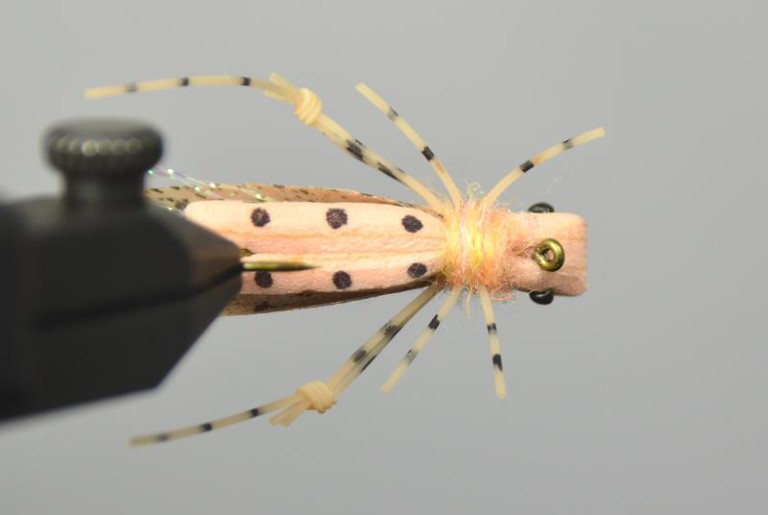
Grand Hopper
Rainy Riding & Jeff Hostetler
www.rainysflies.com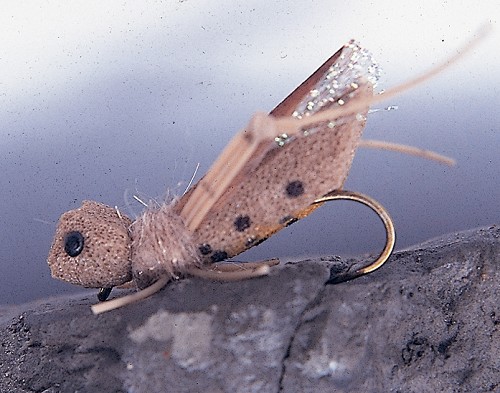
Translated by Carl WuebbenGrasshoppers inhabit the banks of many rivers from the east to the west coasts during late summer and early autumn, and imitations of these important terrestrials populate the fly boxes of many anglers during this time of the season. Many popular grasshopper patterns are tied using only hair and feathers, but they eventually become waterlogged and sink. With the acceptance of closed-cell foam as a fly tying material, it is possible to create a grasshopper, and other patterns, that float forever. Rainy’s Grand Hopper is ideal for fishing wherever trout feed on hapless grasshoppers that fall or fly onto the water. Change body colors to create imitations of any grasshopper you find along the river. Also try a small hunk of foam on top to create an indicator for you to see the fly better. Get creative it’s your fly.
PATTERN
HOOK – 2x long dry fly hook #14 to #4 popular sizes are #8 and #6. Dai-Riki 270 or Tiemco 200r
THREAD – Tan 6/0 (140 denier)
BODY – Closed-cell foam ¼ inch thick (about 6mm)
UNDERWING – Pearl Krystal Flash
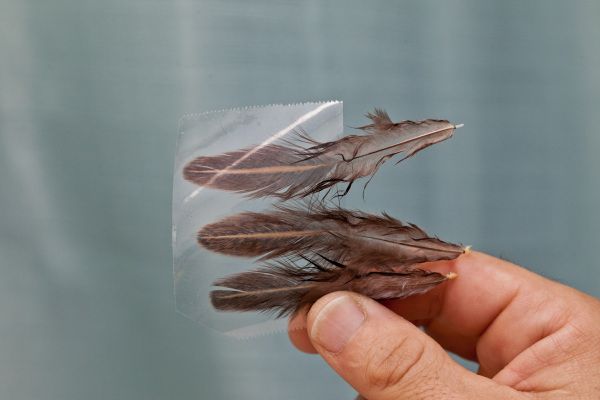
WING - Tan feather or pheasant church window feather placed on clear packing tape and clipped to shape. Add spots using a permanent marker.
LEGS – Tan rubber legs.
COLLAR – Tan dubbing (superfine will work).
EYES – Black marker – black pinheads or equivalent.
OTHER THINGS – Black or brown fine tipped permanent marker - clear packing tape – Zap-a-gap or super glue.
HOW TO TIE
- Hook in vise – start your thread in just in front of the bend of the hook and wrap a nice tight thread base going forward and stopping approximately ¼ the length of the hook shank from the eye. Do this twice and end by the eye where your thread base ends. This helps the foam stay put on the shank.
- From your sheet of foam, cut a strip that is ¼ inch wide and about 1/5 longer than the shank of the hook. (1/4 x 1/4 x 1/5 long).
- Cut a wedge shape in the rear of the foam using a razor or sharp scissors; make an incision down ¾ of the middle of the underside of the foam. Now apply a good coat of Zap-A-Gap to the thread wrapped on the hook shank, then slip the foam body over the shank and give it a slight squeeze and it will bond to the thread on the shank (wedge facing rearward).
- Where your thread is now slowly put a couple loose wraps over the foam, then some tighter ones but not to firm as it could cut thru the foam and you will need to start over. As you tighten the thread the front foam which will be the head should rise slightly, forming a buoyant and distinct head and body. The rest of the parts of the fly will be tied here also.
- Take a clump of 10 to 15 strands of Pearl Krystal Flash and tie it on top so it extends slightly past the wedge shape on the rear of the fly. Trim off the tag ends.
- Now for the wing you can use lots of different things like Thin Skin, plastic sheet or whatever you prefer. We will be using a feather and clear packing tape today. Take a tan feather or pheasant church window feather and if you want to put some dots on it with a permanent marker this is the time to do so, then stick the top of the feather to the clear packing tape. Cut it to the wing shape you want (start with a large triangle and trim it a little at a time) it should end up looking like a heart at the rear and a small straight side in front. The length will be where your thread is now to just a little over the ends of the Krystal Flash. Fold wing in half lengthwise (front to back) and with the taped side facing upward tie it in behind the head (wing should be a little bit on the side of the foam also).
- For the legs, use three or four strands of rubber legs. The main objective is to have a thick thigh portion that comes off the thorax, a knee, and then one strand that will wiggle and protrude into the water. To achieve this, take a long group of legs and tie an overhand knot in the middle (make two of them) this will become the knee. Securely tie the legs to the fly on each side, clip off the tag ends. Then trim the section behind the knee so that only one strand is pointing downward. Tie in one rubber leg on each side on the lower part of each side and trim to size (not very long). You should have a leg facing forward and one rearward and your jointed leg facing all the way to the back.
- Make a dubbing noodle with the tan dubbing by twisting the dubbing onto the thread with your index finger and your thumb then take a few wraps over the head/thorax area to cover all the thread wraps and add to the look of the fly. Whip finish, clip your thread and add a small dab of Zap-A-Gap to the thread with your bodkin.
- With a black or brown fine tipped permanent marker make bars on the rubber legs and small spots on the foam underside which gives it some superficial texture. You can also add eyes to it with the marker also. Try adding orange or red marker to the rear for a hot spot.
TIE UP A DOZEN OR TWO – AND GO FISHING*** But remember to practice C.P.R. (CATCH – PICTURE – RELEASE)