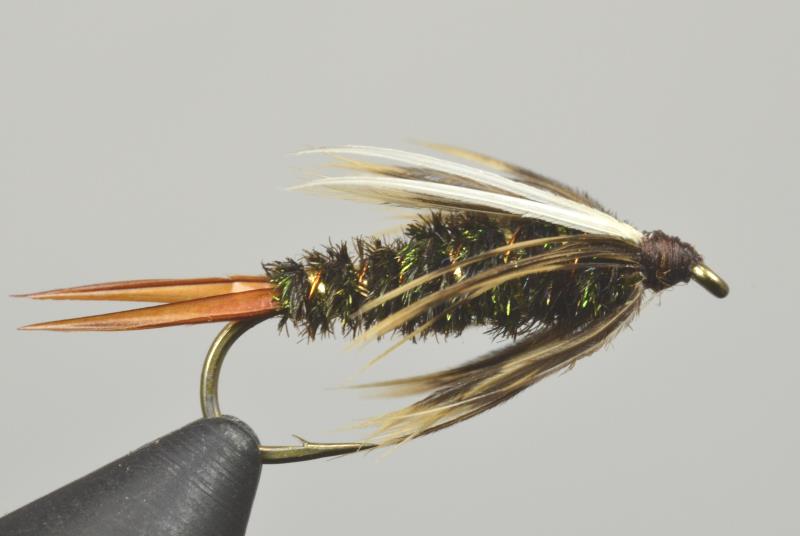
Prince Nymph

Douge Prince – Skip Morris – Steve Mathewson

     
6 grand hopper taped feather

Translated by Carl Wuebben

This fly is not named for the flamboyant musician of “purple rain” fame rather the fly is named after its creator Doug Prince of Monterey, California, developed it in the late 1930’s or early 1940’s. His original Prince nymph had a black body, black soft hackle, and a black tail. A modification of his pattern, which he called the “Brown Forked Tail,” became the well-known Prince Nymph. It works in all seasons and in all kinds of water conditions. Doug Prince designed this as a stonefly imitation for fast water. Try adding a gold bead also to get down faster. The pattern is the same except the gold bead.

PATTERN

HOOK – Standard nymph in sizes #10 - #16
WEIGHT – 8 to 15 turns of non-lead or lead wire the diameter of the hook shank
THREAD – Black 8/0 (70 denier) or 6/0 (140 denier)
TAILS – Brown turkey biots or goose biots
RIB – Fine oval gold tinsel or silver
BODY – Peacock herl
HACKLE – Brown hen-neck (one and a half the hook gap size)
WINGS – White goose biots
FILLER – any type of dubbing and any color, it will not be seen.
TIP Biots are brittle so try using a damp paper towel to slightly moisten them and this will make them easier to work with. Don’t soak them, just a little moisture.


HOW TO TIE

  1. Debarb hook – ( if using a bead put it on the hook before mounting) -  mount in vise – start your thread in behind the eye and wrap a smooth thread base rearward to just before the hook bend using your thread tag end to make close wraps then clip your thread tad end off.
  2.  
    Grab your non-lead or lead wire and wrap some on the middle third of the shank 8 to 10 wraps should do but more or less is ok also. Helicopter the wire to remove and push down on the ends with your fingernail or a tool to flatten it against the shank. Now with your thread build a small dam up against the rear of the lead then spiral wrap the thread forward over the lead in wide spirals and build a second thread dam up against the front of the lead. The dams keep the lead in place and help to build a better looking body. Bring your thread back to the bend of the hook.
  3. Grab two brown turkey or goose biots and doing one side at a time and the tail length should be equal to one half to two thirds the length of the hook shank. Hold the biot against the shank on your side of the hook and flat against the side of the hook, with the tip facing rearward and the butt forward. Line up the length of the tail with the bend of the hook and in line with the shank. Biots have a slight curve so you want the biot curving towards you, so the tails will spread apart. Use your fingers to hold it in place then put a couple loose wraps on the pull them tight before removing your finger grip, wrap over the butt all the way up against the rear thread dam and cut off the extra butt end then do the same on the other side. Bring your thread to the hook bend.
  4.  
    Tie in your tinsel where your thread is now (hook bend) long end rearward for the ribbing, bind down securely and bring your thread back to the rear thread dam.   
     
  5. Grab about six peacock herls and align the tips then trim them back a little at the tips. Tie them in by the tips where the thread is now (rear thread dam) and with the bulk of the herl facing rearward use thread wraps to wrap down to the hook bend. Trim any stray herl by the lead. Bring your thread to the hook bend.
     
  6. Use any type of dubbing and any color to make a dubbing noodle by twisting the dubbing onto the thread with your thumb and index finger then wrap onto the hook from the bend to the rear dam (this helps make the body smoother) then with bare thread spiral wrap over the lead and then make another noodle and wrap it on in the front dam and leaving 1/8 inch behind the eye. Bring your thread to the hook bend.
     
  7. Now bring the herls and thread together and gently twist the herls around the thread (be careful the peacock breaks easily) this will reinforce the herl body. Hold the herl ends and thread then wrap it up the shank and lead with close turns to about 1/8 inch behind the eye, keep a hold of the herl ends and separate them from the thread and with the thread tie them down then clip off any herl tag ends.
     
  8. Spiral wrap the tinsel evenly forward about six to nine ribs. Tie off the tinsel in front of the herl body. Trim off tinsel tag end.
     
  9. Bring your thread forward to about halfway between the front of the herl body and the rear of the eye. Grab your brown hackle for the collar and strip off the fluff to bare the stem. Tie it in by the stripped butt to the shank at this halfway point with the tip facing forward over the eyelet and the concave (cupped) side of the hackle should face away from you. Wrap it down to the front of the body and clip the stem tag end off. Thread now by the body. Grab your hackle pliers or just use your fingers to wind the hackle rearward to the body with three or four turns, each turn up against the last. With the thread put a couple wraps on the hackle to secure it then spiral wrap the thread forward thru the hackle trying not to push down the hackle fibers (wiggle thread back and forth as you wrap) trim the hackle tip off.
     
  10. Using your thumb and index finger stroke back the hackle fibers and put a couple wraps just in front and slightly over the base of the hackle to hold it in place rearward.
     
  11. Grab two white biots then take one of them and hold it up to the hook to measure where to tie it in (full length of the hook). Hold the biot with this measured point just behind the eye, set it flat atop the hook, its butt forward and its tip back, its point angled away from you slightly. The slight curve should be up. Use light turns to secure it then three or four more tight thread turns to secure it. Do the same for the other biot but it should angle out to the same degree as the first one but towards you. Trim off the butt ends closely.
     
  12. Cover the cut ends of the biots with tight thread wraps, build a tapered thread head, whip finish and clip your thread then add some head cement to the head. 

TIE UP A DOZEN OR TWO – AND GO FISHING*** But remember to practice C.P.R. (CATCH – PICTURE – RELEASE)