Creeper Worm
Svend diesel.com
fotm may 2022
Translated by Carl Wuebben

I love taking a new material and using it on old patterns. A worm is nothing new to fishing or fly tying but with this fly you may learn a new trick of using chenille to make a nice wiggly tail. The variation using this material is as endless as one could imagine, but keeping worms simple is something we all believe is best. Try adding weight like a bead head or lead wire under the chenille even dumbbell eyes. Try a collar of ice dubbing or even a hot spot collar of thread. This fly can be used for trout, bass and even carp. Try it on a salt water hook and give it a try also.


PATTERN


THREAD –
Semperfli wax thread 8/0 (70 denier) in red or equivalent
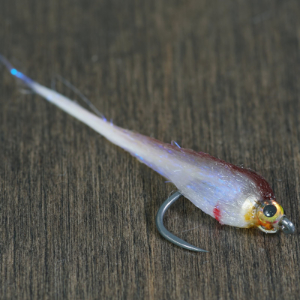
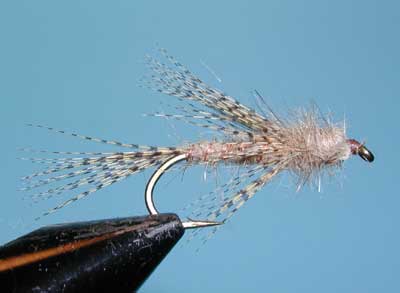
TAIL/BODY – FNF creeper chenille in marshmallow pink (can get at bob Marriott’s in Fullerton)
CEMENT – Bone dry thin resin or equivalent.

HOW TO TIE

  1. Put weight on hook if using - mount hook in vise – start your thread in right behind the hook eye and lay a thread base to the bend of the hook and clip tour tag end of thread off.
  2. Grab your creeper chenille and tie in where your thread is now and by the tip with the bulk of the bunch hanging rearward, secure it firmly. Now measure out the tail by doubling over the chenille rearward to about two times the hook shank length or to what you want but not too long as the fish may just short strike it and not take the hook.  Cut the chenille about ¾ of the hook shank longer than the tail section. 
  3. Now it’s time for furling the chenille directly to the hook. Hold the tip of the chenille and using both hands twist it till it’s tight and wants to twist on its self. If you don’t twist enough it will be loose and bulkier. Once your satisfied with the quality of twists and diameter of the material, fold the material back toward the original tie in position. Reposition the hand nearest the hook shank, so that your thumb and forefinger pinch the material on top of the hook shank.  With the other hand holding the tail, give it a slight twist as you slowly let go of it and it should twist on its self-forming the tail. Now hold the tail at the base and secure it on the hook and wrap it down good.
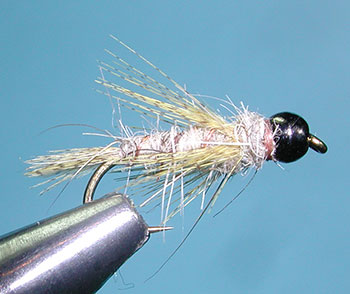
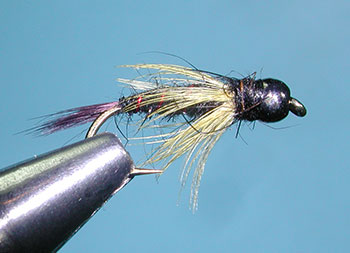
  4. Grab your bag of chenille again and tie some on by the tip, at the base of the tail and bring your thread forward to behind the eye –put a half hitch on and put your thread in your bobbin rest. Put some zap a gap or super glue on the hook shank to make the body more durable. Wrap the chenille forward with close wraps and try not to get the rubber leg pieces on the glue, push rearward on the chenille wraps as you go and end behind the eye about on eyelet from it for the small head. Tie off and clip your tag end off.
  5. Pull back any parts going forward and put some thread wraps down to hold them rearward. Use the thread to make a nice thread head or even use another color thread for a hot spot. Clip your thread, add some UV glue and cure it maybe even two coats, brush out the body with a soft bristle brush and not a metal one as it will tear up the chenille body.  

TIE UP A DOZEN OR TWO – AND GO FISHING*** But remember to practice C.P.R. (CATCH – PICTURE – RELEASE)


Baby Fat Minnow
Clark Pierce / FLYFISHFOOD.COM
fotm feb 2022          fotm april 022 2
Translated by Carl Wuebben

Great for bass, it crushes fish, very durable; fish key in on this fly and is a perfect baitfish fly. It’s a sized down version of the low fat minnow. Very transparent and veny looking, the dubbing in front pushes water and allows fish to pick micro vibrations. The marabou tail gives this fly incredible movement. It’s also a very productive trout streamer. Cast out and let it sit a little then strip in. Try tying it in your favorite baitfish colors.


PATTERN

  HOOK – Fulling mill Bonio barbless carp hook #8 or Firehole 315 in #6 or#8, can also use barbed one but pinch off the barb before tying.
  THREAD – Danville flat waxed nylon 70 denier (8/0) in white
  BEAD – (Optional) Plummeting tungsten bead in nickel 7/64ths (2.8mm) to keel it.
  EYE – 3d holographic eyes 1/8 inch in super pearl.
  BODY – Ice dub UV Callibaetis (#ice50 from Hareline dubbing Inc.) can also use in UV pearl – UV tan –UV dark dun. You can also try a ripple ice dub.
TAIL – Fish hunter UV marabou fl. White / white spay hackle chickabou.
HEAD – Bruiser blend junior (very sparse) by Hareline dubbing / hareline.co TOP- holographic grey BOTTOM- cream.
MARKER – TOP – brown (sharpie or chartpak)
                    BOTTOM – marigold in sharpie or goldenrod in chartpak GILLS – red (fine point)
OTHER THINGS NEEDED - Loon UV glue in flow and thick and also UV clear fly finish and a UV light to cure it.


HOW TO TIE

  1. Put bead on hook - mount hook in vise – push the bead toward the eye and start your thread in at above the barb area on the shank and go forward toward the eye to just before the halfway mark on the shank then push the bead rearward to the halfway mark on the shank. Make sure you have enough room to place the eye on later (eye will sit between the hook eye and the bead). Now with your thread use crossover wraps (figure 8’s) like you’re tying in a dumbbell eye to put a thread dam in front and behind the bead. Bring the thread behind the bead.
  2. With your thread tie in a sparse single marabou feather for the tail in behind the bead with the tips hanging rearward to about two hook shank lengths long. Then clip off the marabou tag end.
  3. Grab a little UV dubbing and make a small dubbing noodle (twist between thumb and index finger) and wrap a small ball behind the bead to cover the thread some. Leave thread behind the bead.
  4. While still behind the bead and using the same UV ice dubbing pull some loose from the top of the bag but leave it wispy, then lay it on top of the hook and pinch it so you force it all around the shank with a slight twist of your fingers it will look like a mess. Make one or two loose wraps around the middle of the dubbing then a couple tighter ones to secure it. Then with your fingers brush it all rearward and put some wraps in front of it to hold it rearward (this is called a clump dub technique). Use a brush to comb it out. Bring your thread forward in front of the bead and cover the shank with thread from the eyelet to the bead.
  5. Grab a very sparse clump of the grey bruiser blend junior ( use your fingers to pull apart and put back to align the fibers) then tie it in on top with half of it forward and half rearward then do the same with the cream on the bottom. Fan the fibers out some. Push back the top fibers and tie off then do the same with the bottom fibers. Make a thread head then whip finish and clip your thread. Take the fibers and work some of them to the sides (both top and bottom) and brush them out.
  6. Now using the brown marker and on the top front end put a little on and using your fingers push it in rearward to blend it in (may have to do a couple of times) flip your fly over and on the bottom put a little marigold yellow color on (just a small section) then use your fingers to blend in rearward. With a red fine point sharpie make some gills on the lower half in above the hook point area.
  7. Grab a pair of plyers that have a flat jaw (no grooves) and flatten the thread head area on the sides so you can put the eyes on better. Stick one eye on each side and align them even then with some flow UV glue put some between the eyes on top and while squeezing the eyes hit it with a UV light. Now flip the fly over and do the same on the bottom of the eyes. Now with the thick UV glue put some on all around the eye area (top-bottom-sides) but not too much (but if you do put too much on use your bodkin to remove the extra ) using your bodkin push the glue rearward and into the area just behind the eyes. Hit it with a UV light. The thick glue is tacky so use some of the flow again to coat the eye area and hit it with the UV light and you’re done.

TIE UP A DOZEN OR TWO – AND GO FISHING*** But remember to practice C.P.R. (CATCH – PICTURE – RELEASE)


The Baby Leech
Chris W / fatfingeredflytyer.com
fotm feb 2022
Translated by Carl Wuebben

While this pattern is tied in black any natural color combination should work depending on the pray species in your local waters. Also try unnatural combos such as pink, yellow and crawfish orange. Retrieving with short, erratic strips as well as swing and lift retrieve will produce strikes. Work along weed lines and structure. It works well on most Stillwater fish like bass, sunfish and even trout.


PATTERN

  HOOK – Standard nymph #16 - 12
  THREAD – Black 70 denier (8/0). Also try other natural colors along with pink, yellow and crawfish orange.
  RIB – Ultra wire copper in XS size
  BODY – Dubbing mix in black 
  COLLAR – Rabbit fur in black


HOW TO TIE

  1. Mount hook in vise – start your thread in behind the eye and clip off the tag end of the thread. now grab a hunk of wire and tie it in, then using the wire to keep a nice thread base wrap rearward to the end of the shank, clip any tag end of wire off in front with a pair of wire cutters or use the rear of the blades on your scissors but this will dull the blade fast. Put the wire off in a material clip.
  2. With the dubbing mix dub a tapered body and wrap it forward and this will be covering ¾ of the hook shank. Do this by twisting the dubbing onto the thread with your thumb and index finger.
  3. Now with the wire counter wrap it to the front of the dubbed body. Secure it with thread wraps and clip the tag end of the wire off.
  4. Bring your bobbin down about 3-4 inches then bring the thread back up and tie down the loop on the hook to make a dubbing loop from the rabbit fur by Clipping from a hide or pull from a bag then with a dubbing twister to hold the loop open put the rabbit fur into the loop and twist the tool to make your dubbing loop noodle. Wrap the noodle forward and as you do pull the fibers rearward with each wrap but leave enough room behind the eye for a head and to whip finish. Just a couple wraps will do then tie off and clip your tag end of the noodle off.
  5. Build a thread head, whip finish and clip your thread off, add some head cement to complete your fly.

TIE UP A DOZEN OR TWO – AND GO FISHING*** But remember to practice C.P.R. (CATCH – PICTURE – RELEASE)


Manhatten Midge
Tim Flager
fotm feb 2022
Translated by Carl Wuebben

This is a variation of Forrest Dorsey’s Manhattan midge, which is, in itself, an enhanced version of other patterns in the Dorsey family of flies. What makes this version a little different is the red Umpqua u-series, size 20 scud/pupa hook. The Manhatten Midge, despite its diminutive size, includes a slew of proven fish catching materials and features. This version, because of the red hook, probably should be called the Brooklyn Midge.

PATTERN
  HOOK – Red Umpqua U-series size #20 or equivalent
  BEAD – Midge – sized, silver killer caddis glass bead
  THREAD – UTC 70 denier (8/0) in red, also try a black version
  WING BUD – Light pink; midge – sized sparkle braid
  RIBBING – Extra – small, silver ultra-wire
  THORAX – Peacock herl


HOW TO TIE

  1. Although the hook isn’t terribly small, plunger – style hackle pliers make handling them much easier. Just secure the shank on the hook of the pliers. You can then drag the hook through some midge – sized, silver Killer Caddis glass beads in hopes of catching one. With the bead on the hook, get the assembly firmly secured in the jaws of your tying vise and push the bead up to the hook eye.
  2. Start your thread in behind the eye and wrap rearward a couple wraps and clip the tag end off. (This pattern also looks great in black thread).
  3. Take an inch-long segment of sparkle braid. Secure the segment to the top of the hook shank with the longer part going forward and take a few wraps rearward to bind it down. Snip the rearward pointing part of the braid off close. Continue taking thread wraps to cover up the butt end then go well down into the hook bend.
  4. Take a hunk of Silver Ultra wire for the ribbing and place one end of the wire against the near side of the hook and take thread wraps to secure it. Continue taking wraps up the shank, binding the wire down as you go. Once the wires bound down up to the braid, wind back down the shank with your tying thread, then back up to produce a lightly tapered body. Try to get the butt end of the braid covered up without adding too much bulk. Give your bobbin a counterclockwise spin to uncord and flatten the thread. This will allow you to fill in any dramatic lumps and bumps on the body. End your tying thread right at the braid.
  5. Get a hold of the silver wire and start making open, spiral wraps with it to create the look of segmentation on the abdomen of the fly? When you reach you’re tying thread, use it to firmly anchor the wire then helicopter it to break the excess close. Pull rearward on the braid and take thread wraps to pin it back on top of the abdomen. Take a few more thread wraps to create some space between the braid and the back edge of the bead.
  6. A single peacock herl is used to produce the thorax of the fly. With the longer flues pointed down, snip an inch or two of the brittle tip off square. With the longer flues still pointing down, bind the herl to the near side of the hook using tight wraps of thread. Clip off the tag end and start taking touching wraps forward with the herl to build up a fuzzy little thorax and when you reach the back edge of the bead, use you’re tying thread to anchor the herl, and then clip your tag end off.
  7. Now no a 3 or 4 turn whip finish, seat the knot well and clip your thread off. Now trim the wing bud so it extends not quite to the back edge of the hook bend.

TIE UP A DOZEN OR TWO – AND GO FISHING*** But remember to practice C.P.R. (CATCH – PICTURE – RELEASE)

Birds Nest (TAN)
         fotm 1 jan 2022

Translated by Carl Wuebben

The birds nest is a nymph pattern designed by the late Cal Bird in 1959. Cal developed this fly for the Truckee River but it works all over. Usually tied in tan colors to imitate caddis pupae, other colors used are cream, brown, and olive. Cal actually used a blend of Australian opossum and died coyote for the dubbed body. He also insisted on wood duck flank for the tail and hackle to achieve the proper stiffness. He gave it its name due to an entanglement with a birds nest while on the Truckee. It’s generally considered an attractor pattern that can be fished on a dead drift, either weighted or unweighted.

PATTERN

HOOK –
Daiichi 1710 or equivalent in #10 - #16
THREAD – Danville camel 6/0 (140 denier)
RIB – Small copper wire
TAIL – Lemon wood duck flank
ABDOMEN – Natural Australian opossum
THORAX – Natural Australian opossum
HACKLE – Lemon wood duck flank

HOW TO TIE

  1. Debarb hook – mount in vise – start thread in just behind the eyelet. Then attach the wire ribbing to the bottom of the hook shank and with your thread wrap it down to the bend of the hook and above the barb. (Keep wire on the bottom all the way back and try not to let it get on the side as this will create an uneven body later).
  2. Now select a wood duck flank feather that is flat on the top. Clip the tip with about 15 – 20 fibers. Measure the tip for a length to be about the same as the hook shank and attach the fibers with the tips rearward hanging off the bend of the hook and this will be your tail. Clip off the butt end tag from the feather. Your thread should be at the rear of the hook.
  3. Grab a clump of the opossum dubbing and with your thumb and index finger twist it onto the thread then dub along the hook shank creating a tapered body to just past the midpoint of the shank.
  4. Then spiral wrap the ribbing to the end of the dubbing (midpoint) and tie off. Helicopter the tag end of the wire off.
  5. Using the feather that you clipped the tip from, utilize the remaining fibers for a collar hackle. Just in front of your dubbing, position the feather at the top of the shank with the tips protruding just beyond the hook bend. Using your thumb and index finger, distribute the fibers around the shank and tie off and clip the feather tag ends off. Lay down a couple more thread wraps to secure it all.
  6. Add more opossum dubbing for a thorax. This dubbed area should be larger in diameter than the body with a more buggy appearance. Cal would use his dubbing tool to create a dubbing loop that facilitated a looser appearance. Whip finish for a small thread head and clip your thread. You can also try tying the beadhead olive and black version.

TIE UP A DOZEN OR TWO – AND GO FISHING*** But remember to practice C.P.R. (CATCH – PICTURE – RELEASE)

ASSASSIN (light)
Tom Loe/variant (of a Cal Bird variant)

fotm 1 may2021         fotm 2 may2021

Translated by Carl Wuebben

Tom Loe came up with his version of the Cal Birds bird’s nest that you can tie in a dark and light variation. The tail material is tips of blood marabou which give a graceful action within Stillwater situations and can mimic small baitfish such as perch fry or damsel nymphs.

PATTERN
Light version
HOOK – Daiichi 1710 #14 -18 THREAD – Uni-thread tan 8/0 (70 denier)
HEAD – 3/32 gold bead
TAIL Marabou blood quills (ginger). Topped by dyed mallard barred flank (wood duck gold)
ABDOMEN – Hareline dubbing in hares ear
THORAX – Hareline dubbing in hares ear
RIBBING – Copper ultra-wire in small
LEGS – Dyed mallard barred flank in wood duck gold

Dark version
Same hook – black thread – same bead – black marabou blood quill for the tail – abdomen and thorax black dubbing – red ultra-wire for the ribbing – legs same feather.

HOW TO TIE

  1. Debarb hook – put bead on the hook small hole first then mount hook in vise and start your thread in behind the rear of the bead. Attach the wire ribbing to the bottom of the hook shank and with your thread wrap it down to the bend of the hook and above the barb.
  2. Now select a marabou feather and a mallard barred flank feather for the tail. Take the marabou and tie on half of the tip area only, about half a hook shank length long and then clip off the tag end, now take the mallard feather and clip out about 15 – 20 fibers from the tip and tie in on top of the marabou, make it the same length (half a hook shank). Clip off tag end. Your thread should be at the rear of the hook.
  3. Grab a clump of hare’s ear dubbing for the abdomen and with your thumb and index finger twist it onto the thread and wrap the dubbing forward along the hook shank creating a tapered body to just a little past the mid-point of the shank.
  4. Then spiral wrap the ribbing to the end of the dubbing (midpoint) and tie off. Helicopter the tag end of the wire off.
  5. Using the mallard feather that you clipped the tail tips from; utilize the remaining fibers for a collar/legs hackle just in front of your dubbing. Position the feather at the top of the shank with the tips protruding just beyond the hook bend. Using your thumb and index finger, distribute the fibers around the shank and tie off and clip the feather tag end off. Lay down a couple more thread wraps to secure it all.
  6. Add more hare’s ear dubbing for the thorax and wrap forward up against the bead. This dubbed area should be larger in diameter than the body with a more buggy appearance. Use a dubbing tool to create a dubbing loop that facilitates a looser appearance. Whip finish to form a small head and clip your thread off.

TIE UP A DOZEN OR TWO – AND GO FISHING*** But remember to practice C.P.R. (CATCH – PICTURE – RELEASE)