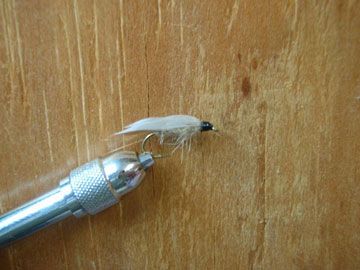
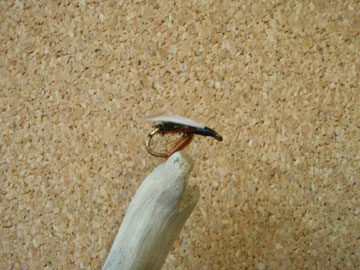
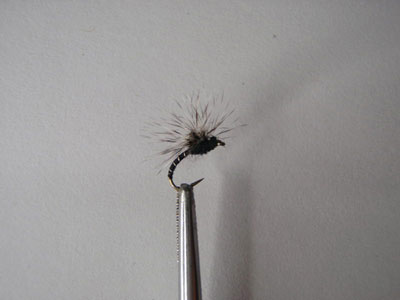
FOTM Mar 2012
HACKLESTACKER MIDGE

fotm-march-2012

By Andrew Puls - Fly Tier magazine

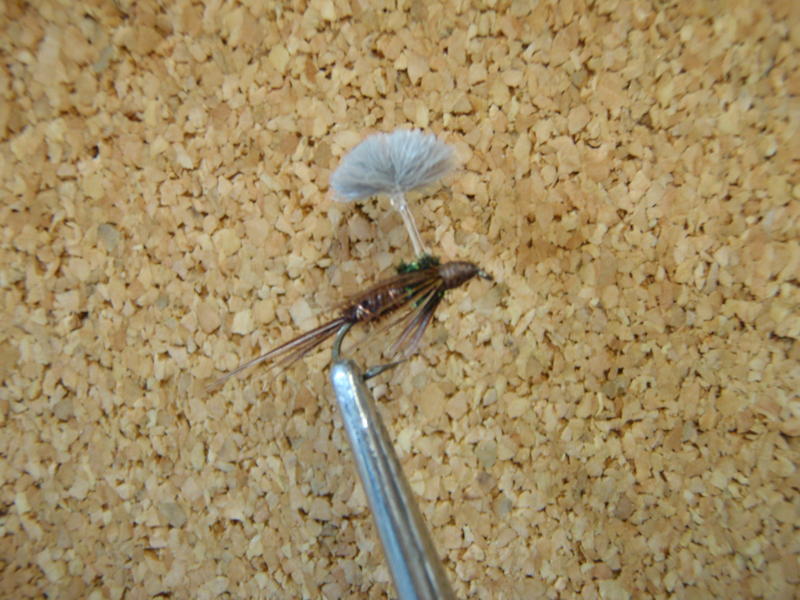
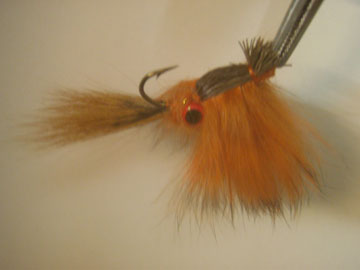
Midge sippers are usually taking emergers which are imitated perfectly by the hacklestacker midge’s curved shank hook piercing the water’s surface. The hackle ball lets the body ride below the surface and is still relatively easy to see. Additionally trout can often be tricked into eating a hacklestacker midge that is considerably larger than the hatching insects; this is a huge benefit when the real bugs are an impossibly small size 26 or 24.Try tying one using golden pheasant for a tail and turkey biot’s for the abdomen also peacock superfine for the thorax the hook and hackle are the same – this one is called a biot hacklestacker.

HOOK   Mustad = C49S  Tiemco = #2487 or equivalent in sizes 20 to 16.
THREAD- black 8/0 (70 denier).
ABDOMEN- Black tying thread 8/0.
RIB – Fine silver wire.
HACKLE POST- 4X monofilament tippet. (doubled to form a loop).
HACKLE-
Grizzly roster neck.
THORAX
– Black dry fly dubbing. (I used super fine).


How to Tie

  1. Debarb hook- mount in vise. Start thread at front of hook shank one eyelet from eye.
  2. Tie in wire and using your thread tie it in halfway into the hook bend keeping the wire on the bottom of the hook and nice close wraps of thread (no gaps).
  3. Wrap thread forward to about halfway on the hook shank then spiral wrap the wire forward to the halfway mark also and tie off the wire and get rid of the tag end.
  4. To make the hackle stack cut a hunk of 4x tippet material about 6 or 7 inches long (16 to 18cm) double it over (tip to tip) to make a loop and tie it in about 2 eyelets from the eye then on top of the shank with your thread wrap it in good and tight to about the halfway point on the hook shank- clip off the tag end of the tippet.
  5. Grab a grizzly feather with the barbs about the size of the hook’s gap or one and a half the gap, it’s your choice. Strip the fibers off the butt end leaving the shaft bare about 1/4inch then tie in with the butt facing the eyelet.
  6. Using one of your fingers, put it in the loop and hold it up tight then using both fingers and thumbs from both hands wrap the hackle up the loop then down. Tie off hackle- you should have enough wraps to push them down on the loop shank then pull the hackle fibers backward to get them all facing toward the hook bend- measure if you have enough by pulling the loop forward to just in front of the eyelet. If there’s enough go ahead and dub in the thorax with the superfine then bring the loop over the thorax and tie in behind the eyelet. (Don’t crowd the head). Clip off the loop tag end, build a small head, whip-finish and you’re done.

**Sounds time consuming but it’s not. Tie up about two or three then it’s a very easy tie. Go tie up about three dozen in about an hour but save your best for the next meeting.

FLY OF THE MONTH CONTEST
FEBRARY 2012

fotm-feb-2012

Hare's Ear Wet
By Skip Morris

Also known as the Gold-Ribbed Hare’s Ear Wet, the companion to the ever popular Gold-Ribbed Hare’s Ear Nymph. This wet fly can imitate Mayfly or Caddisfly adults that have drowned or are swimming down to lay their eggs.

Hook- Heavy wire, standard length.

  • Mustad= R70, R90, 540
  • Tiemco= 760sp, 3769, 9300

or 1x long

  • Mustad=39068
  • Tiemco=3761

In sizes 16-12

Thread- Orange or black 6/0 or 8/0
Tail- Brown hackle fibers
Rib- Gold oval or narrow flat tinsel.
Body- Hare’s mask (or pre-packaged dubbing), heavier and picked out around the thorax area.
Wing- Natural gray duck quill sections (or hen pheasant wing quill sections)

How to Tie

  1. Debarb hook- place in vice- start thread at about the halfway mark on the shank.
  2. Tie in the tail about ¾ to a full hook length off from the bend of the hook.
  3. Tie in the ribbing.
  4. Dub a body with the rabbit fur (thin on the back and fatter in the thorax area). Reverse wind the ribbing forward- tie off and clip the tag end.
  5. Using your bodkin or dental floss brush fluff out the thorax area only (front half of body)
  6. Make a small thread head (cone shape) fat in the back and tapered to the hook eye.
  7. Grab a pair of matched natural gray duck quills and clip out a piece (from the longer barbs side) the width of your thorax. Match the sections with the concave sides facing inward so they line up perfectly. Size up the wings with your right hand- the tips should be up with the hook  bend, then hold the tips with your left hand and the butts with your right. Then hump the wing set slightly by stroking the tips downward. This gives you the desired shape and counteracts the effect the thread will have during tie on. Transfer to your left hand and reestablish the length, using the soft loop or pinch hold (pushing the wings into the thread base) Put thread between  your thumb and forefinger then over the back side of the fly then under and back up to capture the wings on the top side slightly to the side of the fly. After a couple more wraps check wings again, if okay, do a few more wraps while always holding the wings if it is not right unwrap and try again. Once okay, build a cone shape head, whip-finish, clip the thread, and you’re done.

Tip- Wings are done the same way as the October 2011 Fly of the Month, The Leadwing Coachman.
That was not a very hard fly to tie was it? So go tie up a couple dozen but save your best one for the fly of the month contest and bring the rest in so Shawn can sell them to other club members.

Carl Wuebben

FLY OF THE MONTH CONTEST

792

JANUARY 2012

PARASOL PHEASANT TAIL  

BY

TED LEESON AND JIM SCHOLLMEYER

Ted Leeson and Jim Schollmeyer’s parasol series is not so much a new concept as a new angle on a seldom explored concept – A nymph or emerger hanging from a built – in pontoon. Their puff of yarn on a strand of tippet is quick - simple, and functional. The idea is to suggest a nymph, ripe to hatch, just short of reaching the water’s surface. Try tying a parasol onto other nymph patters also like a pmd or bwo and maybe a hare’s ear.  

Pattern
Hook- Light wire, Standard length or 1x long. Sizes 18 to14.
Thread- brown 8/0 or 6/0.
PARASOL- Light gray poly yarn tied with a clinch knot to 4x tippet.
TAIL- 4 pheasant tail fiber tips.
RIB- Fine copper (or gold) wire.
ABDOMEN- Pheasant tail fibers.
THORAX- Peacock herl.
LEGS – Mottled brown hen back hackle fibers (regular brown hen will do also) or pheasant tail fibers.
Comments – This flexible emerger imitates a number of mayfly nymphs when it’s tied in different sizes

HOW TO MAKE THE PARASOL

** Using the 4x tippet and the poly yarn.

  1. Cut 2 lengths of 1 to 2 inches of poly yarn.
  2. With the tippet tie an improved clinch knot tightly around the center of the poly yarn sections. Trim off the tag end of the tippet.
  3. Comb out the ends of the yarn with your hair comb you use for combing out the fuzz on deer hair. Do not cut the yarn yet we will do it at the very last step.

HOW TO TIE

  1. Debarb the hook and place in vice.
  2. Start your thread and bind on the tippet about 2/3 up the shank leaving about a ¼ inch between the hook shank and the yarn ( depending on hook size ) keeping the parasol on top of the hook shank. Clip off tag of tippet and wrap to the end of shank.
  3. Tie in some pheasant tail fibers (about 4) ½ to 2/3 the hook length at the rear of the hook shank.
  4. Tie in a piece of fine copper wire at the rear of the hook shank and set aside in your material clip.
  5. Tie in about ten strands ( less for smaller hooks ) of longer pheasant tail fibers at the rear of the hook shank ( by the tips).Wrap pheasant tail around thread clockwise to make a rope Then wrap forward to right behind the parasol tippet. Tie off and clip off tag ends.
  6. Counter wrap wire forward to the tippet parasol – tie off and clip tag end.
  7. Using your thread - put a couple wraps right in front of the tippet parasol to keep it straight up.
  8.  Tie in about 3 or 4 strands of peacock herl right in front of the parasol then wrap the peacock around the thread clockwise to make a rope – put one or two wraps behind the tippet parasol then wrap in front of the parasol a couple times to make the thorax. Tie off and clip the tag ends.
  9. Grab a hen feather with the barbs about the size of the thorax you made – pluck off the fuzz on the bottom - then pull off the barbs on one side of the feather leaving the other side on. Now on that same side pull just a small section of barbs toward the top of the feather off so you can use as a tie in point on the feather just a couple barbs will do. Now tie the feather in by the tip side where you last pulled a few barbs off – Then clip your tag end off and try and keep your barbs facing up away from the shank – then wrap it around 2 or 3 times to make the legs – tie off – clip tag ends –make a small thread head then whip-finish-, cut the thread and your almost done.
  10. Comb out the parasol one more time to try and mix the strands together better (it will not be perfect). Gather the ends of the yarn and pull them firmly up. Cut them straight across. The result should be a dense puff of yarn, rounded on the top, suspended above the fly by a little bit of tippet.

*Now that was easy – Tie up a couple dozen but save your best one for the FLY OF THE MONTH CONTEST we have at each meeting. The winner gets their picture in the newsletter along with their fly. And don’t forget at the end of the year we have an award for FLY TYER OF THE YEAR.

 CARL WUEBBEN   >)))))))(‘>

FLY OF THE MONTH CONTEST

fotm-oct-2011

OCTOBER 2011

LEADWING COACHMAN

Traditional winged wet flies were out of use for some years. However, they have been rediscovered, mainly because they catch so many trout, are easy, and are so much fun to fish. The leadwing coachman is an excellent searching wet fly. It represents a caddis, the gray and spotted sedges.

Pattern
Hook- Wetfly/ Nymph, standard or 1XL shank length (1XL works best). Size 10 to 14.
Thread- Black 6/0 or 8/0
Tag- Narrow flat gold tinsel
Body- Peacock herl
Hackle- Soft dark brown barbs (hen feather) tied as a beard
Wing- Gray goose or duck

HOW TO TIE

  1. De-barb hook and place in vise. Start thread just in front of the bend of the hook. Then wrap to just a little bit into the bend of the hook.
  2. Tie in tinsel- most tinsel has silver on one side gold on the other. We want the gold, so tie it in with the gold side against the hook shank, because this material has a tendency to flip over with the first wrap-trim off tag end, and wrap forward 3-4 wraps, then tie off and clip excess.
  3. Tie in about 6 or 7 peacock herl. Line up the tips and then clip the tips even. Tie in just in front of the tinsel. Then make a peacock rope by taking the peacock and spinning it around the thread counterclockwise about 12 to 15 turns, this will only start you out. Can add more later. Then wrap the rope forward to about 2 eyelets from the eye- tie off- clip tag ends.
  4. Take a hen feather, that has barbs, the length from the hook point to just in front of where you tied off your peacock herl. (about a gap and three quarters) Strip the fluff off then strip one side off also. Leaving a feather with one side bare and the other side with the barbs still on it. Tie it in just in front of the peacock herl-clip tag end- Then wrap forward 2-3 wraps while petting it backward so they wont wrap over each other. Tie off- clip tag end. Then push as much of the barbs down to the lower part of the fly while wrapping the thread over it to hold it down and back (don’t worry some barbs will not go down so just clip them real close to the body). Tie off- clip tag end.
  5. Use thread to tie a cone shaped head to mount the wings on.
  6. Now comes the tricky part. Grab a pair of matched feathers (left and right side) from a goose or duck, and clip out a piece (from the longer barbs side). The width of your body should be about 3/16 to 7/32 inch wide. (6 or 7mm) Using the darker color of the feather, match the sections with the concave sides facing inward so they line up perfectly. Size up the wings with your right hand. The tips should line up with the hook bend then hold the tips with your left hand and the butts with your right. Hump the wing set slightly by stroking the tips downward. This gives you the desired shape and counteracts the effect the thread will have during tie-on. Transfer to your left hand and reestablish the length. Using the pinch hold (pushing the wings into the thread base), put thread between your thumb and forefinger, then over the back side of the fly, then under and back up to capture the wings on the top side slightly to the side of the fly. Do this a couple times before releasing the wing, then let go of the wings and check if it is ok. If not, unwrap and retry. If it is good, put a few wraps on to secure the wing then inspect again if it is ok. Clip wing butt ends. Then build a cone or bullet shape head whip-finish, clip thread and you are done!

Not too hard to tie. The wings are a little hard to get used to. But the more you practice, the better you will get!

CARL WUEBBEN   >)))))))(‘>


FLY OF THE MONTH CONTEST

fotm-sept-2011
SEPTEMBER 2011
CRAZY PANFISH CHARLIE

Sometimes in the heat of the summer you just need to go fishing for anything that will take your fly. That’s where the crazy panfish charlie can help you out catching all those large crappie and other panfish. Whom are just waiting for you to toss one to them for a real scrappy fight for their size. Try tying them in other colors also. (Green-Blue-Black-Chartreuse-Etc.) They tie up real fast so you can make a dozen in less than an hour. Try tying one on the hook bend for a two fly setup using different colors. Who knows, you may even get two on at once. What a fight!

Pattern
Hook- #12 Mustad #R50-94840
Eye- 2.4mm Steel Ball Chain Nickel Plated (At Jo-ann Jewelery Dept.)
Thread- Yellow 6/0
Body- Small Red Ultra Wire
Wing- Yellow Marabou (Blook Quill)
Glue- Zap-A-Gap


HOW TO TIE
  1.  Put hook in vice- Tie thread in behind eyelet, then go about 3 to 4 eyelets from the eye. (This will be your thread base to help hold the eyes.)
  2.  Cut 2 beads from your chain and figure eight them about 3 eyelets from the eye and use some zap-a-gap to help hold it down to the hook shank.
  3.  Flip your hook over and tie in your wire just behind the eyes, using the wire to keep close wraps. Bind the wire to the bottom of the hook shank to the bend of the hook. Then go back to the eyes with the thread only doing very close wraps again to make a smooth underbody for the wire.
  4.  Wrap wire forward toward the eyes, making very close wraps trying not to leave any gaps between the wire. Tie off and clip or bend off the tag end.
  5.  Take one marabou feather and tie in, just in front of the eyes with the tips extending 1 gap length past the hook bend. Before you clip the tag end, put two wraps in front of the tag end to bring it up so you can clip it cleaner and not leave any to get in the way of the eyelet.
  6.  Now clip the marabou tag end and build a small head- whip finish- put a little head cementon and your ready to go panfishing.

Now go tie up a couple dozen, but save a good one for the September fly contest. Just bring ont to the meeting and you may get your picture of you and your fly in the newsletter.

FLY OF THE MONTH CONTEST

AUGUST 2011

fotm-august-2011

ORANGE SKITTISH CRAYFISH

by
NATHAN PERKINSON

It’s no secret that big fish love to eat crayfish. These crustaceans are high on the menu for big bass and trophy trout. Tie on a crayfish pattern to catch the biggest fish. The skittish crayfish matches the basic silhouette of a crayfish while imitating the crazy backward swimming motion. So tie up a bunch because you will lose a few. But don’t worry, they tie up really fast and you won’t feel such a loss as if you spent an hour tying a realistic one.

Pattern

Hook – your favorite streamer hook, sizes #8 to #2
Thread - Orange 6/0 (140 Denier)
Eyes– Orange painted dumbbell eyes (can use red) with black pupil.
Claws – Orange squirrel tail or bucktail (I used squirrel tail natural fox)
Head – Orange squirrel dubbing or substitute (I used crayfish orange S.L.F.)
Carapace – Moose body hair
Body & Legs– Orange rabbit Zonker strip (can use barred crawfish orange)

Tail – Clipped ends of moose hair

How to Tie

  1. Put hook in vice. Tie thread on just in front of the hook bend. Make a thread base forward, halfway up the hook-shank, and then back toward the bend. Put a little Zap-a-gap on it and let it dry a minute or two. Tie in your eyes using a figure 8 wrap, then put a little zap-a-gap on to hold the eyes still so they won’t spin on the thread base (locate eyes just in front of the bend of the hook.)
  2. Tie in the squirrel tail for the claws just behind the eyes (bend of hook side), then wrap forward to tie the rest in for an underbody and clip at an angle a little bit behind the eye of the hook. Wrap back to the hook bend and separate the squirrel tail claws in half by using your thread (I did it like I was posting). Just keep it to each side any way you can.
  3. Dub some squirrel dubbing or your substitute from where you tied your claws in, and go around and under the eyes to the front of the eyes (figure 8’s).
  4. Invert the hook or rotate your vice. Tie in a clump of moose hair by the tips right in front of the eyes (eyelet side) enough to cover the top and just a little over the side (comb out fuzz and put in a stacker.)
  5. Tie in a rabbit zonker near the eyes (eyelet side), and wrap it forward to a little bit in front of the eyelet (2-3 eyelets), petting it backward as you go. Tie off, clip tag end, then brush the rabbit hairs down with your finger (wetting it helps.)
  6. Pull the moose hair back and tie off with several wraps of thread keeping the hair snug and not letting it spin on the hook shank (behind the eye.)
  7. Whip-finish the thread under the moose hair, and then clip the hair to form a tail. Apply head cement to the thread wraps, both over and under the tail.

NOTE: You can also tie in olive and tan. Just replace the orange with the other color. Everything else is the same.

Now that wasn’t so bad – now go tie up two dozen or more and go catch a big rock…oops, I mean fish (you will lose some on the bottom.)

If you tie this fly then fish it, please give me some feed-back on how well it worked for you. Or for any other questions, please contact me.