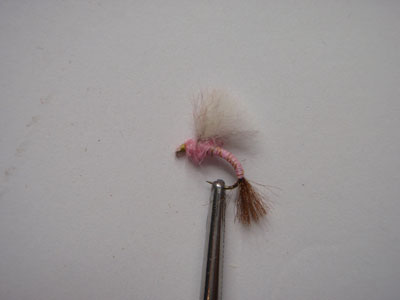
OLD FART

fotm-september-2012

 BY MARLA BLAIR


Yes you read it right the old fart, It’s a cousin of the original pattern Blair’s emerger. It’s like a nymph/emerger pattern the white closed-cell foam acts like an air bubble or wing case fish it deep, using split shot and a strike indicator. Remember if you are not getting any strikes and you’re not hooking the bottom of the stream you are probably not deep enough.

HOOK - Daiichi #1150 (has the eye up) or I used Mustad C495 or TMC 2488 (has the eye straight) or a similar scud hook, sizes #20-#14
THREAD - Pink 8/0 (70 Denier) or 40 (140 Denier) depending upon the size of the fly.
WING CASE - 1mm white closed-cell foam
BODY - Adams gray super fine dubbing. I used dark gray fly rite (it matched the pattern better)

How to Tie

  1. Debarb hook and place in the vice. Start thread at the front of the hook about two eyelets from the eye and lay down a thread base about half way down the hook shank.
  2. Cut a foam strip wide enough so that it will cover the upper half of the thread base when folded into position. Tie the foam securely over the thread base on top at the mid shank point of the hook and the tag end facing the hook bend and working forward. Then clip off as much of the tag end as you can. And cover it with thread. Remember to not crowd the head. One eyelet from the eye is good.  You will need the space for dubbing.
  3. Bring your thread back then fold the foam back and lean the foam toward you as you tie it down. This will move to the top and you will have foam on each side of the shank. Clip off the excess foam tag. Cover the tag end with thread wraps. Don’t leave any white tag ends showing. It seems to bleed through the dubbing.
  4. Wrap a smooth underbody. It should extend halfway into the hook bend and tapered with the thick side up against the thorax. End your thread underbody up against the foam.
  5. Dub the super fine starting at the rear of the thorax foam then make one or two crossing wraps (figure eight) under the thorax area of the hook. Try and guess how much dubbing you will need so you end the dubbing at the hook bend (I used about one inch for a #18 hook) Remember it’s easier to add more dubbing than it is to remove some. Continue wrapping the dubbing down the hook to create the body of the fly. You should run out of dubbing just as you reach the end of the under body thread.
  6. Loosely spiral-wrap the bare thread forward to create the rib. Whip-finish and clip the thread and you’re done.

A VERY SIMPLE TIE. Also try using other super fine colors like caddis green- mahogany brown- rusty brown- pale yellow- BWO just change the thread to a slight contrasting color and the rest of the pattern is the same. You can tie up three dozen in less than one hour.
 

BLACK FOAM BEETLE

fotm-aug-2012

BY TED FAUCEGLIA

Beetles belong to the order of insects known as coleoptera, which includes both the aquatic and terrestrial genera. Both genera are on the trout’s menu, but the terrestrial adults are far more significant simply because they’re much more numerous. Some terrestrial adults have elongated bodies with a noticeable separation between their thorax and abdomen, while others have integrated, olive shaped bodies. They range in sizes from 4 to 20 millimeters and sport a variety of colors but most are either dark brown or shiny black. By sheer happenstance, beetles stray into trout streams. Trapped within the surface film, there’s no escape, and the trout seem to know it. Soft rise forms under overhanging tree limbs or along the grassy edge of a stream with no visible insects in sight are a sure sign the trout are after a terrestrial insect. Usually a beetle. This calls for a flush-floating imitation attached to a long section of 6x or 7x tippet and presented with a tuck cast that duplicates the noisy “plop” of a beetle hitting the water.

HOOK - TMC 2302, (can use TMC 200R or MUSTAD C53S - Down eye works best)
THREAD - Black, 6/0
WING CASE - 2mm Black Foam (cut to shape)
BODY - Hareline olive brown ice dub. (I used SLF squirrel dubbing)
LEGS - Larva lace amber super floss.
INDICATOR - Small cut of 2mm foam yellow
EYES - Small black mono eyes (optional on smaller sizes)
HEAD - Wing case extension (cut to shape)

How to Tie

  1.     Debarb hook and mount hook in vice. Start thread about mid shank and lay a thread base to just a little bit into the hook bend. Put some zap-a-gap on the base and while it’s drying get your black foam and cut a strip about a little bigger than the hook gap then cut the end to a point. Now tie it in with the pointed part facing forward then put some zap-a-gap on it to help keep it stable.
  2.     Bring the thread forward to about a little bit more than halfway on the shank and tie in the mono eyes with a crisscross then figure eight wraps add some zap-a-gap. Then wrap thread back to the foam body. (eyes on top of shank)
  3.     Tie in the rear legs about halfway between the foam body and the eyes. Then bring your thread back to the foam body and dub the abdomen up to the eyes.
  4.     Bring the foam body up and over the top of the abdomen and give it a gentle pull and tie down just behind the eyes. Now tie in the yellow indicator on top and your front legs on each side.
  5.     Dub a little between the eyes and then bring your body foam over the top of the eyes and tie down just in front of the eyes.
  6.     Dub a little more then tie down the foam just in front of the eyelet.(don’t crowd the eye) Clip the foam tag end and whip finish. Clip your legs to length and you’re done.

**A fast and easy tie. Now tie up a couple and throw them near the trees and bushes in the water of course but save your best for the next meeting along with how well it fished for you.

HPU WEEDLESS FLY    
(HOOK POINT UP)

fotm-july-2012

BY
DERRICK FILKINS

Since Lee Baermann will be our speaker for this month I thought we should tie up a salt water fly that is easy to alter to suit just about any fishing scenario in which you don’t want the fly to get hung up. So unbind yourself from traditional hooks and designs, and you will find new ways to be creative with your tying.

HOOK - 1/0-2/0 or 3/0 - extra – wide – gap or standard worm hook. Bass Pro #033548004636 2/0, Gamakatsu #58411-25 1/0, Mustad #38105bln 2/0
THREAD - White 6/0 or 8/0 or color to match your pattern tied.
SHAFT - 80 pound hard monofilament (I used Hard Mason brand).
TAIL – White marabou.
FLASH- Pearl halo flash. (I used flashabou mirage opal).
EYES - 3-D or 2-D holographic eyes or flat stick on eyes, which are considerably lighter in weight.
 BODY – Pearl crystal chenille or estaz opalescent white,
ADHESIVES - Zap-a-gap, plus Zap-a-gap gel or aquaseal.

How to Tie

  1. Debarb hook and put to the side (This will help the marabou tail pass through freely). Place a short piece of the hard mason monofilament into the vice. (About the size of the hook – you will trim later). Tie in thread about one-eighth inch starting at the vise and moving forward just as thought the monofilament were the shank of a hook. Cover the thread base with Zap-a-gap.
  2. Tie in the marabou and holo flash on the top, bottom and sides of the strand of mono.The length and the amount will depend on the size of the baitfish you want the fly to imitate. A little bit of Zap-a-gap will keep it from moving around.
  3. Tie in a short piece of crystal chenille onto the mono, and wind the thread forward to the position where the mono will be tied to the hook. Before you start winding the chenille forward, measure the distance between the point of the hook and the beginning of the flat forward surface where you will start tying the mono to the hook (The length of the body) Mark the mono with a pen so you have a reference point. Wind the chenille forward, and tie off at the point where you stopped the forward thread wraps, at that spot, Put in a couple of half hitches to keep the material in place. Leave the tag end of the chenille for finishing the fly.
  4. Remove the mono body from the vice and use some cutting pliers to remove the section of mono that was held by the vise. Immediately in front of the chenille, Flatten the hard mono with a smooth surface flat pliers so it will make it easier to tie onto the hook. Put the hook into the vise (Upside down) and make a few wraps over the mono and onto the hook just behind the eye of the hook, positioning the fly so that the tail passes freely through the hook point. You may need to trim the front flat part of the mono to help it fit better over the hook point. Then put some additional wraps of thread onto the mono and hook to really hold it down. Now put some Zap-a-gap onto the thread wraps to hold the mono better onto the hook. Use thin thread since more wraps of thin thread are stronger than a few of heavier thread. Wrap the remaining chenille forward to behind the eye and tie off and whip finish.
  5. Clip a little bit of chenille out where you will put the eyes in, put some Zap-a-gap gel or aquaseal to fix the eyes to the chenille, and you’re done.   

**Quite a unique fly and you can change the colors to suit your baitfish pattern of your choice. Get creative. Can also be used as a freshwater fly. Another option is to use a hackle feather on the body to slow down the sink rate or to keep it from sinking you can add foam to the mono to make it float. Go tie up a bunch and save your best for the fly of the month contest at the next meeting.

TIP  Pull the eraser off a pencil and put it on the hook point to keep from getting poked by the point.


FOTM June 2012
Double Bunny

fotm-june-2012
BY Scott Sanchez


This is called an attractor streamer which has a long history both as imitations of tiny fishes and as nonimitative attractor flies. Though it’s quite minnow - like, the double bunny is primarily an attractor.  It doesn’t really matter – big trout move for this fly.  Try stripping it wildly across a river to stir a trout into doing something stupid.  Also try olive over white and olive over yellow for the wing


HOOK -   Heavy wire, 4x long, size #2 (I used Mustad #9672 or R74)
THREAD -   White 3/0 or heavier
WEIGHT - lead wire 0.035 – inch diameter
BODY AND WING – Magnum (extra – wide) natural gray zonker strip bound atop the shank at the eye and a magnum white zonker strip pushed over thee hooks point and bound below the eye. Cement the strips together around the shank and lead and beyond the bend.
SIDES - A few strands of pearl Krystal flash and silver holographic flashabou
EYES - Red plastic molded eyes with black pupils, 7/32 – inch (7mm) in diameter. (Can use doll eyes – mono eyes –stick on – etc.)                 
 

How to Tie

  1. Debarb hook- mount in vise – Put about 20 wraps of lead on the hook shank and center it on the shank then start your thread behind the eye and bind the lead on by wrapping loosely over it front to back and putting a small tapered dam of thread in front and back of the lead.
  2. Cut the grey zonker strip about two shank lengths long.
  3. Now cut a white zonker the same size as the grey but put a slot in where it meets the hook shank in the back side and put the zonker on over the hook point and move to the lower side of the shank (skin side toward hook shank). Put glue on zonker skin side and push up against the hook shank. Then tie off in front of eyelet with a few wraps only.
  4. Tie in the grey zonker on top of shank then put glue on the skin side and push down onto the top of the hook shank and on down and onto the white zonker (skin side to skin side) pushing the zonkers down on each side also to make a fuller body. Build a tapered thread head.
  5. Tie in two strands of silver holographic flashabou and two strands of pearl Krystal flash – double over the flash so you have four of the flash and two of the flashabou on each side of the fly keeping it centered on the side of the fly.
  6. Now glue the eyes on each side right between the thread head and the zonkers – let it dry then put some sally Hansen’s on it or UV glue to form a nice head and secure the eyes better. Trim the flash and flashabou and you’re done.

**This is a very nice pattern and very easy to make. You can also try making it in smaller or even larger hooks. Go tie up a bunch and save your best for the fly of the month contest at the next meeting.

TI P = Pull the eraser off a pencil and put it on the hook point to keep from getting poked by the point.

NOTE = If the zonker strips are not thick enough to cover the sides also - you can use white rabbit dubbing to cover the lead and hook shank. Then put the zonkers on the top and bottom.


FOTM May 2012
Hendrickson
(Bucktail Emerger)

fotm-may-2012

by Paul Weamer from Fly Fisherman Magazine


Don’t you love the look and fish-catching ability of quill bodied dry flies but hate all the preparation and the results often produce brittle flies that can unravel when they are exposed to a large trout’s sharp teeth. Then here’s your answer to all that quill preparation. Use bucktail instead, it’s more durable and you can mix colors along with thread. To get the right color for your pattern it’s pretty cheap and one tail lasts a long time. You can put some floatant in the wing or don’t put any in at all and as soon as the fly soaks up some water it goes down into the water so you can fish it as an emerger rising to the surface as opposed to an emerger sitting on top of the waters film waiting to dry its wings and fly away. Next time you’re on a massive hatch but you can’t get them on a dry use an emerger pattern like this and you may  have that twenty or thirty fish a day you dream about all the time.

Hook- #12-14 Tiemco 247 (fine-wire scud hook)
Thread- Light olive 8/0 uni- thread
Shuck- dark brown darlon (Antron or z-lon also work)
Abdomen- four pink and two tan bucktail fibers twisted with light olive thread.
Thorax- Hendrickson pink beaver dubbing.
Wing- A clump of snowshoe rabbit’s foot hair.

*Note- For the wing I used natural rabbit that had a lot of white and I mixed it with sulphur orange super fine to get the dirty white/yellowish color (pale yellow)

How to Tie

  1. Debarb hook and mount in vise- start thread about three to four eyelets from the eye and lay down a tight thread base going back just a little bit into the curve of the hook, now tie on your suck ¾  the length of the hook shank but leaving a longer strand to tie down as the underbody keeping close wraps and ending where you started your thread then back to the rear of the hook.
  2. Tie in four pink and two tan bucktail fibers and align them by their tips. Clip the fine ends making them the same length and diameter. Tie in at the rear of the abdomen and with the bucktail laying down on top of the body  wrap forward to your wing location then back again with close wraps in order to get a smooth abdomen.
  3. Twist the bucktail fibers with the thread to make a rope then wrap forward to your wing location and tie off.
  4. Cut a clump of snowshoe rabbit from between the toes. Remove the underfur and tie in the wing so that the tips extend toward the hook Bend approximately three quarters the length of the hook shank. Trim the tag ends and bind down the remaining butts.
  5. Dub behind and in front of the wing. Whip-finish and clip your thread and you’re done.

VERY EASY TIE   Now tie up a couple dozen but save your best for the fly of the month for may any questions call or e-mail carl wuebben

GREEN SUPER HAIR
CADDIS EMERGER

fotm-april-2012

By JIM SCHOLLMEYER
Fly Fishing & Tying Journal

This pattern is meant to be fished in the surface film or just below it, trailing behind an adult caddis pattern. This pattern can also be used to imitate a sunken egg-laying female.

HOOK - Mustad = R50-94840 or equivalent in sizes 16-18
THREAD – Chartreuse 6/0 and dark brown 8/0
TAIL - Tan Anton yarn fibers
UNDERBODY
– Chartreuse thread
OVERBODY- green or chartreuse super hair
WING – Dark dun or black CDC feather barbs

How to Tie

  1. Debarb hook- mount in vise. Start thread at mid shank and then tie in a sparse bundle of Anton and one strand of super hair at the rear of the hook shank.
  2. Using the thread form a tapered underbody over the rear ¾ of the hook shank then wrap the super hair strand over the underbody keeping each wrap against the previous one. Tie off and clip the tag end also tie off the underbody thread and clip off.
  3. Tie in the brown thread right in front of the chartreuse thread underbody and form a small head then coat the body and thread wraps with head cement and let it dry
  4. Strip the barbs from 1 – 3 CDC feathers and tie in with the brown thread to form the wing making sure it extends just a little bit past the hook bend securing them on top then lift the butt ends and put two or three wraps at the base of the CDC to push them up a little. Whip-Finish and clip the thread.
  5. Trim the butt ends even with the front of the eye and the wing even with the hook bend.

**Now that was an easy tie, you can substitute other things for the overbody like supreme hair – fluoro fibre – kinky fibre and for the tail try sparkle yarn. Now don’t forget to tie up a very nice one for the next meetings fly of the month.