BEAD – HEAD BIRD’S NEST
CAL BIRD

fotm-april-2013


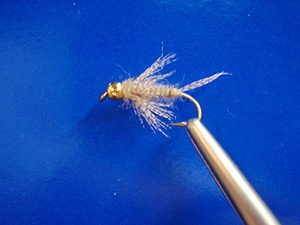
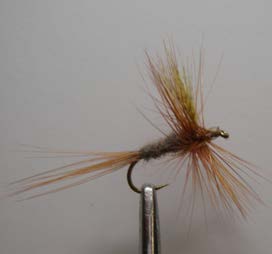
If you’re always looking for a pattern that is quick to tie and also very effective then Cal Birds bird’s nest will fill your needs. It’s been around for 30 years or more and seems to be more popular each year. It’s very effective because of it being quite generic in shape and materials. Tie it with a shaggy and spiky body that gives it a lifelike and buggy quality. It can imitate a mayfly, dragonfly, damselfly and stonefly nymphs depending on the size and color you tie it in. You can also use the bead head or a leaded body if you prefer and change colors and materials to fit your needs. Opossum can be replaced by hare’s ear. Wood duck can be replaced by dyed mallard or even partridge.

PATTERN

HOOK – Standard nymph Mustad #3906B #16 - #6
HEAD – Gold metal bead in size to match hook
THREAD – Tan or brown 6/0 or 8/0
TAIL - Wood duck flank or dyed mallard flank to match
BODY – Australian opossum with guard hairs or hare’s mask
RIBBING – Copper wire HACKLE – Wood duck flank or dyed mallard flank to match
THORAX- Same as body

HOW TO TIE

  1. Debarb hook – put bead on hook (small hole in bead first) – slide forward to the eyelet – start thread behind bead head and lay a small bump behind it to keep it in place - then bring your thread to the back of the hook shank just before the bend .
  2. Remove 3 to 8 fibers from the wood duck feather and tie them in for your tail (butts facing the eyelet and it should be the length of the shank) the number of fibers depends on the hook size. Attach the copper wire in at the point where the tail is tied in. Clip tag ends.
  3. Twist some opossum dubbing onto your thread – then dub a body a little thicker than normal with a little taper on it (thin in the rear – thicker in the front) leaving a space between the dubbed body and the bead. (You will need the space for the thorax). DUBBING TIP- Put a thin layer down first then go back and build your taper after you got your base layer down.
  4. Wind your copper wire forward in a reverse direction of the body – about 4 to 6 turns and tie off.
  5. The original pattern said to remove 12 to 20 fibers from your wood duck and carefully wrap them around the shank which is a real pain. I left the wood duck together but ran my fingers down the feather shank to fluff out the fibers then just cut a small piece from the feather (cut the shank of the feather) and you can tie in a small bunch on each side then clip it from the shank after you have it tied in securely. They should be a little shorter than the body. Just remember to lay the fibers toward you and the thread tension will roll the feather a little and fan out like you want them to do.
  6. Apply a small amount of dubbing to your thread and wind a couple of turns forward right up against the bead to form the thorax. Whip finish – apply head cement if you want.Use a dubbing needle or your bodkin to pick out the body and the thorax to make it more buggy looking.


HOT CREEK CADDIS
ERIC OTZINGER

fotm-march-2013

This fly is for all those members going to fish hot creek this month. It’s a very simple caddis pattern and is very effective for slow water caddis hatches that occur on hot creek throughout the fishing season. But where it really excels is when the water gets a little rougher at the head of a run. You can toss the fly in there and it is still floating when it comes on out - unless a fish has hit it of course. Designed by Eric Otzinger perhaps one of the best tiers in the world. This pattern sits low to the water and simulates the small gray sedge caddis that is prevalent on hot creek; which is a slow water spring creek. It can also be used as a mayfly emerger during pale morning dun and blue-winged olive hatches.

PATTERN

HOOK – light wire dry fly. Mustad #R50-94840 or Tiemco # 100 #16-#22. THREAD – 8/0 medium to dark gray.
BODY – medium to dark gray or other colors to match hatching naturals.(I used superfine).
Wing – coastal deer hair or very fine elk. HACKLE – grizzly neck.

HOW TO TIE

  1. Debarb- mount hook – start your thread just before the bend of the hook – dub an ever so small taper from the rear of the hook shank to just in front of the eyelet. (About one and a half eyelet space from the eyelet).
  2. Prepare the deer hair wing by removing all the under fur with a small comb then put it in a hair stacker with the tip first to align the tips (Don’t forget to use your cruddy scissors to cut the deer hair – cause it will dull your good ones). Tie the deer hair wing in about ¾ up the shank – right about where you stopped your dubbing with the tips facing the rear of the hook it should extend just a little past the bend of the hook – but don’t clip your excess deer hair yet you will need it to help lift it as you wrap your hackle.
  3. Tie in your grizzly hackle with the dull side down and it should be one and a half to two times the hook gape and wind parachute style underneath the wing and butt ends. (Between the wing/butts and the body) make two to four turns, depending on the size of the fly and tie off.
  4. Pull the deer hair butts and hackle feather back, whip finish the head and cut off the excess deer hair leaving a small stub similar to an elk hair caddis.


SOFT HACKLE PHEASANT-TAIL NYMPH


Learning to give flies movement will make you a much better angler. Using patterns that have a lot of natural motion, such as soft-hackle wet flies, is one of the best ways to do this. Soft hackles are some of the easiest trout flies to tie, and when fished with extra movement, such as swung or stripped like streamers. They produce lifelike, pulsating motion that triggers fish into striking. Trout are like any other fish, and when presented with a fleeing prey, they rarely pass it up. Soft hackles have a very long history of catching fish. Before the dry fly came along, all fly fishing entailed fishing wet flies and soft hackle “spiders”. Spiders originated in Scotland, Northern England, and Italy more than three centuries ago. Early anglers fished these patterns downstream with rods measuring more than 10 feet long. This style of fishing still works in practically every type of trout water, from steam riffles to still waters, but you do not have to use an ultra-long fly rod, nor do you have to fish exclusively downstream. Today, a “soft hackle” refers to almost any nymph tied with a collar of hackle such as hen or partridge.

PATTERN

HOOK – TIEMCO TMC3761 or Equivalent, sizes 18 to 10
THREAD – Fluorescent Pink and Brown 8/0 (70 Denier)
BEAD - Black Tungsten
TAIL – Pheasant Tail Fibers
ABDOMAN – Pheasant Tail Fibers
RIB – Small Copper Wire
THORAX - Olive Ice Dub
HACKLE - Hungarian Partridge

HOW TO TIE

  1. Debarb hook – Put bead onto hook - Mount the hook in the vise and start the pink thread in at half shank and go back to just before the bend of the hook and tie in a sparse tail of pheasant tail fibers (3) about the length of the shank of the hook.
  2. Tie on a piece of copper wire right in close to the tail then tie in roughly 12 pheasant tail fibers in the same spot as the wire (smaller hook – smaller amount of fibers for the abdomen) by the tips.
  3. Wrap the pheasant tail forward to just about the center of the hook shank and tie it down – then spiral wrap the wire forward to make the ribbing and tie it off, clip off any tag ends.
  4. Spin a pinch of dubbing for the thorax and wrap onto the hook. (Just a small one – 2 or 3 very thin dubbing wraps)
  5. Using the pink thread still - wrap a slight slope of thread (Tapered down toward the eyelet) that you can slide the bead onto but leaving a small amount of pink thread showing ( Like a hot spot) – whip-finish and cut the thread.
  6. Push the bead back onto the pink thread and then start the brown thread in front of the bead – clip off the tag end of the thread.
  7. Strip the fibers from the left side of the partridge hackle (This will be up against the hook) and tie in by the tips (This is a very fragile feather so go slow at stripping the fibers and start at the butt section – removing only a couple of fibers at a time) in front of the beadhead.
  8. Wrap the feather forward while petting the fibers backward to create the sparse soft-hackle collar. Tie off and clip off the tag end of the feather. Now put a few wraps on to form a small tapered head – Whip-finish and clip the thread.


MOLE FLY (BROWN)

fotm-january-2013
by CHARLIE CRAVEN

When you think of the mole fly, you can’t help but remember the adage that you can’t judge a book by its cover, an inarguably simple pattern; the mole fly doesn’t sell itself or strike a sense of confidence in most onlookers. But if you were limited to one fly to cast to trout rising to baetis or midges, the mole fly would get an immediate nod. The success of the mole fly is how it sits in the water, with the hook eye parallel to the surface and the purpose-built, sodden beaver fur hanging in the film with the CDC wing perched atop. With the fly in this position it exposes it as a crippled emerger and fish know that these bugs are trapped and therefore easy prey. After catching a few fish the CDC starts losing its floatation and to help keep it afloat try using a light coating of TIEMCO DRY MAGIC (a thin gel-type floatant) that won’t mat down the delicate fibers. But dry it out first with a cloth called WONDER CLOTH DRY FLY PATCH Umpqua feather merchants markets a kit with both products called the magic patch. Most commercial fly floatants are not compatible with CDC flies.


PATTERN

HOOK - #16 – 24 TIEMCO 2487
THREAD - 8/0 GRAY UNI-THREAD
BODY - BROWN BEAVER DUBBING
WING - NATURAL DUN CDC

How to Tie

  1. Debarb hook- mount hook in vise- start thread behind hook eye, and form a short thread base back toward the bend of the hook and stop at about where the hook point is or about ¾ down the shank of the hook.
  2. Select a thick CDC feather with a thin stem. Pinch the tip of the feather down into a clump and tie it to the shank just behind the eye with a couple of tight thread wraps. Hold the thread taut while you pull the end of the feather (the butt section) back to shorten the wing to about shank length long.
  3. Anchor the wing with a few more tight wraps of thread. With the tip of your scissors trim the feather butts at an angle.
  4. Wrap thread over the tapered feather butts and well into the hook bend. Bring your thread forward halfway up the shank.
  5. Dub a thin strand of beaver fur onto the thread, leaving a bit of bare thread between the top of the dubbing strand and the hook. Use the bare thread to work back to the end of the thread base, making the first turn of dubbing about halfway down the hook bend. Wrap forward to the base of the wing, forming a slight taper. The tapered butts of the CDC wing help build the correct body shape.
  6. Use tour thumb and fore finger to pull back the wing, and then bring the thread to the front of the wing just behind the hook eye. Hold the wing out of the way while you whip-finish the thread at the eye. Clip the thread.
  7. Use a dubbing brush to rough up the beaver fur body. By fluffing it up like this it will allow it to quickly get wet and sink the back of the fly.

Fishing Tip Cast up and across to a feeding fish and pull the fly under with a short strip – or lift of the rod tip – just before it reaches the target. The buoyant CDC pops the fly back up to the surface and it seems that any fish that witnesses this upward movement in immediately convinced, and crushes the fly.

Bi-Plane Streamer in 3D

fotm-november-2012

By Chief Needabeh and Nathan Perkinson

A critical eye will discern one major flaw in the design of standard major flaw in the design of standard streamers. Although designed to imitate baitfish, standard streamers are tied flat, in two dimensions. A streamer with saddle-hackle wings looks great from either side, where its height and length come into play, observe the same streamer from below, the angle at which many fish will see your fly and it suddenly becomes a narrow body of wool, silk or tinsel. Those long, flowing wings all but disappear and your brilliant bait fish imitation begins to resemble a swimming candy cane. Many anglers have developed flies that are tied in three dimensions so that fish are presented with an appetizing offering whether it’s these “3D” streamers feature feather wings that are tied flat atop the hook, rather than upright in the typical style, although these streamers have largely been forgotten as historical oddities, they are in fact effective flies that you can use to catch trout, salmon and bass today. 3D streamers were developed to address tough fishing conditions. They are an alternative to the ordinary; simply a representation of the eternal tinkering that defines us as anglers and fly tiers. Chief Needabeh called this fly a bi-plane because the wings are attached in a perpendicular plane to the bend of the hook. You can tie the wing to the body to prevent fouling and maintain the fly’s shape in the water.

Pattern 

HOOK - long streamer, sizes 2 to 10
THREAD- Black
RIB - Flat silver tinsel
BODY- black wool
UNDERWING- Red buck tail
WING - six white and one brown saddle hackle, tied flat
SIDES - peacock herl
HACKLE – red, tied full

How to Tie

  1. Debarb hook- mount hook in vise- select six white saddle hackles and one brown. Strip hackles to a length slightly longer than the hook (one and half the gap past bend of the hook), stack the feathers with the brown one on top and secure with a drop of head cement near the bare hackle stems. Set the wing aside to dry.
  2. Start your thread about mid shank wrap backward about three quarters of the hook shank then tie in your silver tinsel ribbing. And dub the wool to make a straight (not tapered) body ending just about an eyelet from the eye (don’t crowd the head) wrap the tinsel forward for the ribbing and tie off and clip the tag ends off.
  3. Level the head with several wraps of thread to ensure the wing lies flat then tie in several strands of red bucktail as an underwing. (about one gap length past the bend of the hook)
  4. Lay the wing assembly flat on top of the fly and secure with a few loose wraps just behind the head and in front of the body (a gap and a half past the bend of the hook). When you get the wing in position bind it down with several firm wraps, clip the hackle stems and add a drop of head cement.
  5. Tie in a pair of peacock herls just behind the head and in front of the body on each side of the streamer (two gap lengths past the bend of the hook).
  6. Tie in one red hackle just behind the head and in front of the body and wind a full collar. Build a neat tapered head, whip finish and cement.

REMEMBER CPR

CATCH – PICTURE - RELEASE

Dark Cahill
fotm-oct-2012By
Dan Cahill

The Cahill to me, Dark or light represents the ideal of the traditional dry fly. Their soft, muskrat or badger fur bodies, the subtle contrast of their hackles and tails against those bodies, and their gracefully curved, finely marked wood duck wings all tell of elegance. These characteristics also make the Cahill’s a fine choice for imitating mayflies from dark to light, and for imitating other insects. The light and dark Cahill were created on the east coast by Dan Cahill, but are now in use across America.

Pattern

HOOK - Mustad #R50-94840 – Tiemco #100 or any standard dry fly sizes #20-10

THREAD - Tan, brown, or black 8/0 or 6/0 WINGS- Wood duck or dyed mallard TAIL – Brown hackle fibers.
BODY – Muskrat fur
HACKLE – Brown.

** For Light Cahill change the thread to tan or cream – tail is ginger hackle fibers – body is cream badger under fur and hackle is ginger. All the rest is the same.

How to Tie

  1. Debarb hook and place in the vice. Start thread at the front of the hook about two eyelets from the eye and lay down a thread base about three eyelets from the eye.
  2. Strip the fuzz from the base of a wood duck feather, and then strip a section from each side of the feather. Set the sections back to back, measure them against the hook (It should be at least as wide as the hooks gape, even as wide as the hook shank is long) and tie them in about three quarters up the shank, trim the butts at an angle near the end of the hook shank and bind them down with thread wraps.
  3. Strip some hackle fibers for the tail, measure them against the hook shank (shank length) – trim butts at an angle and bind them down with thread wraps.
  4. Snip some muskrat from the hide, pull it apart and mix it together to fluff it up and with it dub a tapered body to just in front of your wood duck.
  5. Pull the wood duck wing up and lay a couple thread wraps in front of it to hold it upright. Divide the wing in half using a bodkin or your scissors then using a fig- ure eight wrap bind down the wing. Then with the thread and using loose thread turns and starting at the bottom of one of the wings and going up from the base then as you go back down with tighter wraps to post one side of the wings then repeat for the other side.
  6. Size (fibers about shank length ), prepare (strip fuzz out), and tie in two hackles behind the wing and wrap- ping one at a time forward to just behind the eye. Se- cure each one with a couple thread wraps, build a thread head, whip finish and you’re done.

This is a fun one to tie up!