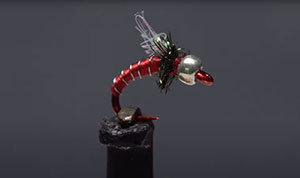
This is a variation of Forrest Dorsey’s Manhattan midge, which is, in itself, an enhanced version of other patterns in the Dorsey family of flies. What makes this version a little different is the red Umpqua u-series, size 20 scud/pupa hook. The Manhatten Midge, despite its diminutive size, includes a slew of proven fish catching materials and features. This version, because of the red hook, probably should be called the Brooklyn Midge.
Manhatten Midge
Tim Flager
Translated by Carl WuebbenPATTERN
HOOK – Red Umpqua U-series size #20 or equivalent
BEAD – Midge – sized, silver killer caddis glass bead
THREAD – UTC 70 denier (8/0) in red, also try a black version
WING BUD – Light pink; midge – sized sparkle braid
RIBBING – Extra – small, silver ultra-wire
THORAX – Peacock herl
HOW TO TIE
- Although the hook isn’t terribly small, plunger – style hackle pliers make handling them much easier. Just secure the shank on the hook of the pliers. You can then drag the hook through some midge – sized, silver Killer Caddis glass beads in hopes of catching one. With the bead on the hook, get the assembly firmly secured in the jaws of your tying vise and push the bead up to the hook eye.
- Start your thread in behind the eye and wrap rearward a couple wraps and clip the tag end off. (This pattern also looks great in black thread).
- Take an inch-long segment of sparkle braid. Secure the segment to the top of the hook shank with the longer part going forward and take a few wraps rearward to bind it down. Snip the rearward pointing part of the braid off close. Continue taking thread wraps to cover up the butt end then go well down into the hook bend.
- Take a hunk of Silver Ultra wire for the ribbing and place one end of the wire against the near side of the hook and take thread wraps to secure it. Continue taking wraps up the shank, binding the wire down as you go. Once the wires bound down up to the braid, wind back down the shank with your tying thread, then back up to produce a lightly tapered body. Try to get the butt end of the braid covered up without adding too much bulk. Give your bobbin a counterclockwise spin to uncord and flatten the thread. This will allow you to fill in any dramatic lumps and bumps on the body. End your tying thread right at the braid.
- Get a hold of the silver wire and start making open, spiral wraps with it to create the look of segmentation on the abdomen of the fly? When you reach you’re tying thread, use it to firmly anchor the wire then helicopter it to break the excess close. Pull rearward on the braid and take thread wraps to pin it back on top of the abdomen. Take a few more thread wraps to create some space between the braid and the back edge of the bead.
- A single peacock herl is used to produce the thorax of the fly. With the longer flues pointed down, snip an inch or two of the brittle tip off square. With the longer flues still pointing down, bind the herl to the near side of the hook using tight wraps of thread. Clip off the tag end and start taking touching wraps forward with the herl to build up a fuzzy little thorax and when you reach the back edge of the bead, use you’re tying thread to anchor the herl, and then clip your tag end off.
- Now no a 3 or 4 turn whip finish, seat the knot well and clip your thread off. Now trim the wing bud so it extends not quite to the back edge of the hook bend.
TIE UP A DOZEN OR TWO – AND GO FISHING*** But remember to practice C.P.R. (CATCH – PICTURE – RELEASE)


