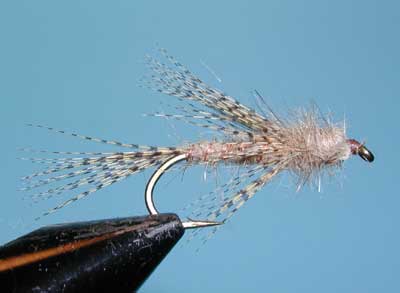
Birds Nest (TAN)The birds nest is a nymph pattern designed by the late Cal Bird in 1959. Cal developed this fly for the Truckee River but it works all over. Usually tied in tan colors to imitate caddis pupae, other colors used are cream, brown, and olive. Cal actually used a blend of Australian opossum and died coyote for the dubbed body. He also insisted on wood duck flank for the tail and hackle to achieve the proper stiffness. He gave it its name due to an entanglement with a birds nest while on the Truckee. It’s generally considered an attractor pattern that can be fished on a dead drift, either weighted or unweighted.
Translated by Carl WuebbenPATTERN
HOOK – Daiichi 1710 or equivalent in #10 - #16
THREAD – Danville camel 6/0 (140 denier)
RIB – Small copper wire
TAIL – Lemon wood duck flank
ABDOMEN – Natural Australian opossum
THORAX – Natural Australian opossum
HACKLE – Lemon wood duck flank
HOW TO TIE
- Debarb hook – mount in vise – start thread in just behind the eyelet. Then attach the wire ribbing to the bottom of the hook shank and with your thread wrap it down to the bend of the hook and above the barb. (Keep wire on the bottom all the way back and try not to let it get on the side as this will create an uneven body later).
- Now select a wood duck flank feather that is flat on the top. Clip the tip with about 15 – 20 fibers. Measure the tip for a length to be about the same as the hook shank and attach the fibers with the tips rearward hanging off the bend of the hook and this will be your tail. Clip off the butt end tag from the feather. Your thread should be at the rear of the hook.
- Grab a clump of the opossum dubbing and with your thumb and index finger twist it onto the thread then dub along the hook shank creating a tapered body to just past the midpoint of the shank.
- Then spiral wrap the ribbing to the end of the dubbing (midpoint) and tie off. Helicopter the tag end of the wire off.
- Using the feather that you clipped the tip from, utilize the remaining fibers for a collar hackle. Just in front of your dubbing, position the feather at the top of the shank with the tips protruding just beyond the hook bend. Using your thumb and index finger, distribute the fibers around the shank and tie off and clip the feather tag ends off. Lay down a couple more thread wraps to secure it all.
- Add more opossum dubbing for a thorax. This dubbed area should be larger in diameter than the body with a more buggy appearance. Cal would use his dubbing tool to create a dubbing loop that facilitated a looser appearance. Whip finish for a small thread head and clip your thread. You can also try tying the beadhead olive and black version.
TIE UP A DOZEN OR TWO – AND GO FISHING*** But remember to practice C.P.R. (CATCH – PICTURE – RELEASE)