RS2 AdamsTim FlaglerTranslated by Carl Wuebben
Rim Chung created the pattern we call the RS2 in the 1970’s, and since then this fly has developed an extremely loyal following. I believe the main reason for its popularity is that regardless of conditions, place, or time of year, it almost always catches fish. Try tying it in smaller hooks like a size 28 or 30. Tim developed his own technique for creating a nicely segmented abdomen similar to Mr. Chang’s. He also ties on the microfibbet tails a little differently, but for the most part he stays fairly true to the original pattern. The RS2 is a very adaptable fly. You can create incredible variations by switching materials for the tail, body, and wing. If you haven’t tied or fished the RS2, you’re missing out.
PATTERN
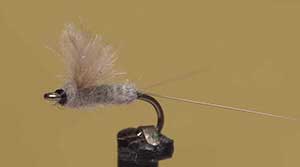
HOOK – Lightning Strike DF3 or an equivalent regular dry fly hook, size #20
THREAD – Black 12/0 gel spun.
TAIL – Medium gray Microfibbets.
ABDOMEN – Adams gray beaver dubbing.
WING – Natural dun Cul De Canard puff feather.
THORAX – Adams grey beaver dubbing.
HOW TO TIE
- De-barb the hook (if you want) and mount in the vice. Start your thread in on the hook about 2 eyelets space from the eye of the hook and clip your tag end off. Make a smooth thread base ending just before the bend of the hook. Next, tie the Microfibbet tail to the top of the hook shank at the rear where your thread is now; the tails should be about equal to the length of the shank.
- Take a small piece of doubled over thread to form a small loop and put the loop end under the hook shank then bring it rearward up against the bend of the hook and under the tail area; the loop should be on the bend of the shank below the Microfibbets. Bring the loop of thread up by its ends from under the end of the hook shank (loop will stay in at the hook bend) and in-between the tails then lightly pull the ends of the loop up and forward to split the tail fibers. Tie the loop ends to the top of the hook shank and clip any excess.
- Spin a pinch of dubbing on the thread to form a small noodle about two inches should do. Put one wrap on the body right at the base of the tail. Make sure to get a full wrap of dubbing around the shank. Now hold one finger on the thread where the dubbing ends on the thread then bring your thread up to the fly at where you started your thread in step one and tie it off then clip the side of the thread the noodle is on but keep ahold on the noodle end and put your hackle plyers on the noodle end and using a dubbing spinner attach it to the hackle plyers and spin it clockwise to form a tight noodle. Spin it tight this will help create a nicely tapered body. Now remove the twister tool and use the hackle plyers to wrap the noodle up the hook to create the abdomen of the fly. End it where your thread is now, tie it off and clip off any excess dubbing next to the shank.
- Tie on a Cul De Canard puff or other suitable material for the wing right where your thread is now with the tips facing forward then secure firmly and clip tag ends off and put a wrap or two of thread in front of the wing to keep it upward then bring your thread behind the wing.
- Spin another, smaller pinch of dubbing on your thread; but there’s no need to spin this tight like the other noodle (just spin with your fingers only). Wrap the noodle around the base of the wing (figure eight) front and rear to form the thorax but don’t crowd the head, whip finish and clip the thread off.
- Using your fingers, hold up the Cul De Canard wing and clip it off at an angle. It should be about a hook gape in size.
TIE UP A DOZEN OR TWO – AND GO FISHING*** But remember to practice C.P.R. (CATCH – PICTURE – RELEASE)