Drifters Punk PerchTom LoeTranslated by Carl Wuebben
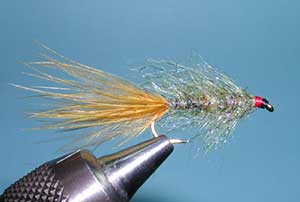
Local guide, Tom Loe of Sierra Drifters, uses a variation of the mohair leech pattern with his “Punk Perch” rather than using angora goat or seal dubbing Tom uses ice dubbing which is a finely cut Mylar. The Punk Perch is tied somewhat differently with a thin rear portion to the body and a much longer dubbed upper body in which the Ice dubbing fibers reach the base of the tail. Use a dubbing loop and adjust the amount of material so that the bulk will be wound nearest the forward portion of the shank. As you twist the loop, the material will also be somewhat tighter around the rear portion of the shank and this will assist in the profile. In the water, this profile is really good for mimicking a Sacramento perch fry which is a prevalent food source for large trout within Lake Crowley. Keep the pattern less than 2 inches since the trout will not feed on larger patterns due to the sharp fin spines that develop on the fry. The translucent effects of the material give real life to the fly. The hook is a 2x long wet fly. He also incorporates a thin red thread collar behind the head for gills which can be a strong triggering mechanism to the fly as an alarmed baitfish with its gills flashing.
PATTERN
HOOK – Daiichi 1710 #6 -16 or equivalent
THREAD – Danville black 6/0 (140 denier)
GILLS - Red thread 6/0 (140 denier)
RIB – Fine copper wire
BODY – U.V. light olive iced dubbing, some U.V. black ice dubbing mixed in.
TAIL – Olive marabou
For a Drifters Punk Perch – light. The hook – thread – gills are the same just change the. RIB- Fine gold wire BODY- Pearl ice dubbing TAIL- Gray marabou with silver Krystal flash strands (about 3 to6 strands).
HOW TO TIE
- De-barb the hook and mount in the vice. Start thread in about 2 eyelets from the eye and make a thread base to just before the hook bend; clip about 30 to 40 strands of marabou from the quill, keeping the ends even. You may have to make two separate clippings to get enough strands. Measure the tips so that they are about the same as the hook shank length and tie them just before the bend of the hook. Wrap down the excess forward up the shank to the ¾ position then tie it off and clip off the tag ends.
- Attach a length of fine copper wire for the ribbing to the underside of the shank starting at the front of the hook and securing the wire with thread wraps to the tail tie down position. Make a dubbing loop with a dubbing twister about 3 -4 inches in length. Secure the loop by wrapping the thread around the loop at the shank. The loop is held open by the dubbing tool. Wrap the thread forward not your loop yet and hang the bobbin away from your work with your bobbin rest.
- Blend a little bit of U.V. black ice dubbing with the U.V. light olive ice dubbing. The light olive makes up about 90 % of the mix. Adjust the material within the loop so that the bulk (75%) is within the bottom half of the loop. Twist the loop closed, the material closest to the shank will tighten first. Tighten the loop but do not overtighten, so that the last half of the loop becomes a tight noodle. It should be somewhat bulky.
- Wrap the loop forward to just behind the eye (one eyelets space), leaving adequate room for a head. Tie down the loop and trim off the tag end of the dubbing noodle/loop.
- Bring the copper wire forward with evenly spaced spiral wraps in a reverse method to counter wrap over the dubbing. Tie it off and helicopter the wire off or clip it off. The ribbing helps secure the dubbing fibers. Build up a tapered thread head and whip finish then clip your thread off.
- For the gills tie in your red thread just in front of your dubbed body and make a small band then tie off, whip finish and clip the red thread.
- Pick out the dubbing with a bodkin. You should get the much longer fibers from the front half of the shank. Take a piece of Velcro and work the material to blend the material together and get it to flow in a backwards sweep. Trim any wayward fibers. Try to get a tapered silhouette. The front fibers should be able to extend to the base of the tail.
TIE UP A DOZEN OR TWO – AND GO FISHING*** But remember to practice C.P.R. (CATCH – PICTURE – RELEASE)