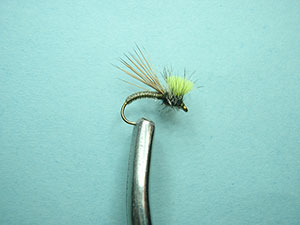
CLOWN SHOE CADDIS
JAY ZIMMERMAN Translated by CARL WUEBBEN
Forget your Stimulator flies just tie up a bunch of clown shoe caddis flies the D-rib abdomen is indestructible. The bright Mcfly foam post makes it noticeable from space, but not too crazy from the fish-eye-view. The way the hook drops off away from the butt of the elk hair/middle of the fly makes it a workhorse dry fly that can suspend heavy droppers. Because of Jay’s purposeful design, the Clown Shoe Caddis lends itself well to broken water and dry-dropper rigs as well as fishing from a drift boat or raft. The heavy hackle and colorful post make the fly both buoyant and visible in the roughest water, and that D-rib body is pretty darn buggy looking also.
PATTERN
HOOK – TIEMCO (TMC) #2487 in #12 - #18
THREAD – 8/0 (70 denier) Olive dun UNI-THREAD
BODY – Small clear D-rib
WING – Yearling elk, natural or dyed dun
HACKLE – Grizzly saddle
INDICATOR – Mcfly foam in your choice of bright colors
THORAX - Black Superfine dubbing
HOW TO TIE
- Debarb hook- place hook in vise – start thread in a little bit into the bend of the hook and wrap a thread base halfway up the hook shank (mid shank). Now tie in your D-rib with the flat side facing up. While slightly stretching the D-rib keep the D-rib on top of the shank and wrap your thread back over it to the bend of the hook (close wraps), creating a smooth thread underbody as you go. Now bring your thread forward to the mid shank where you tied in the D-rib (close wraps).
- Wrap the D-rib forward over the underbody keeping close wraps and tie off where your thread is now (mid shank). Clip off the tag end.
- Build a thread base up to the hook eye and back again to the front of the abdomen (d-rib).
- Cut, clean out the underfur and stack a clump of elk hair as long as the hook and as thick as about the diameter of the abdomen (D-rib). Tie it in place on top of the last turn of D-rib with the tips toward the back of the hook. Now make a narrow band of thread over the flared butts to lock them in place, and then trim off the butts of hair at an angle (45 degree). Lift the tips of the wing and make a single turn of thread around the back of the elk hair to group the hair together in a tight bunch.
- Wrap forward over the butt ends of the hair to the hook eye, creating a smooth base. Prepare and tie in an appropriately sized grizzly saddle feather (gap long fibers) at the base of the wing (strip off a small section of the feathers fibers at the butt side to tie on).
- Separate a small bunch of Mcfly foam (any color) from the main clump and tie it down on top of the hook at the center of its length. Make the anchoring wraps one on top of the other at the center of the thorax area (the smooth base covering the elk hair butts). Lift the Mcfly foam up together and put a few wraps of thread at the base of the foam like posting it but not going up as far just about four or five wraps should coral it so you can do the next step easier. Bring your thread up to the eye of the kook.
- Dub the thorax starting just behind the hook eye and continue back to the base of the wing. (twist your dubbing onto the thread by putting a little dubbing wax on the thread then using little pieces of dubbing at a time, twist the dubbing onto the thread between you thumb and index finger in a clockwise direction to make a small and slender noodle ( you can add more if needed ). Return the dubbing back to the hook eye, forming a robust thorax. If the foam gets in the way pull it back out of the way.
- Spiral wrap the hackle forward over the dubbed thorax with close wraps and tie it off at the hook eye. Clip the excess feather off and build a small thread head and whip finish.
- Stretch the Mcfly foam slightly upward and clip it just beyond the hackle length. Trim the hackle on the bottom of the thorax flush with the dubbing (bottom only).
TIE UP A DOZEN OR TWO – AND GO FISHING*** But remember to practice C.P.R. (CATCH – PICTURE – RELEASE).


