Fender
BARRY CLARKE Translated by CARL WUEBBEN
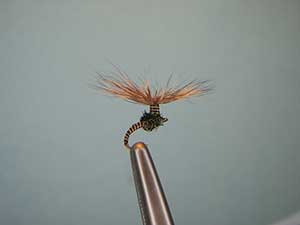
This is an alternative method to tying the traditional parachute-style pattern. Deer hair replaces the hackle of a normal parachute. Make the post using deer hair as well, which enables the abdomen and thorax of the fly to sit deep in the surface film in a realistic manner while in a fish’s feeding window. The ribbed-moose- mane (quill like body) tying technique I am showing you is fairly old, but I revitalized the method with the help of bug bond UV resin (or any UV glue). We all know that the floating qualities of deer hair are hard to match, but it’s still worth giving this pattern a coat of floatant for extra buoyancy. This quick and simple parachute technique requires only deer hair and UV glue or a substitute adhesive.
PATTERN
HOOK – Mustad C49S, size to match the natural (I used a size #18).
THREAD – Dyneema (gel spun). Lays nice and flat.
ABDOMEN – Moose mane hair coated with bug bond UV resin (any UV glue will do) or a substitute adhesive.
HACKLE– Deer hair (short/fine deer hair best) and bug bond UV glue
THORAX – Two strands of peacock herl
HOW TO TIE
- Debarb hook – mount in vise with as much of the bend exposed as possible. Start your thread behind the hook eye and wrap a very close thread wrap down deep into the bend of the hook.
- Select some long moose mane hair. You will need two one white and one black. Select one with as much white in the middle as you can and trim off the brown or black off the tip and trim the tip off the black one then match the tips together and tie the tips on at the bend of the hook with the points close to each other (black on bottom white on top of it).
- Wrap a tapered thread underbody with the thicker end near the back of the thorax (about mid shank).
- Grasp both moose hairs at once making sure the black hair is at the bottom and begin wrapping the hairs up the hook shank- leave no gaps between the wraps. Stop about three or four eyelets space from the eyelet (middle of the thorax area) and tie off and clip your tag end off.
- Although moose mane hairs are remarkably strong, you may strengthen the abdomen with a coat of UV glue (thin type the best) then cure it with a UV light.
- Cut-comb out fuzz and stack a small bunch of deer hair. Tie the butt ends of the hair to the top of the hook in front of the abdomen (tips facing forward). The hair should be about the same length as the hook. Trim off the tag ends (butts) and put a couple wraps down to secure it. Put a wrap or two in front of the hair to put it in an upright position.
- Reposition the hook in the vise with the eye pointing up. Using your thread wrap up the base of the hair to make a post then back down to the hook shank – use just enough thread to keep a little stiffness on the post.
- Select two more long black and white moose hairs and prep them like in step two. Tie them in at the base of the post (butt ends up against the hook shank) and wrap them up the post with the thread to secure them then back down to the hook shank. Now take the two moose hairs and wrap them down the post, keeping them close to each other and tie them off at the post base them trim the tag ends off. Use UV glue like in step five on post.
- Reposition the hook like from the start. Bring your thread to the rear of the thorax (behind the post) and tie in two long lengths of peacock herl. You can make a rope with the peacock herl by twisting it loosely onto the thread (clockwise) and then wrapping the herl rope to the eyelet (don’t crowd the eye) this reinforces the herl or just bring your thread forward to the eyelet and wrap the herl to the eye , ether way just make sure you criss cross under the post (figure eight) so you have no bald spots on the bottom or sides, tie off behind the eye and clip off the tag ends – whip finish and clip thread.
- Place your finger in the center of the deer hair post, press down until the deer hair flattens and flares outward. Fluff out the hair so you have equal amounts all around then place a small drop of UV glue or zap-a-gap in the center of the deer hair parachute hackle, use a UV light to cure it.
*** But remember to practice C.P.R. (CATCH – PICTURE – RELEASE).