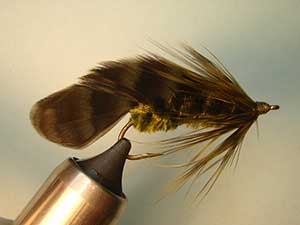
Olive Matuka
BRAD BEFUS Translated by CARL WUEBBEN
Developed in New Zealand, the Matuka has proven itself on American waters as a first-class streamer. Many believe that this fly’s big advantage over conventional streamers is its wing, which is bound all down the body and therefore doesn’t separate from the body when the fly is fished and won’t catch around the hooks bend. Although fishlike and normally tied in fishy colors, Matukas inhabit that gray area between attractors and imitators, leaning one way or the other as needed.
PATTERN
HOOK – Streamer- heavy wire, 3x to 6x long sizes #10 to #2
THREAD – Olive or black 8/0 (70 denier) - 6/0(140 denier) - 3/0(210 denier)
RIB – Fine copper, gold or silver wire or oval gold tinsel
BODY – Olive chenille (or dubbed olive rabbit fur)
WING & TAIL – Four to six dyed olive grizzly hen neck or back hackles or just big rooster saddle hackles
HACKLE – Dyed olive grizzly hen neck or back hackle
HOW TO TIE
- Debarb hook – mount in vise – start your thread in at the rear of the hook (just before the bend of the hook), tie in about three inches of fine wire for the ribbing by the tip just in front of the hooks bend and leave it hanging toward the rear of the hook, then tie in about three inches of chenille their also the same way. Now bring your thread forward about two to three eyelets from the eye.
- Thinly coat the thread wraps with head cement and wrap the chenille forward (clockwise) to where the thread stops. Tie the chenille off, half-hitch, and trim the excess chenille not the thread.
- Select four to six (depending on the quality of the feather and the size of the fly) matching hackle feathers (two or three from each side of the cape if you have). The feathers should be at least one and a half shank lengths long, and the better they match, the better the finished product will be.
- Now size and trim the feathers by holding the matched feathers up to the hook shank and define a length equal to one and a half shank lengths. Cut off the excess portion of the butts. Now, strip off about one-eighth of an inch off the barbs from the butts by pulling the fibers backwards. This is the part you will be tying in later.
- Hold the grouped feathers by the butts, and using the shank as a gauge, strip the bottom barbs off of the shaft of the feathers but only up to the bend of the hook. Leave the barbs on the portion of the feathers that will extend past the bend of the hook and on top of the fly.
- Tie down the butt ends of the feathers up front by the eyelet and on top of the hook shank (where your thread is now) keeping the stripped part of the feathers on the bottom and on the top of the hook shank. Now holding the tips of the feathers with your thumb and forefinger of your left hand, and with the thumb and forefinger of the right hand, groom the upper feather fibers (a moistened finger may help) so that they stand upright. Hold the feathers on top of the hook shank at the rear of the hook. Now with the fingers of the right hand, wind the ribbing material through the fibers of the feathers, spiral wrapping it forward. Use your bodkin to push the fibers forward and backward so you can get the ribbing between the fibers and onto the feather shank only at right angles (don’t bend any of the fibers). Keep going forward to the stripped butts and tie off the ribbing there and half-hitch.
- Find a hackle with fibers about half the hook shank long and strip off the fluffy stuff and tie in by the butt. The curve of the feather toward you (to make the fibers slant back), then wrap closely three to four wraps forward. Tie down the feather, trim the excess, and form a tapered head then whip finish and coat head with cement.
NOTE- If the hackle won’t slant back, pull them backward and put a few wraps of thread over the front portion of the hackle till they stay where you want them.
*** But remember to practice C.P.R. (CATCH – PICTURE – RELEASE).