Klod Hopper
PAUL STIMPSON Translated by CARL WUEBBEN
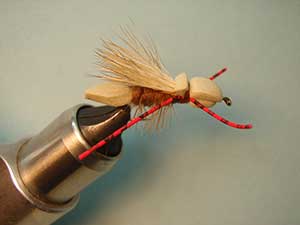
Its hopper season again and grasshoppers and crickets often fall or are blown into the water by summer winds and are taken with enough regularity that trout become eager for their imitations. On hot days, a hopper or cricket dressing fished on a meadow stream or near the shoreline of a big river can cause an instant detonation, even when just a few naturals are around. Hoppers and crickets have approximately the same body build. A dressing style that works for one can be tied in a different color to match the other. The KLOD HOPPER is tied in a tan color not your traditional yellow or olive. The red grizzly legs seem to be the key to this fly’s success. So try this one for yourself on selective fish, I’m sure you’ll be pleasantly surprised.
PATTERN
HOOK – Dry fly, 2x long, size #12 - #6
THREAD – Brown 6/0, Flat waxed nylon
BODY – Tan, closed-cell foam (1/8 inch – 3mm)
OVERBODY – Brown dubbing (I used super fine)
WING – Elk hair or fine white tail deer hair
HACKLE – Brown dry fly saddle
THORAX – Tan, closed –cell foam (1/8 inch -3mm)
LEGS – Red, grizzly legs
HOW TO TIE
- Debarb hook – mount in vise – start your thread in at the rear of the hook (just before the bend of the hook) – cut a piece of 1/8 inch (3mm) tan closed – cell foam into a strip about 2 inches long and as wide as the gape of the hook. Trim one end to a point. Lay down a thread base to the front. Tie in the strip of foam just behind the eye on top of the hook (this is the front of your thorax) and the pointed end coming off the bend of the hook and hanging just a little bit longer than a hook gape from the bend of the hook. Leave a ½ inch or more extending over the eye. Pull the foam forward and bring your thread behind the foam and wrap a few wraps rearward (about 5or6 eyelets from the eye) then bring the foam back down onto the top of the hook shank and secure the foam again (this is the back of your thorax). Now with evenly spaced spiral wraps, move the thread over the foam to the back of the hook (loosely). Now go forward to the spot you started the spiral wrapping again evenly spaced and not too tight. Even though we are going to cover this part of the fly with dubbing in a following step, do not wrap the foam down with any more turns of thread, we want the foam to retain as much of its shape to help the fly float. Now cross over the entire bottom of the fly to the rear of the hook shank where you started your thread. Put a little ZAP-A-GAP on the bottom thread wraps and let it seep some onto the foam, this will keep things from moving but let it dry before the next step.
- Prepare and measure a rooster hackle with the barbs length the same as the width of the gape of the hook. Tie in at the rear of the hook (where your thread is now). Dub the body by placing a small piece of dubbing (I used super fine) up against the thread ( you can use dubbing wax if you want) and twisting it between your thumb and index finger in a clockwise direction, then wrap it onto the body and add more and wrap as needed and end it behind the thorax.
- Palmer (spiral wrap) the hackle forward and tie off behind the thorax. Clip your tag end off (extra hackle stem).
- Clean a stack of elk hair with a hair brush about the thickness of a large wooden match stick then put them in a hair stacker (tips first) and tap the stacker bottom on the table 2 or 3 times to even up the tips and then remove them by the tips. Now tie them in on top of the hook shank by the butts right behind the thorax with the length just a little bit smaller than the rear body (don’t go past the rear pointed foam end). Make a thick thread wrap right behind the thorax to secure the wing and give it a spot to secure the legs. Clip off the tag ends of the elk hair (The butts).
- Secure one leg on each side by the rear of the thorax and make a couple wraps to hold them in place and spread your front leg forward and your rear leg backward. The rear legs should be longer.
- Pull the front foam back over the front part of the fly to form a bulky, hopper head then clip off the extra foam. Now whip finish it and trim the legs to size and you’re done.
*** But remember to practice C.P.R. (CATCH – PICTURE – RELEASE).