BLUE-WINGED OLIVE
DAVE HUGHES
Translated by CARL WUEBBEN
We tie this fly in memory of my very good friend and fishing buddy of mine BOB YANTA who loved to fish a Blue winged olive.
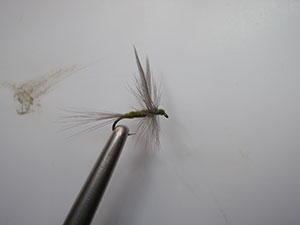
Traditional dry flies have hackle fiber tails, slender bodies, upright paired wings, and collars wound from the best rooster hackle. The shape is based on the form of the natural mayfly dun. The hackle represents legs and wings and it also floats the fly on fairly rough water. The tail, body, and hackle have the same footprint on the water and give the same light impressions as the natural. That’s often more important than an exact imitation of an insect, especially on riffles and runs where a trout doesn’t get a long look at a fly and must make a quick decision to take it or leave it for their neighbors to have. The Blue Winged Olive represents the widest array of hatches all across the continent. This is one of the traditional “Catskill” styles of dry flies.
PATTERN
HOOK – Standard dry fly sizes 12 – 20
THREAD – Olive 6/0 (140 denier) or 8/0 (70 denier).
WINGS – Blue dun hen hackle tips.
TAIL – Blue dun hackle fibers.
BODY – Olive fur or synthetic dubbing - can use Superfine.
HACKLE – Blue dun – rooster neck.NOTES
- May also use dubbing wax for dubbing material.
HOW TO TIE
- Debarb hook – mount in vise – start your thread in about one eyelet from the eye and wrap rearward to just about the halfway mark (make a thread base). Now chose two blue dun hen hackle tips and pair them up to the length of the hook and pull off the excess fibers from the lower half of the feather. Now using a soft loop and a few good turns going forward to tie the wings in one-fourth the shank behind the eye (tips rearward butts forward). With your fingers prop the feathers upward and use a few thread turns behind the wing to prop them up and use your bodkin to separate the feathers then a figure eight of thread between them to keep them separated. Clip off the excess wing stems (butts).
- Now using your thread wrap back to the bend of the hook making a close thread base. Even up the tips of five to ten long blue dun hackle fibers and peel or clip them from the stem then measure them the length of the hook and while using a soft loop, a few turns of thread going forward to tie the tails in at the bend of the hook and keeping the tail straight out from the hook shank while wrapping the butts down and going forward to about the midpoint of the shank, then clip off the excess tail fibers (butts).
- Bring your thread back to the tail area close to the bend of the hook (put dubbing wax on thread if you want to now) then grab some olive fur or synthetic dubbing and make a tapered dubbing noodle about 1 ½ to 2 inches long (thinner by the hook the fatter downward) – this is done by twisting the dubbing tightly between your thumb and forefinger (in one direction only). Now wrap the body noodle forward from the base of the tail to the wing – it should be slender and tapered but leave a gap between the end of the dubbing noodle and the wings about one turn will do – this will help you tie in the hackle.
- Select a blue dun rooster neck hackle feather with fibers the length of two hook gaps. The hackle should be just a little shorter than the wing tips when wound. Strip off the webby fibers from the base of the feather and tie it in by the butts with the concave side facing you and with the stem between the wings then take two turns of thread behind the wings then pinch the wings together and tug them upward and take five to six turns of thread in front of the wings. Clip off the excess stem.
- Grasp the tip of the hackle with your hackle pliers then take two or three turns (of the feather) behind the wings then three or four more in front of the wings (close wraps) leaving enough room for the head – tie off the hackle with three or four wraps of thread and clip off the excess feather tip. Gather all the hackle fibers back from the eye with your other hand and take a few wraps of thread up against the hackle to hold the hackle back and to form an even base for the head. Whip finish and clip the thread then apply some head cement to the head.
TIE UP A DOZEN OR TWO – AND GO FISHING*** But remember to practice C.P.R. (CATCH – PICTURE – RELEASE)