FLY OF THE MONTH CONTEST
FEBRUARY 2011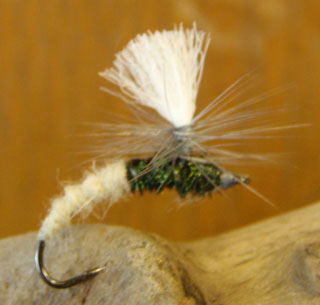
KLINKHAMER SPECIAL
HANS VAN KLINKENHans Van Klinken created the klinkhamer and considers it an imitation for both mayflies and caddis flies when tied in various sizes and colors. It’s an imitative fly with no tail like the real thing but the trout don’t seam to care its more of a searching pattern suggesting more than one insect. A proper drift is more important than a tail (which is often no movement at all); the right size and shape play a part also. The klinkhameris designed to rest on its hackle, with its abdomen submerged – the suggestion of an insect in an early stage of emergence wings up and legs free of the split top of a shuck that still contains most of its body. Try a dead-drift presentation with an occasional light twitch. Try tying in sizes 18 to 14.
From skip morris book fly tying made clear and simple #2 advanced techniques.
Hook – Light wire, Humped shank sizes 18 to 8. I used partridge hook size #14 klinkhamer # 15bn.
Thread – Gray or tan 8/0 or 6/0
Wing – White poly yarn (Or use whatever color you see most easily – red, yellow, orange.)
Hackle – Hans prefers light to dark blue dun and chestnut hackles but any color is ok. Try a grizzly.
Abdomen – Tan (Or any imitative color) synthetic dubbing.
Thorax – Peacock herl.HOW TO TIE
- Debarb the hook. Start thread about one eyelet from the eye of the hook and go back to about halfway down the hooks shank then wind halfway back up the first layer of thread.
- Take a two inch piece of poly yarn and divide it into three (can make three fly’s now) tie in on the top of the hook shank.
- Hold the poly yarn straight up with your right hand and with your left hand put two firm counterclockwise turns of thread around the base of the wing. Now it should remain upright and you should not have to hold the wing again controlling thread – tension makes this possible
- Wind the tread in close light-tension turns up the base of the yarn just far enough to accept five to eight turns of hackle ( still counterclockwise) with your bobbin pointing straight down and then just circle the tip of the bobbins tube around the wing.
- Now wind the thread down the base in moderately tight turns to the shank
- Strip out the fuzz on your hackle but don’t clip the stem. Tie it in with the tip going upward along side of the wing and with your thread going counterclockwise again bind the stem of the hackle against the wing base with firm thread tension then angle the hackle shaft to the rear of the hook and tie in on the shank of the hook – This reinforces the wing post.
- Wrap the thread to the rear of the shank and start dubbing your abdomen starting just a little bit into the bend of the hook. Dub forward till you get about two to three eyelets from wing post.
- Tie in four to six peacock herls for the thorax. Make a rope with the peacock and thread and wrap forward making sure you get around the wing post bottom and end it about one eyelet from the eye of the hook and tie off the herl.
- Clamp the tip of your hackle with your hackle pliers and couunterwrap it five turns but no more than ten. Bring the tip forward and tie off behind the eyelet.
- Build a small tapered thread-head. Whip-finish –clip thread - add a little head cement.
- After head cement is dry you can reset the wing and hackles back in place. Pull the wing upward and clip the yarn the distance equal to the distance from the tip of the hooks eye to the center of its bend. (Don’t need to be perfect). (I found if you measure – eyelet to just a little bit past the wing post worked for me).
If you tie this fly then fish it, please give me some feedback on how well it worked for you. Or for any other questions, please contact me.
CARL WUEBBEN >)))))))(‘>