Bead Butt Hare's Ear
Kelly Galloup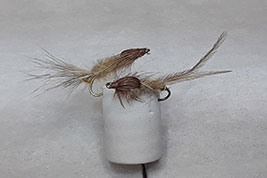
Translated by Carl Wuebben
This particular fly was developed in the 80’s. As opposed to traditional beadhead flies, these flies do not emerge with their heads downward as they come to the surface. Most face upward to the surface with their air bubble. This fly accomplishes this with the bead in the rear. The tail gives it the great movement most fish are looking for in an insect. You can also try this method on other flies as well. Also try one size bigger than actual fly.
PATTERNHOOK – #16 Tiemco 200R or Diachie 1250 (Deeper Gap) – (photo is a 200r #12)
THREAD – original was 12/0 Brown or Olive (I used 8/0 so it won’t break as easy)
BEAD – Gold to match hook
TAIL – Original muskrat but you can use Ostrich plumes, Marabou or a hare’s ear mask
BODY – Hare’s ear mask (Can use packaged dubbing and works better) Can also try light, dark, or olive hare’s ear packaged dubbing.
LEGS AND WING CASE – Pheasant Tail
RIBBING – Gold wire
OPTIONAL – Ox mono tippet or 15lb mono (if doing 1B way)HOW TO TIE
- A. Put bead on hook with the small hole first. Mount hook in vise and start thread in just before the bend of the hook. With the bead forward and by the bend of the hook, make a small dame of thread just a little bit into the bend of the hook. Check that the bead will not go past it, just snug onto it. Whip finish and clip thread. Put some zap-a-gap on the thread dam and slide your bead up against it. Restart your thread just in front of the bead. Continue to step 2.
-OR TRY THE NEW STYLE-
B. This method gives you more of a gap. Mount hook. Start thread in rear by the bend of the hook. Make a thread base about half way forward. With some 0x (15lb) tippet, thread through the bead and double it over so you have one mono strand through the bead and the other on the outside. Tie the bead and mono on with the bead hanging just a little bit off the bend of the hook (On top of hook)and the tippet should be facing forward toward the eye and secured with thread wraps keeping the mono on each side, stop about 1/2 shank. Clip off tag end of the tippet put a little zap-a-gap on the thread wraps. Wrap your thread back to the bead. Continue to step 2.- Grab a hunk of gold wire and tie in on the top with the longer end facing rearward to just about half way up the shank, this will be the ribbing. Bend the front tag end over and secure it with the thread. Then with the thread wraps secure the ribbing down to the rear by the bead. Make sure not to have it too close though.
- Grab your hare’s mask. Clip out a small clump of lighter color hair with the guard hairs and some under fur. Tie it in with the tips facing rearward, secure the tail well (tail is ½ shank length) and coming off the top of the bead. Clip tag ends off and bring your thread close to the tail. Make a dubbing loop by making a large loop downward and putting a dubbing tool in the loop. After that, use the thread to tie off the loop on the hook shank then bring your thread forward (Not the loop). Put the bobbin in the bobbin rest
- Pull some hare’s ear fur and guard hairs from the mask, a small 1”hunk will do. Spread it out in between the dubbing loop, and then twist your tool to make a small noodle. Wrap the abdomen (rear body) with the noodle and stop a little past half shank. Tie off and clip off noodle tag end. You should have a small taper (small to the front)
- Counter wrap your gold wire ribbing forward 4-5 turns over the abdomen. Tie off, helicopter or clip tag end off. Fluff up the abdomen with a dubbing brush.
- Grab your pheasant tail and clip off a small batch with longer fibers about 12 of them. Tie in a little bit behind the eyelet with the tips forward and the butts rearward and the shiny side facing down, about half shank length, not too long this will be your legs. Wrap your thread rearward up against the abdomen. Do not clip off rear butt ends as this will be your wing case.
- Clip off some more hare’s ear for the thorax. Make another dubbing loop, spin it, and wrap it forward to the eyelet and legs (pheasant tail tips)continue the taper forward, tie down, clip tag end of loop off.
- Split the pheasant tail legs (tips) in half. Tie them down to keep them rearward and to the side with a few thread wraps. Bring the rear pheasant tail fibers forward (on top). This will be your wing case. Tie off in front of the eyelet, clip the tag ends, whip finish, clip the thread and use a dubbing brush to fluff up abdomen and thorax. Apply head cement.
TIE UP A DOZEN OR TWO – AND GO FISHING*** But remember to practice C.P.R. (CATCH – PICTURE – RELEASE)
