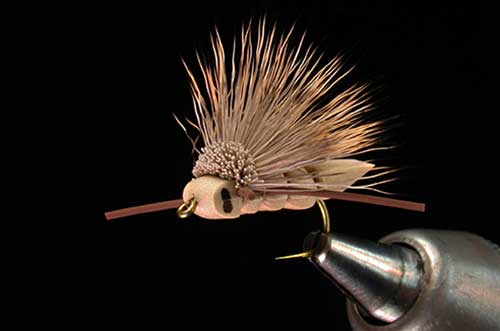
Charlie Boy Hopper
By Charlie Craven
Translated by Carl Wuebben
Charlie developed this pattern after a day with his clients as they went thru a lot of Dave’s hoppers and he figured there had to be a better option. While Dave’s fly works fine, it becomes waterlogged after a couple fish and is a pain to tie. The Charlie boy hopper (named after his son) meets all of the requirements in a hopper pattern: active rubber legs, incredible durability, realistic silhouette, good visibility, and great floatation. The best part is it is especially easy to tie. The standard tan color seems to be the most common color of the naturals, as well as in yellow, green, olive and even blue/green. The blue/green (with red rubber legs) matches the hoppers found in the mountain streams in Colorado. The Charlie boy hopper also works great as an indicator dry with a dropper. Its high visibility and superior floatation make it a natural for this application.
PATTERN
HOOK – Tiemco 100sp-bl #8 -#10 or TMC 5212 or TMC 5262 #4 - #8. He uses the 2XL TMC 5212 & 5262 for larger sized hoppers and has recently switched the smaller Charlie boy hoppers over to the standard length, wide gaped TMC 100sp-bl to improve the hook gap while still making a smaller sized hopper. The normal length of the size #8 100sp-bl is the same as the 5212 in a size #12, but with a much bigger hook gape. In smaller sizes the narrower gap of the 5212 is filled in by the foam body, where the 100sp-bl leaves plenty of bite.
THREAD – Tan 3/0 monocord (great for the binder strip)
BODY – 2mm X 2mm piece of foam body (tan or your choice of color)
LEGS – Brown medium round rubber legs
UNDERWING – (optional) mottled tan web wing
WING – Natural deer hair
OTHER THINGS NEEDED - ZAP-A-GAP and a double edge razor bladeHOW TO TIE
- Mount hook in vice, begin by cutting a strip of 2mm foam so it is as wide as the gap of the hook. I use a cutting board, metal straight edge and a razor blade to cut it, as scissors make it much harder to get a clean straight cut. The strip of foam should be at least three inches long.
- Remove the hook from the vise and poke the hook point through the foam about ¾ of an inch from the end of the strip. Make sure the hook point is centered in the foam. Now place the hook back in the vise and the smaller end of the foam rearward and centered in the middle of the hook point
- Start the 3/0 monocord thread at the eye of the hook and wrap to the bend then back to the hook eye.
- Cut another strip of foam from the sheet. This should be about 2mm X 2mm. Tie this thinner “binder” strip of foam to the hook shank immediately behind the hook eye. Spirals wrap back over the foam strip to the bend of the hook and then break off the excess. Run the thread up the hook shank over the binder strip and back again to the bend, compressing the foam to the shank. This binder strip is going to give us some shank diameter and texture to glue to later, so it need not be pretty. Leave the tying thread hanging at the bend of the hook.
- Lift the wide strip of foam up under the hook and pull it up to the peak of the hook bend so it touches the back of the binder strip. Note that the foam will tilt slightly upward. If yours doesn’t do this, your binder strip is not bound down far enough back. Pull the foam strip taut under the hook shank and measure where the hook eye lines up with the foam. Poke a hole through the foam from both the top and bottom where the eye lines up you can use a bodkin to do this. Push the foam over the hook eye so the eye protrudes through the front side of the foam.
- Put a thin coat of ZAP-A-GAP CA glue on the entire upper surface of the foam, including the hook shank/binder strip. Smear a bit more glue along the foam that extends out past the bend of the hook too. Keep in mind, with CA glue, too little is better than too much.
- Quickly, before the glue starts to dry, fold the front end of the foam back over the top of the shank, pinching it together all the way back off the bend of the hook. Try to get the edges of the foam to line up together along the sides of the shank. The top portion of the foam should mirror the original angle of the foam sticking up from the bend of the hook. That is, the foam should be slightly elevated at the rear of the hook, not coming straight out from the bend. Also note that the tying thread is still hanging at the bend of the hook.
- Make three tight wraps over the foam right at the bend of the hook. These turns of thread should compress the foam right down to the hook shank. Try to make these wraps as upright as possible and right on top of each other. Cross the thread lightly across the top of the foam body about one fourth of the way forward. Make another upright segment one fourth of the way forward on the hook shank with three more tight turns of thread. Continue forward by crossing on the top of the shank and make two more evenly spaced segments for a total of four bands of thread and three crosses.
- You should now have a fly with all the crosses on the top of the fly, and the bottom of the fly will only show a nicely segmented body. Make sure the foam part hanging off the bend of the hook is bent slightly upright …. Otherwise ya gotta start over!
- Use a double edge razor blade to make a straight cut through the extended foam (behind the bend)by keeping the blade level with the body , make one straight cut through the foam without sawing back and forth. The double edge blades are sharp and thin and will slice right through the foam with only light pressure. The cut should come straight off the top of the body.
- Now, we have the extended portion of the body to clean up a bit. The back end of the fly is now a bit wider than the rest of the fly… so we are going to cut a bit from each side of the fly forming a tapered end to the fly. Don’t try to cut the body to a point, but merely taper it a bit toward the back end. Now as we look at the fly from the top we see the last segment near the hook eye is also a bit wider than the rest of the fly. We are going to use the same razor blade to cut a sliver of foam from each side of the head squaring the head off a bit so it is the same width as the rest of the fly.
- Now, your thread should be hanging in the last segment behind the head of the fly now and we are ready for the legs. Take a single two-inch long strand of round rubber leg and tie it in place along the side of the fly in the last segment with a single turn of thread then cross the thread back along the top of the fly into the second segment back. Catch the rubber once again along the side of the hook in this segment with another single turn of thread. Make sure that the rubber leg is centered from top to bottom along the side of the foam body.
- For the legs on the far side, we are going to take another single two-inch strand of rubber and attach it in the reverse order of the first one. Lay the rubber along the far side of the shank and catch it with one turn of thread in the second segment. Cross the thread forward on top of the hook back into the first segment. Catch the front end of the far leg with another single turn of thread on the far side of the hook in the joint behind the head. You can see now why a single turn is all that is necessary for each point, as the wraps become cumulative as you go and any more would create unneeded bulk. Trim the back legs so they extend to the end of the foam body. The front legs are cut just slightly shorter than the back legs.
- WING TIME – if you’re going to put in a underwing this is the time to do it if not than lets continue cut, clean and stack a generous bunch of deer hair. Measure this clump of hair against the shank so it is equal to about a shank length long. Place the tips of the measured hair into your material hand and cut the butt ends as straight across as you can. You should now have a cut-to-length clump of hair in your material hand with the butt ends sticking out just a bit. Place the clump of hair flat on top of the hook with the butt ends just slightly in front of the thread at the head joint. Place two soft turns of thread over the hair in the head segment. Pull down on the thread slightly to compress and crimp the hair a bit. This will ensure the thread wraps lie right on top of each other.
- Place the index finger of your thread hand along the far side of the hook right up against the hair to keep it from rolling. With your finger in place, pull straight down on the thread with your material hand to flare the hair in place. make one smooth pull on the thread and the hair should flare up nicely.
- Make a three turn whip finish right through the butt ends of the hair. Cinch the thread down tightly after tying the knot and clip the thread close. No head cement is needed as the CA glue will leach onto the thread from the crease in the foam. Happy accident.
- Now, I know eyes on flies like this are just for the fisherman, but when they are this easy, how can you refuse? use a black sharpie marker to make an elongated oval on each side of the head, hoppers eyes are taller than they are wide so don’t just dot them In place.
TIE UP A DOZEN OR TWO – AND GO FISHING*** But remember to practice C.P.R. (CATCH – PICTURE – RELEASE)