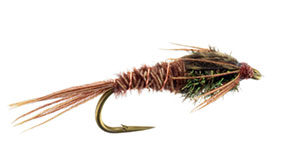
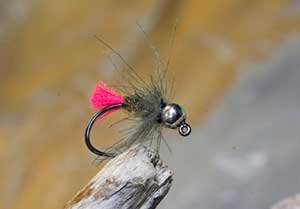
CDC Red Tag
Andy Larkin
fotm february 2020
Translated by Carl Wuebben

THE JIG IS UP - Not everyone participates in or supports competitive fly fishing. But no matter where you stand; Gear, Presentation techniques or Flies have all been influenced by competitions. Flies tied using slotted beads and up eye jig hooks offer a number of advantages. From a practical perspective jig nymphs ride hook point up, reducing the risk of snagging and fouling a good characteristic for any nymph tumbling through infested reaches of a river bottom where trout prefer to reside. Another benefit of a jig nymph is that the majority of your fish will be solidly hooked in the upper lip. Fish hooked in the upper lip have a hard time throwing the fly they also provide a subtle jigging action helping suggest life and convincing the fussiest of fish that they are worth at least a sample nibble. The vast majority of jig nymphs are simple flies tied in the round. Flies tied in the round offer fish the same view of the fly no matter its orientation in the current as there are no wing cases or other features to suggest whether a fly is upright in the water or not.

PATTERN
HOOK – HANAK competition H450BL, #12 -#16 or DAIICHI 4640 or 4670 up eye jig hook #12 - #16
BEAD – Slotted tungsten silver or metallic pink tungsten
THREAD – Black 8/0 (70 denier) can use 6/0 (140 denier)
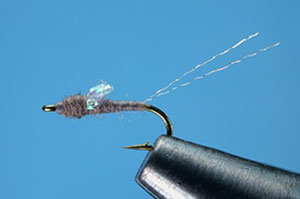
TAIL – Daytum Globrite Floss #4 (fire orange)
RIB – Red wire
BODY- Arizona synthetic peacock, Bronze peacock spectra dub #45 or peacock dyed red COLLAR – Natural CDC

HOW TO TIE
  1. Slide a slotted tungsten bead (small round opening first) onto the hook. Place in the vice and slide the bead forward up against the hook eye. Twist the bead as necessary so the slotted portion of the bead navigates around the angled shank so the bead pushes tight against the hook eye. Tie thread on behind the bead. Build a thread ramp behind the bead to lock it into place then cover the rest of the hook shank with thread. You should finish with your thread just behind the bead.
  2. Cut an 8 to 10 inch length of Globrite floss from the spool. Align the ends together. Double the floss over itself a number of times so it forms a small bow tie. Now tie the floss bow in just a little bit from the bead and there are equal amounts of floss on each side of the tie in point.
  3. Fold the forward floss rearward over the back half to form the tail. Secure the folded floss back down the shank to the bend of the hook with the thread. This will ensure a smooth and even underbody. Trim the floss even with the hook bend to form a short stubby tail. Your thread should now be behind the bead.
  4. Tie in the wire rib just behind the bead and secure it back along the near side of the shank to the base of the tail (wire should be hanging out over the tail).
  5. Form a neat slender tapered body from the base of the tail to the rear of the bead. Twist some Arizona synthetic peacock dubbing onto the thread by twisting it between your thumb and index finger real tight to form a noodle then wrap it forward and end it up against the bead (don’t forget your tapered body shape). Now tie it off. Spiral wrap the wire rib forward over the body using even open turns. Tie it off behind the bead then using a pulling and twisting motion (helicoptering) to break away the wire tag end.
  6. Using a magic tool or a bull clip fold a single CDC plume into it. Now you can use a dubbing loop or split the thread to make the collar.
    Dubbing loop – Pull about 3-4 inches of thread out and insert you’re dubbing tool then bring the thread back up to the body and wrap onto the fly behind the bead then insert the CDC fibers and twist the tool to make the collar rope.
    Split the thread – Flatten the tying thread by twisting the thread counterclockwise when looking from above. Using a dubbing or sewing needle carefully split the tying thread. Insert your finger into the split thread loop to keep it open then place the folded CDC plume into the split thread loop then remove your finger to trap the CDC in the loop. Twist the thread tight by spinning the bobbin clockwise which locks the CDC in place.
  7. Wind the dubbed CDC directly behind the bead. Stroke the CDC fibers back after each wrap. The finished CDC hackle should be sparse and flow back over the body. Pinch off or trim any errant CDC fibers. Apply head cement or brushable superglue to roughly 1/2” of tying thread and wind the coated thread directly behind the bead. Whip finish to complete the fly then clip your thread off.

TIE UP A DOZEN OR TWO – AND GO FISHING*** But remember to practice C.P.R. (CATCH – PICTURE – RELEASE)

Steelhead Slammer
By Tyler Straight
fotm jan 2020
Translated by Carl Wuebben

The steelhead slammer is a simple fly pattern for high water steelhead.

PATTERN

HOOK – MFC #7045 – MUSTAD c49s – TMC 2488 – DAIICHI 1120 size 10
THREAD – Red 6/0
TAIL – Vernille or micro chenille
BODY – Estaz regular
COLORS – (tail/Estaz) chartreuse/orange, pink/chartreuse, brown/chartreuse.

HOW TO TIE
  1. Place your scud hook in the vise so the hook eye is pointing down slightly. Attach your thread in behind the eye and clip the tag end off, then make a thread base by wrapping rearward to just a little into the bend of the hook and above the hook barb with close wraps.
  2. Tie in a piece of Vernille or micro chenille with a one inch tag extending forward using a pinch wrap.
  3. Secure the chenille tag by making tight spiral wraps forward up to the hook eye but leave about an eyelet space so you don’t crowd the head. Make a couple wraps to secure the chenille then trim off any excess chenille.
  4. Tie in a length of Estaz in at about where you started your thread. Then bring your thread forward to about one eyelet space from the eye.
  5. Make 2 -3 wraps forward of Estaz. Make a small thread head, clip the tag end of Estaz, whip finish, and cut the thread. Trim the chenille tail so it is about 2 inch. Long
  6. This is an optional step. You can take a lighter and melt the end of the chenille to a point. This doesn’t affect the fish catching ability of the fly, just makes it look nicer to the fisherman.


TIE UP A DOZEN OR TWO – AND GO FISHING*** But remember to practice C.P.R. (CATCH – PICTURE – RELEASE)

Balanced Chironomid
By Snake River Fly (You Tube)

fotm may 2019  

Translated by Carl Wuebben

This fly is pure evil when it comes to the indicator game. This fly is responsible for many big fish to the net. It’s also a simple pattern if this is your first time tying balanced flies.

PATTERN

HOOK – 90 degree size #8 also can use 60 degree hook
PIN – silver or gold sequin pin (can use a dress maker’s pin but will have to cut it to fit)
BEAD – 1/8” silver – can use tungsten if it balances right
DUBBING – Snake River scud dubbing in silver or your brand choice
THREAD – Montana fly co. midge body thread or equivalent and 6/0 (140 denier) red Flymaster plus or equivalent
RIB – Brassie ultra-wire in silver
SHUCK  Darlon in pearl or white

HOW TO TIE

  1. Debarb the hook – mount in vise then start the thread in behind the eye and clip the tag end off, then make a thread base by wrapping to mid shank with close wraps. Put a bead on the pin (large hole first) then tie onto the hook shank with the bead and pin hanging about two more bead lengths past the bend of the hook by the eye. You can adjust as needed. Secure the pin down by wrapping over the pin and hook shank and add some zap-a-gap on the thread wraps to hold it in place better, then wrap the thread rearward and stop just before the bend of the hook.
  2. Tie in a small piece of pearl Darlon in the rear for the shuck (hanging off the bend of the hook) clip the tag end off right tight up against the butt of the pin on the shank; wrap it down to even out the body on the shank. If the shuck is too long you can clip it to size.
  3. Tie in the brassie wire at the rear of the hook for the ribbing, don’t wrap it yet we will do it later. Clip off the tag end and return your thread to the rear of the hook (don’t cut off) lay it to the side.
  4. Put the midge body thread in a bobbin and tie it in at the rear of the hook and wrap forward with overlapping wraps (touch wraps) to the front of the fly tight up against the bead. Now with your regular thread that is at the rear of the hook wrap forward with spiral wraps and when you get to the bead and midge body thread tie off the midge thread and clip the midge body thread off.
  5. Spiral wrap the wire ribbing forward and tie off behind the bead. Clip off tag end of wire.
  6. Grab a small clump of scud dubbing and make a dubbing noodle on the thread by twisting the dubbing onto the thread with your fingers then do a couple of turns of the noodle behind the bead (you may have to add more dubbing) but keep it sparse. Whip finish and clip the thread. Brush the dubbing a little bit with a dubbing brush or a toothbrush.

TIE UP A DOZEN OR TWO – AND GO FISHING*** But remember to practice C.P.R. (CATCH – PICTURE – RELEASE)

Drowned Trico
From the book LaFontaines Legacy
By Al and Gretchen Beaty
fotm may 2019  

Translated by Carl Wuebben

Some of the toughest fishing could be when the female tricos were laying their eggs. At that time the fish tend to hold under the surface, feeding on the drowned adults rather than exposing them by eating the spinners on the surface. Gary believed he got better results using a submerged fly rather than a dry one during a heavy trico spinner fall.

PATTERN

HOOK – 1x long dry fly size 18 to 22
THREAD – white and black 6/0
TAILS – two blue dun hackle fibers, split
ABDOMEN – white thread 6/0
THORAX – black thread 6/0 and black touch dubbing
WING – clear antron fibers, sparse, slightly longer than the thorax

HOW TO TIE

  1. Debarb the hook - mount in vise and attach the white thread in the center of the shank, now using the tag end of the thread and keeping it up on top of the shank wrap rearward toward the hook bend making a thread base and ending just before the bend of the hook. But don’t cut the tag end yet.
  2. Select two blue dun hackle fibers, and tie them to the back of the hook to form a tail (about one hook shank length long). Secure them with a couple thread wraps. Pull the thread tag end between the two fibers to separate them. After achieving the desired separation, anchor the thread to the hook while advancing it back to the center of the hook while keeping close thread wraps again. Trim off the waste part of the tail and the extra thread. Whip-finish and clip the thread off.
  3. Attach black thread next to the white in the center of the hook and trim off the tag end. Coat the thread with super tacky dubbing wax then apply black touch dubbing to the thread by “patting” the clump to the tacky strand. Do not twist the dubbing: instead wrap the thread around the front of the hook to form the thorax (leave some space for the wing). Leave the thread hanging near the front of the hook.
  4. Select a sparse clump of clear antron fibers, and tie them to the hook to form a wing (behind the hook eye) use about eight fibers on a fly smaller than a size 20. Clip the tag end of the fibers and form a small Head.
  5. With a pair of scissors trim the wing short (slightly longer than the thorax). Whip-finish – clip the thread and put some head cement on to complete the fly.

TIE UP A DOZEN OR TWO – AND GO FISHING*** But remember to practice C.P.R. (CATCH – PICTURE – RELEASE)

Pheasant Tail Nymph
Frank Sawyer

fotm may 2019  

Translated by Carl Wuebben

Fibers such as peacock, pheasant tail, and even ostrich or marabou attract a good amount of trout when they’re wound as herl. Is it the minute points of light that each tiny barbule reflects or the way they quiver in the water more than likely both. The pheasant tail nymph is a key fly everyone should have in their fly box. The pheasant tail represents nymphs of the prolific little olive (baetis) mayfly group, so abundant in spring creeks and tail waters. You can also tie it with a bead head.

PATTERN

HOOK – Standard nymph, sizes #14 - #16 - #18 - #20 -#22.
THREAD – Brown 6/0 or 8/0.
TAILS – Ring neck pheasant tail fibers.
ABDOMEN – Butts of ring neck pheasant tail fibers.
RIB – Fine copper wire (size to hook size-small. or ex-small).
SHELLBACK – Ring neck pheasant tail fibers.
LEGS – Tips of shellback fibers.
THORAX – Peacock herl.

HOW TO TIE

  1. Debarb the hook- put bead on if used (small hole first and push it to the eye)- mount in vise – start your thread behind the eye (or bead head) and lay a thread base all the way to just before the bend of the hook. Now select three or four long tail fibers from the tail of a ring necked pheasant and Measure them up against the hook shank they should be the length of the hook shank, and tie them in at the rear of the shank where your thread is now and the tips to the rear, about a gape long (This is your tail), secure the butts down on the shank and stop at halfway to two-thirds of the shank. Pull the butts back over what you just tied in and wrap back over them again till you get to the base of the tail again do not cut the butts off we will wrap this like herl later to make the body (Abdomen).

  2. Clip 2 or 3 inches of fine copper wire for the rib. Tie in at the base of the tail with tight wraps and the longer part hanging toward the rear of the hook. Now bring your thread forward to where you ended the pheasant tail then take the pheasant tail butts you should have at the rear of the hook and wrap them forward half way to two thirds up the shank of the hook, then tie off and clip off the tag end (extra fibers) – If you end up not having enough fibers just tie off what you have then tie in another couple fibers and keep going.

  3. Advance your thread to about two or three eyelets space from the eye, select six or so fibers from the same pheasant tail feather that you used for the tail and body (This will be your shellback or wing case and legs) then even up the tips of the fibers by pulling the fibers straight out before cutting them from the feather stem and measure the tips about the length of the hook shank and tie in where your thread is now and the tips hanging over the eye of the hook (about 3 or 4 eyelets long) and on the top of the shank (These will be reversed later for your legs of the fly). Wrap the thread rearward over the butts of the fibers and end tight to the front of the abdomen don’t clip butts yet this will be used later (This will become the shell back or wing case later).

  4. Tie in two or three peacock herl fibers by the tips and at the base of the shell back (front of abdomen). Make a herl rope if you want- by lightly twisting the herl around the thread in a clockwise direction then wrap the peacock herl rope forward and stop one eyelet space from the eye and tie off and clip off the tag end of the herl (You will need this slight gap between the eye and the end of the thorax to tie off the shell back and form a head). Counter wind the copper wire at the rear of the fly forward thru the pheasant tail abdomen and the peacock herl thorax and end it and tie off just behind the eyelet, the wire can be clipped off with some dull scissors or just put a little pressure with your finger on one hand at the point you want it to break off and with the other hand just bend the wire back and forth with a little pressure and it will give. This is called helicoptering it off.

  5. Draw the shell back fibers over the peacock herl thorax, and tie them off tightly in the gap between the thorax and the hook eye then clip off the tag end of the pheasant tail fibers (Make sure you leave enough room for the head of the fly).

  6. Separate three leg fibers (hanging over the eyelet) to each side. If you don’t have that precise number, don’t worry – trout can’t count. Pull the fibers back along the side of the fly. Take one turn of thread over them to lock them in place -Pull the fibers back and down along the side of the fly - make any adjustments needed to get the legs in place then take another turn of thread to lock them in place. They should slant back and slightly down. Form a neat head behind the eyelet, whip finish and cement the head.

TIE UP A DOZEN OR TWO – AND GO FISHING*** But remember to practice C.P.R. (CATCH – PICTURE – RELEASE)

Bobesh Hare's Ear
Dave HUghes

fotm may 2019  

Translated by Carl Wuebben

The bobesh Czech nymph style started out as an imitation of a green rock worm caddis larva, and has been varied endlessly, the only difference being the color fur used for the body. Quite often it is mixed, with a “HOT SPOT” of fluorescent or UV dubbing in the center or at the head.

PATTERN

HOOK - heavy-wire curved scud sizes 6, 8, 10, 12
WEIGHT - 15 to 25 turns non-lead wire. Sized to hook shank
THREAD - brown 3/0 (210 denier) or 6/0 (140 denier)
SHELLBACK - clear thin skin (or ziploc bag)
RIB - copper wire
BODY - hare’s mask fur and sparkle yarn mix

HOW TO TIE

  1. Debarb hook- mount in vise. Layer most of the hook shank with non-lead wire approximately the diameter of the hook shank. Start your thread in behind the hook eye and layer it all the way into the hook bend just a little bit while building up a small damn of thread in front of and behind the non-lead wire
  2. Clip a long strip of thin skin or other shellback material about one-half the hook gap wide. Clip the corners at one end to facilitate tying it in. Tie it in well down the bend of the hook, tie in two or three inches of ribbing wire at the hook bend area. Put them rearward to us later.
  3. Dub a long but thin amount of the fur and sparkle mix onto your thread by using the finger twisting method or a dubbing loop with a tool. Just make sure it’s tight. 
  4. Wrap the dubbing forward to just behind the hook eye, leaving room for the thread head. The body should be tapered a little. (Thin in the rear) and tight. A tight body will help the fly sink. A loose and fibrous body might make the fly look more alive. But it also might prevent it from getting to the bottom as quickly.
  5. Draw the shellback forward over the body and tie off behind the eyelet. Clip off the tag end of the shellback. Wind the ribbing wire forward over the body and the shellback, segmenting the fly, and securing the shellback material in place. Tie off the ribbing and either clip or helicopter off the excess. Form a thread head which will not always be neat (the fish won’t inspect that part). Whip finish, clip thread tag end, put a very small dab of head cement on to help keep it together. As a final step, pick out a little of the fur from the underside of the nymph, but keep the amount minimal to avoid hindering the sinking.
  6. Try adding some red fur or synthetic dubbing to create a hot spot about ¼ inch back of the eye. Or you can even use a beadhead with the non-lead wire for extra heavyweight.

TIE UP A DOZEN OR TWO – AND GO FISHING*** But remember to practice C.P.R. (CATCH – PICTURE – RELEASE)