Hook-Up Crayfish
GREG HEFFNER Translated by CARL WUEBBEN
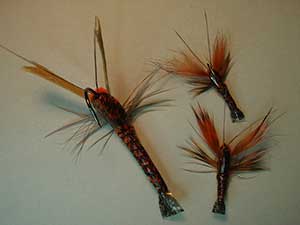
Numerous studies have shown that in many waters, crayfish are the number one prey of smallmouth bass, and in some waters they are a predominant prey of trout. Not only are there many species (more than 300 In North America), but they all live and grow for several years. That means there are probably crayfish of various sizes almost anywhere we fish. Like all animals with exoskeletons, crayfish must periodically molt their shell and wait until new ones form. That “soft - shell “stage of development inevitably raises the question: Do fish like soft – shell crayfish more than one with a hard shell? If given a choice, they will eat soft – shell crayfish before their hard – shell cousins but during the molt, crayfish retreat into hiding places until their new shells harden. This makes it harder for fish to get at them. So even though the fish may prefer the soft-shells, the hard-shell crayfish, which are out and about on the river or lake bed, are easier to catch and eat. The HOOK-UP CRAYFISH is a hard-shell imitation and it is very effective. Make the claws fairly thin and equal to no more than half the length of the body. The larger fly in the photo was made on a 2/0 hook and I used tan craft fur and UV glue to make the claws and a saddle hackle for the legs plus I used orange chenille for the body all the rest is the same.
PATTERN
HOOK – Tiemco. TMC 200R, Dai-Riki 270, or a similar 3x – long curved shank hook, size #6 or #4
THREAD – Brown 3/0 monocord
ANTENNAE – Two pheasant tail fibers
WEIGHT– .035 – inch lead free wire
CARAPACE – Natural oak mottled thin skin
THORAX – Dubbing, color to match the local crayfish
CLAWS – Brown rabbit fur
LEGS – Grizzly hackle dyed brown
ABDOMEN – Same dubbing as the thorax
RIB – Brown monocord thread or brown medium ultra-wire. (Wire best)
HOW TO TIE
- Debarb hook – mount in the vise – Start the thread about two eye-widths from the eye of the hook. Secure a piece of .035- inch lead free wire to each side of the hook shank one at a time ( The length of the shank from where you started your thread to just before the bend of the hook.) By using light tension to get it in place then putting more tension on as it is held in the place you want it (On the hook shank side.) Put some cement on them and let it dry. Tie on two pheasant tail fibers for the antennae at the rear of the shank – the length of the hook shank.
- Turn the hook upside down in the vise. Tie on a long strip of thin skin: the width of about half the width of the hook gap. At the point you have your thread now (Back of hook shank.)
- Spin a pinch of dubbing on the thread by twisting it on in a clockwise direction on the thread between your index finger and your thumb but just a little you can add more if needed (Just a one inch noodle is fine) then wrap the noodle of dubbing onto the shank on the rear and covering where you tied on the thin skin.
- Tie in two small bunches of brown rabbit fur for the claws (clip from a hide or strip) on each side of the hook right up against the dubbing ball, make them fairly thin and equal to no more than half the length of the body. Too dense and it can actually deter a fish from eating it (It looks like a crayfish in a defensive position.)
- Spin more dubbing on the thread and begin wrapping the thorax. Just a little bit bigger than the first ball of dubbing. Now tie on a grizzly hackle dyed brown by the butt section (Don’t wrap yet) and spin more dubbing on the thread and wrap about one-third of the body (About halfway up the hook shank.) Spiral wrap the hackle over the thorax two or three times, and tie off and clip the tag end off (Excess hackle.)
- Trim the hackle on the top and bottom of the fly; the hackle fiber legs extend from the sides of the pattern. Next, pull the thin skin over the thorax with just a little stretch and tie it down but do not cut the excess off. We still need the rest of it.
- Pull the thin skin backward and put a few wraps over it to give it more of a separation, and then tie on a 6-inch length of brown monocord thread or medium brown ultra-wire for the rib.
- Spin more dubbing on the thread and wrap the abdomen up to the hook eye (Small noodles.) pull the thin skin over the abdomen with light stretching and tie it down near the eye. Next spiral-wrap the rib of the fly (Clockwise direction) tie off the ribbing material.
- Cut the surplus piece of rib material. Lift the thin skin and bring your thread in front of it and behind the eye of the hook then whip-finish the thread behind the hook eye. Trim the thin skin, leaving an appropriately sized tail (About one and a half eyelets space from the eyelet.) Clip your thread off and apply some head cement to the thread wraps.
But remember to practice C.P.R. (CATCH – PICTURE – RELEASE).